Creepy Pumpkin Drawing Tutorial for Beginners
Skill Level:
Perfect for absolute beginners or anyone new to drawing simple horror characters.
Medium:
Graphite pencil on paper.
Before we begin, I need you to lower your expectations; Not of the tutorial, but of the pumpkin. If your pumpkin ends up lumpy, crooked, and looking like it just woke up from a 200-year nap, you are not bad at drawing. You have simply created a very accurate pumpkin. These things grow by rolling downhill and absorbing chaos.
Uneven eyes? Normal.
A smile that looks slightly unhinged? Ideal.
A pumpkin that appears to be silently judging you? That is just good horror design.
In this step-by-step tutorial, you’ll learn how to draw a creepy pumpkin using simple shapes, gentle shading, and beginner-friendly techniques. No fancy tools, no complicated methods, and absolutely no requirement for your drawing to look like it belongs on a greeting card.
This guide is designed to help you relax, build confidence, and learn the foundations of horror character drawing without overthinking every line or threatening your pencil with violence.
Materials You’ll Need:
- Pencil (HB or 2B) – for sketching and light shading
- Eraser – any standard eraser will do
- Paper (no special paper required – normal sketch paper is absolutely fine).
Optional (Shading Tools):
- 4B pencil – for darker shading and added depth
- 6B pencil – for the deepest shadows (eyes and mouth)
- Blending stump – for smooth blending
- Cotton buds or tissue – great alternatives to a blending stump
Optional (Shading):
- Shading is completely optional in this tutorial.
- If you’d rather stop after the outline stage, that’s perfectly fine.
- A clean line drawing still looks great on its own, especially for beginners.
You don’t need professional tools for this tutorial.
Simple supplies are more than enough to get started.
Not sure which pencils or tools are best for this? I’ve broken it all down in my Horror Drawing Tools Guide for Beginners.
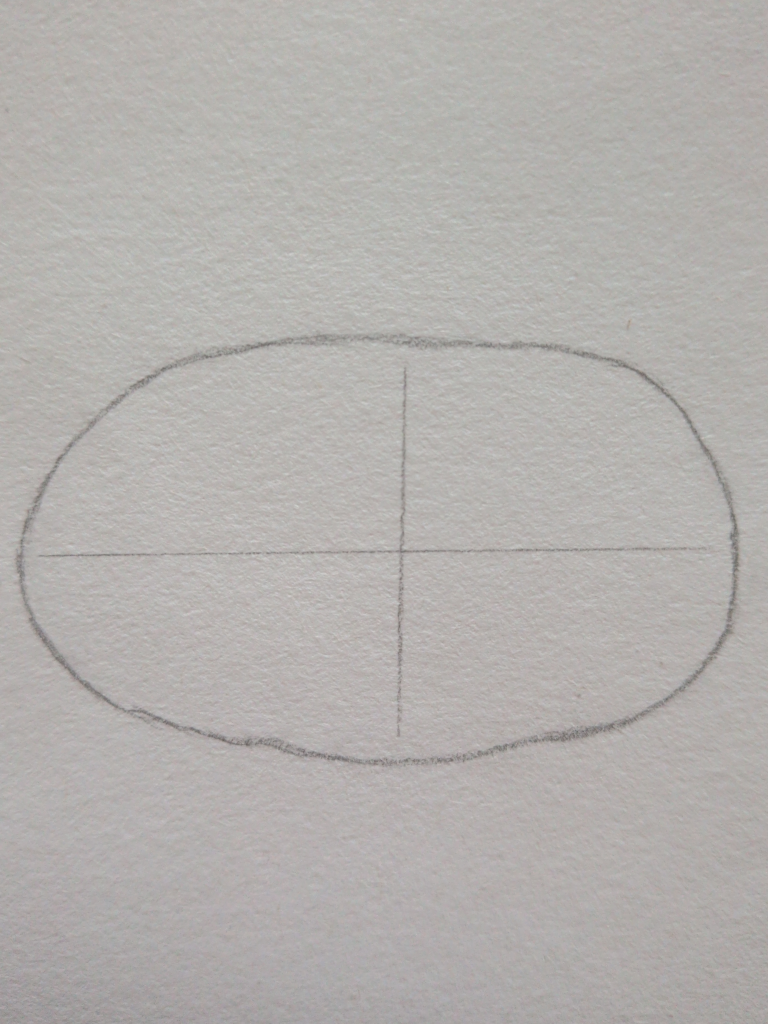
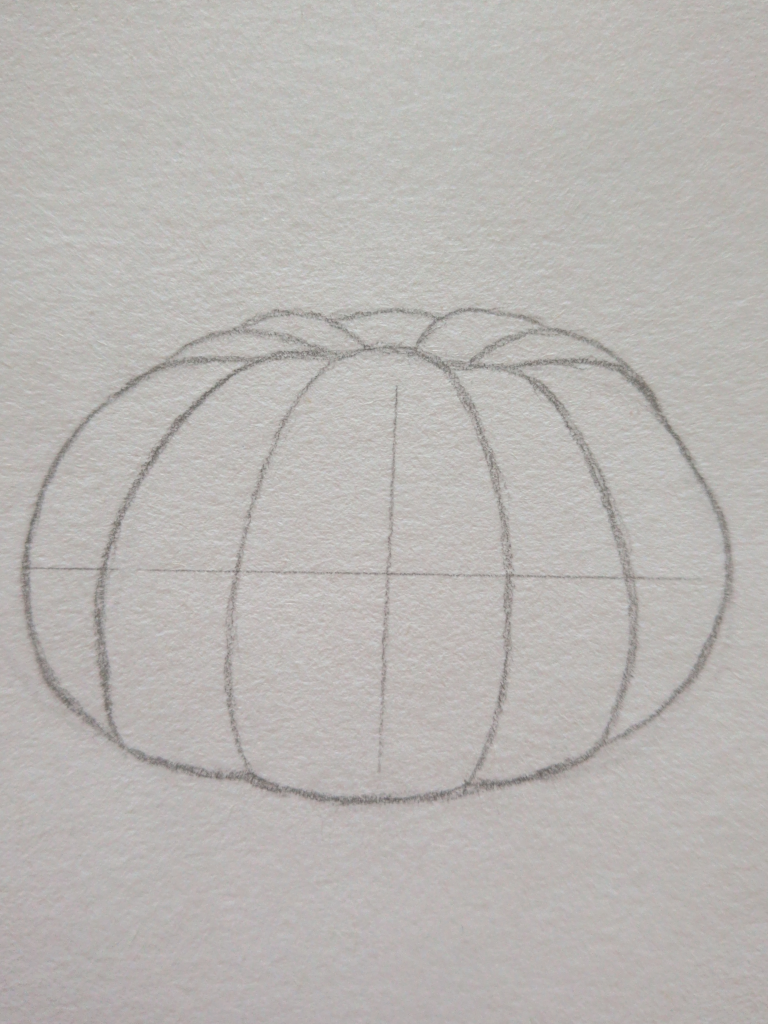
Step 1: Draw a Soft, Squashed Oval
Using an HB or 2B pencil, draw a large, slightly squashed oval in the centre of your page.
- Do not aim for a perfect shape
- Keep your line loose and gentle
- A little wobble is completely fine
This oval is just a starting guide for the pumpkin’s body. It does not need to be smooth or symmetrical. Pumpkins are naturally uneven, and this helps your drawing feel more organic later on.
If your shape looks a bit lumpy or off-centre, leave it exactly as it is. Do not erase or correct it yet. We will refine the shape in later steps.
For now, focus only on getting this soft base shape down on the page.

Step 2: Add Light Guidelines
Using the same light pencil, add a few very faint guidelines to your pumpkin shape.
1. Draw a light vertical line down the centre of the oval.
This helps keep the pumpkin balanced and shows where the middle sits.
2. If it helps, you can also add a light horizontal line across the centre of the shape.
This is optional, but it can make later steps easier.
Keep these lines extremely soft. They are only guides and will be erased or hidden later.
Do not press hard and do not worry if the lines are not perfectly straight. These guidelines are here to help you, not judge you.
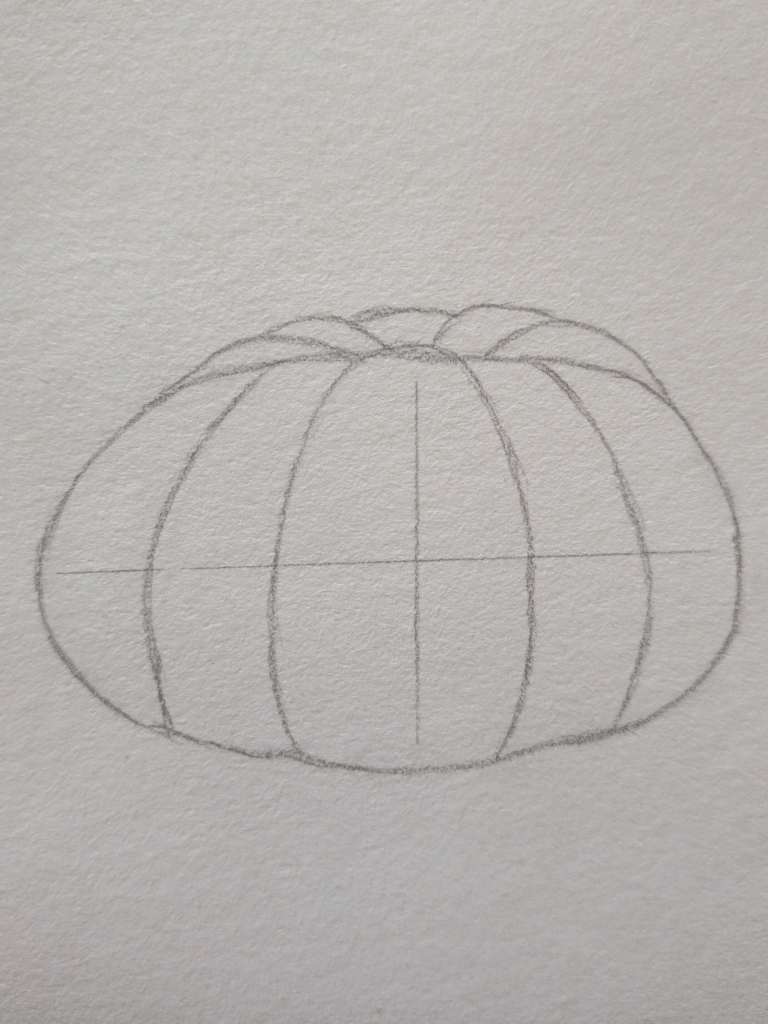
Step 3: Add the Pumpkin Segments
Using a light pencil, begin adding curved lines to divide the pumpkin into simple segments.
1. Start near the top centre of the pumpkin and draw a gentle curved line down toward the bottom edge.
Let the line follow the round shape of the pumpkin rather than going straight down.
2. Add a few more curved lines on each side of the centre line.
Space them out evenly, but do not worry if they are not identical.
3. Keep all lines light and soft.
These are still construction lines and will be refined later.
Don’t press hard and don’t try to make the segments perfectly symmetrical. Pumpkins are naturally uneven, and slight differences between the segments help the shape feel more organic.
At this stage, your pumpkin should look rounded and slightly three-dimensional, even without shading.
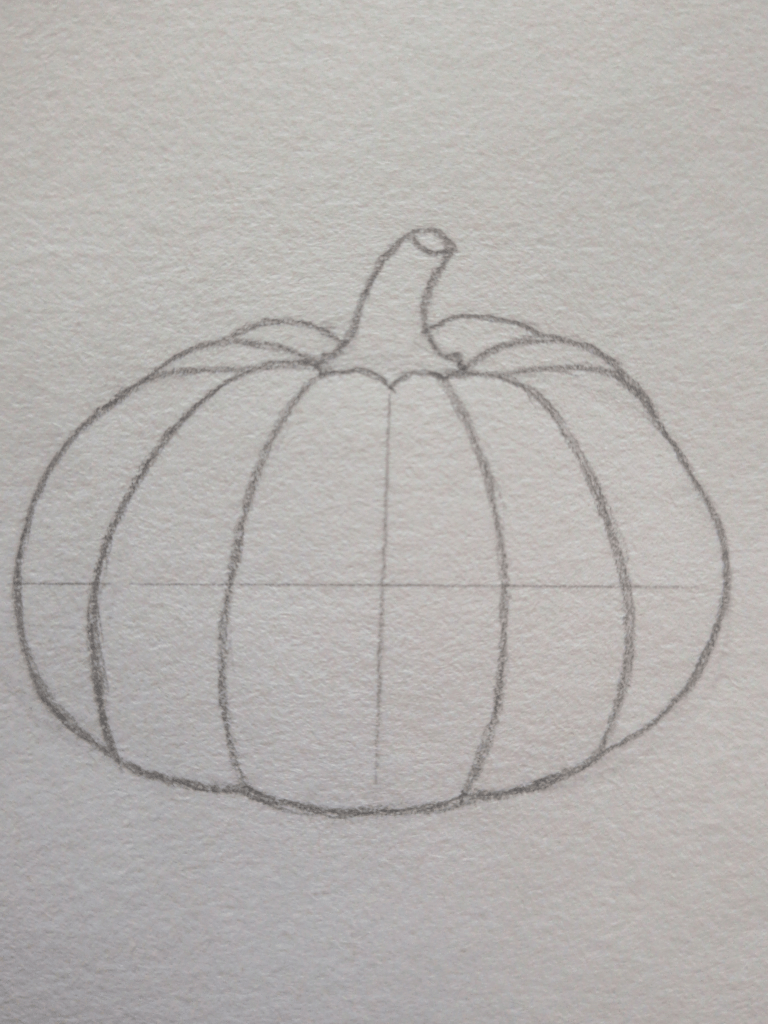
Step 4: Tidy and Refine the Pumpkin
At this stage, we are not adding new features. We are simply refining the shape of the pumpkin.
Using a light pencil:
1. Gently go over the outer edges of the pumpkin, smoothing any very uneven areas.
Do not aim for perfection. Small bumps are fine.
2. Lightly refine the side and top segments, helping them flow more smoothly into each other.
Follow the natural curve of the pumpkin rather than straightening the lines.
3. Keep all lines soft and relaxed.
This is still a construction stage, not the final outline.
Do not add the stem yet. We will shape the top centre and add the stem in the next step.
Your pumpkin should now feel more solid and rounded, while still looking sketchy and editable.
Step 5: Add the Stem Outline
Now it’s time to give your pumpkin a stem.
Using a light pencil, draw a simple stem shape at the top centre of the pumpkin.
1. Start by sketching a short stem that rises gently upward from the top middle.
It can lean slightly to one side if you like.
2. Keep the stem simple and rounded.
Avoid sharp edges or heavy details at this stage.
3. Do not add shading yet.
For now, we are only focusing on the outline and placement.
Your stem doesn’t need to be perfect or straight. A slightly crooked stem adds character and keeps the pumpkin looking natural.
At this point, your pumpkin should have a clear shape, defined segments, and a simple stem, while still looking light and sketchy.
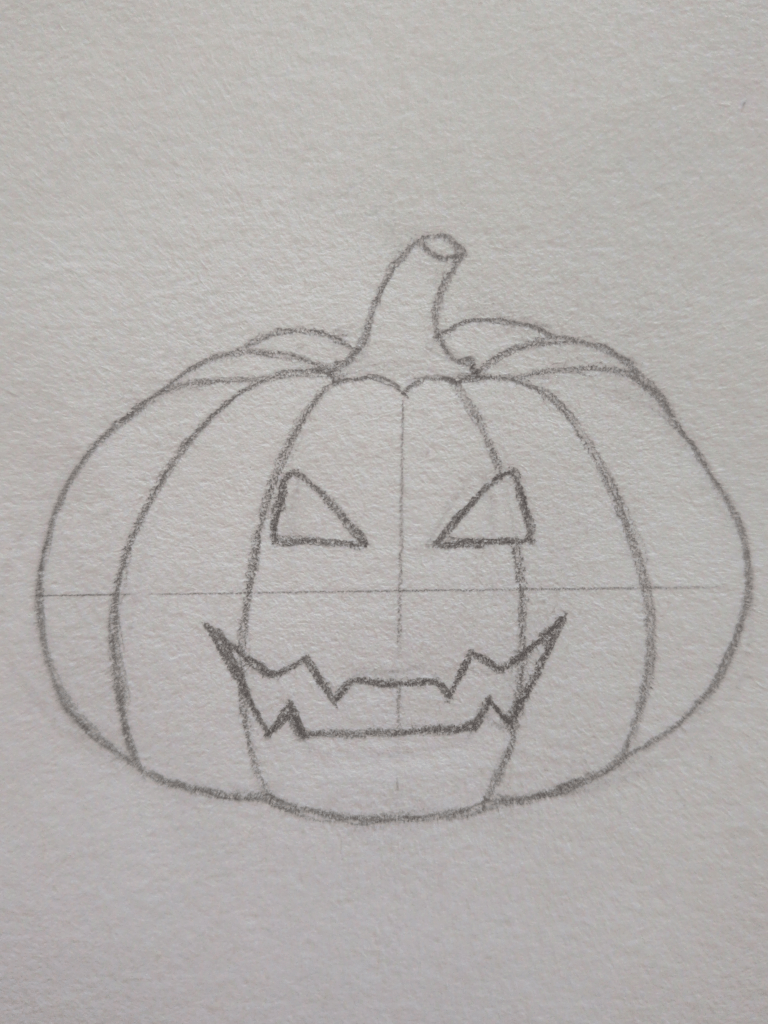
Step 6: Add the Eye and Mouth Outlines
Now it’s time to give your pumpkin a face.
Using a light pencil, sketch in the basic outlines for the eyes and mouth.
Eyes
- Draw two simple triangular eye shapes
- Place them just above the horizontal guideline
- Keep them slightly angled for a spooky expression
- Avoid adding details or shading
Mouth
- Draw a jagged, zigzag mouth shape below the guideline
- Let the mouth curve gently with the shape of the pumpkin
- Keep the lines light and simple
At this stage, focus only on placement and shape.
Your pumpkin may look a bit flat or silly right now, and that’s completely normal. We will refine and add detail in the next steps.
Don’t worry if your face isn’t perfect yet. This step is just a rough guide, and everything can still be adjusted.

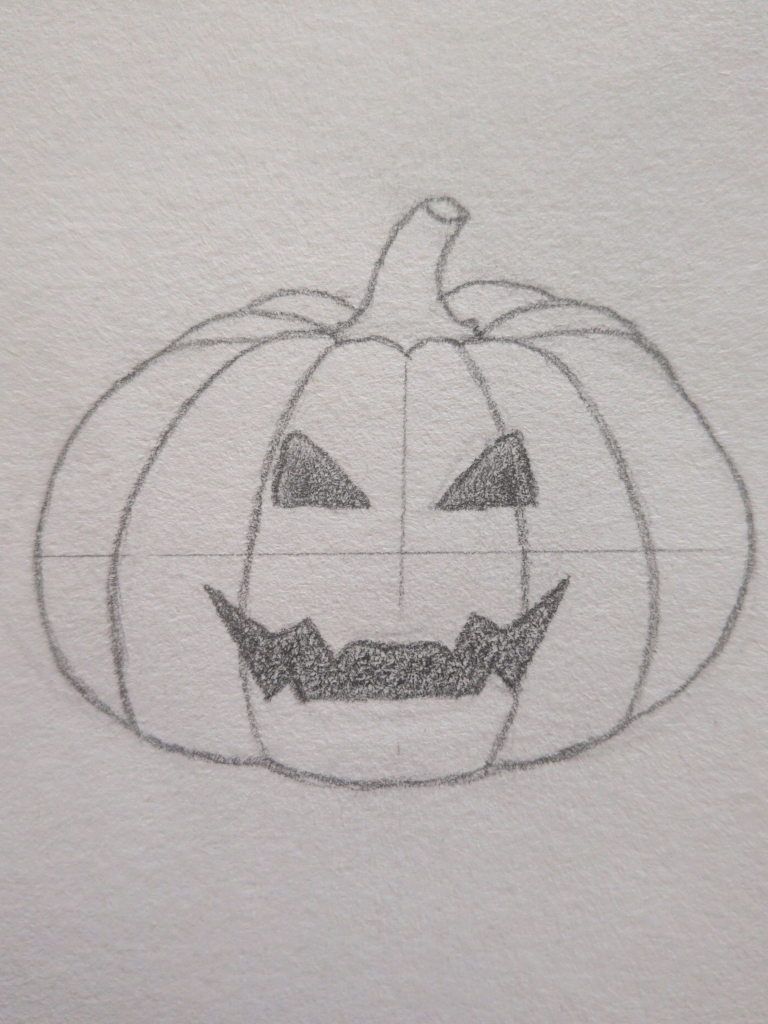
Step 7: Refine the Eyes and Mouth
Now gently erase any messy or overlapping sketch lines around the eyes and mouth, then redraw the shapes more cleanly.
Focus on:
- Tidying up the triangle eyes and sharpening the corners
- Cleaning up the zig-zag edges of the mouth
- Making the facial features look clearer and more intentional
Keep your pencil pressure light and don’t add any shading yet. This step is all about refining what’s already there, not making it perfect.
If your lines still look a little uneven, that’s completely fine. A slightly wonky jack-o’-lantern just looks more mischievous anyway.
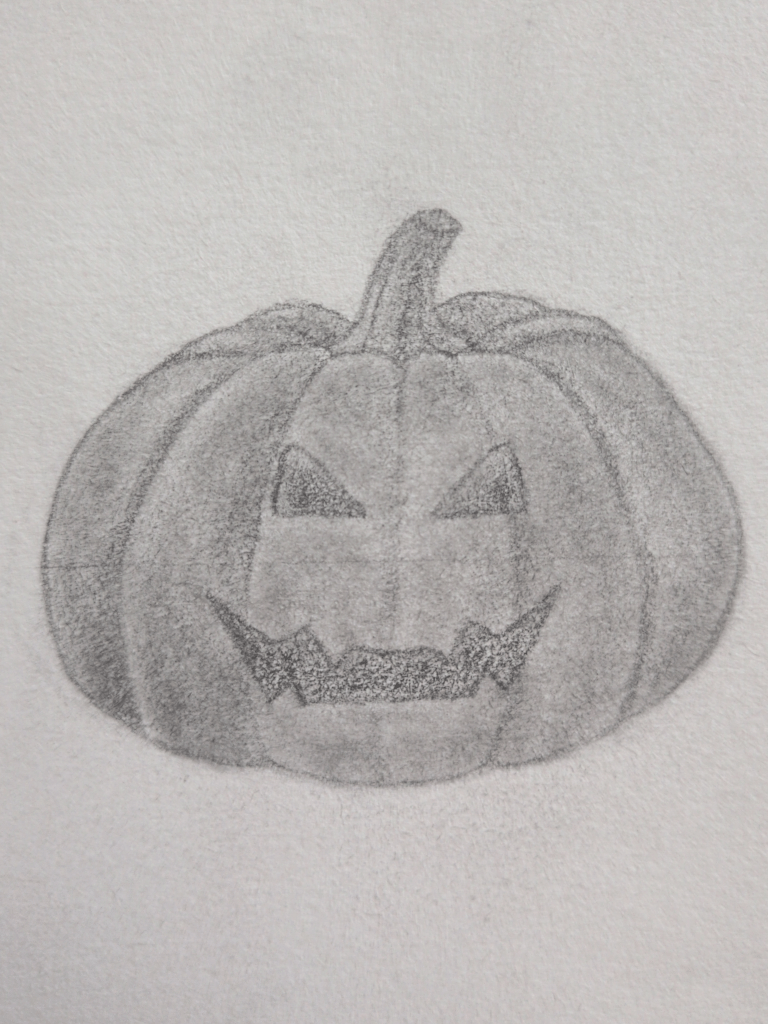
Step 8: Add Shading Inside the Eyes and Mouth
Now we’re going to add depth to the pumpkin by shading inside the carved areas.
For this step, I’m using a 4B pencil.
Using a soft pencil, lightly shade:
- Inside the triangle eyes
- Inside the mouth shape
Keep the shading:
- Even and soft
- Inside the outlines only
Avoid pressing too hard or filling the areas completely black. At this stage, the goal is to suggest depth, not finish the shading. You can always darken areas later, but it’s much harder to lighten them if you go too dark now.
Step 9: Add a Light Base Shade to the Pumpkin
For this step, switch to a 2B pencil.
Lightly shade the entire pumpkin body to create a soft base tone.
Use gentle pressure and aim for an even layer of shading across all the pumpkin segments. The eyes and mouth should already be shaded from the previous step, so focus here on the pumpkin flesh itself.
Keep this layer:
- Light and subtle
- Even across the surface
- Free from strong shadows
This is only a base shade to help build depth later, so avoid pressing hard or trying to add contrast at this stage.
If the shading looks soft, pale, or slightly flat right now, that’s exactly what you want.
Note:
If you don’t have a 2B pencil, you can use an HB pencil instead; just maintain a firmer pressure.
Step 10: Add Darker Shading to the Pumpkin Segments
For this step, switch to a 4B pencil.
Now we’re going to start building depth by adding darker shading to the pumpkin.
Using slightly more pressure than before, shade along:
- The outer edges of the pumpkin
- The grooves between each segment.
Keep the darkest tones closest to the edges and gently fade the shading inward toward the centre of each segment. This helps give the pumpkin its rounded shape.
Tips for this step:
- Work slowly and build the shading in layers, rather than pressing hard straight away
- Aim for soft contrast, not harsh lines
- Let the lighter centre of each segment remain visible
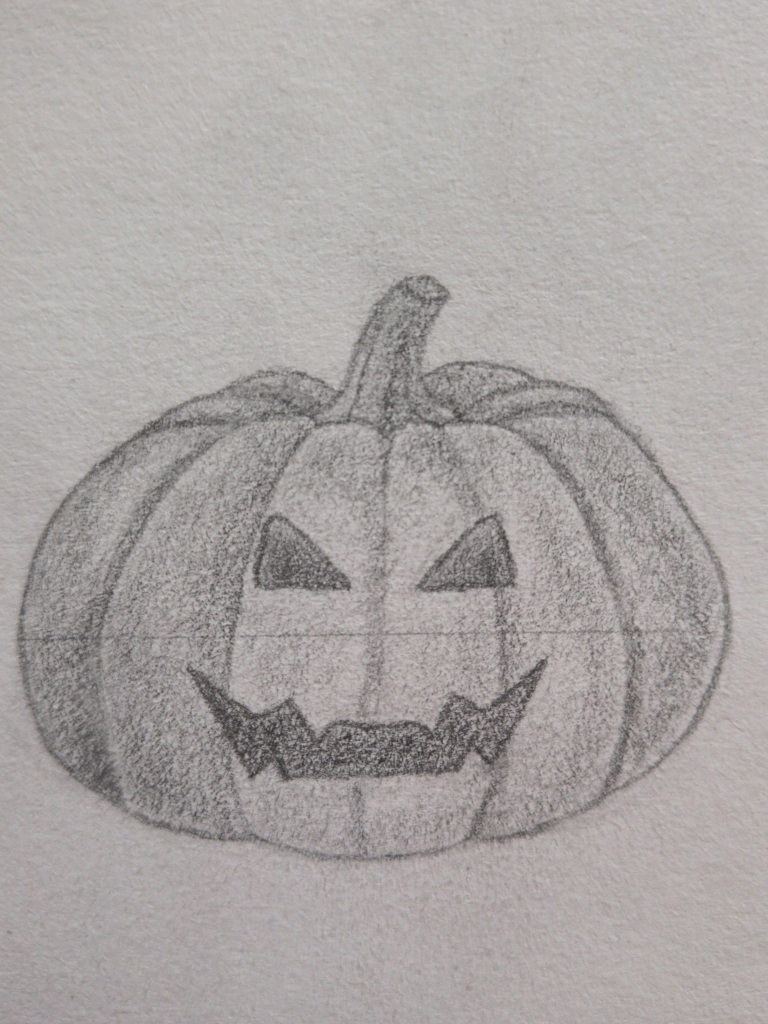
Step 11: Shade the Pumpkin Stem
For this step, use a 2B pencil.
Using light to medium pressure, add shading along one side of the stem to show its rounded shape. Keep the opposite side lighter so the stem doesn’t look flat.
Focus on keeping the shading:
- Soft
- Even
- Gradual
Avoid harsh lines or heavy pressure. The stem should still look subtle and natural at this stage.
Next, lightly darken the area where the stem meets the top of the pumpkin. This helps the stem feel connected rather than stuck on.
Tips for this step:
- Build the shading slowly rather than pressing hard
- If it starts to look too dark, lightly soften it with a blending stump, tissue, or cotton bud
- Don’t worry about perfection. Slight texture actually works well here
At this stage, the stem should look gently shaded, not dramatic.
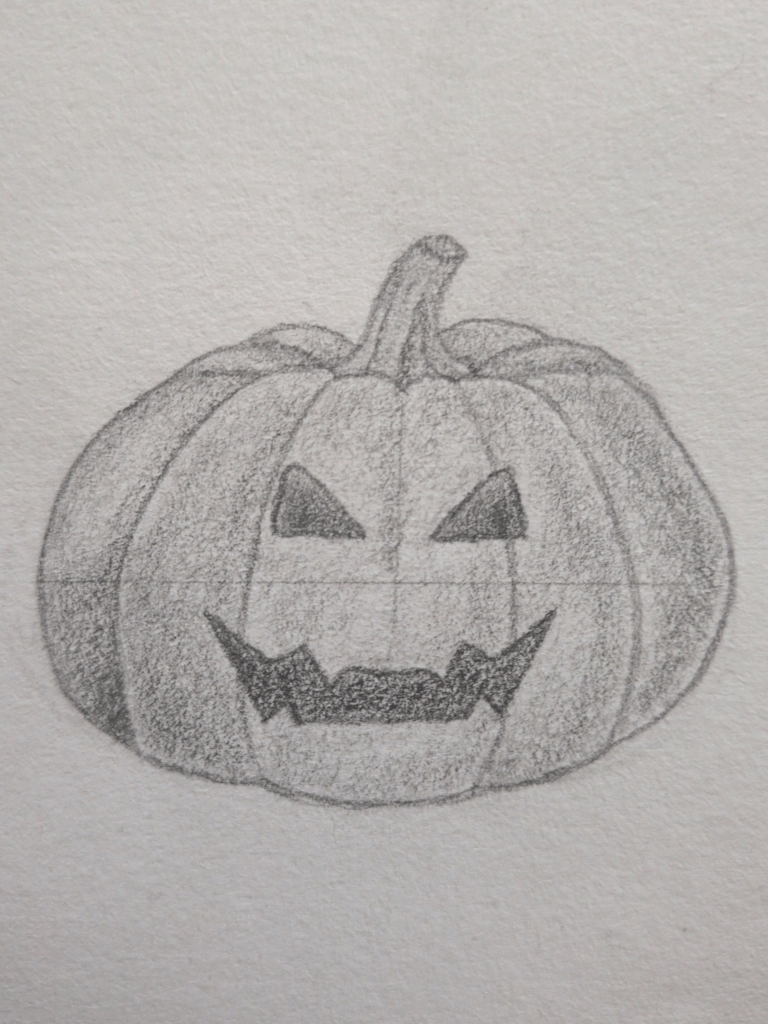
Step 12: Gently Define the Pumpkin Segments
For this step, use a 4B pencil.
Using light pressure, gently shade along the outer edges of each pumpkin segment. Focus on where one segment curves away from the next.
Let the shading fade softly toward the middle of each section. The goal here is to suggest depth, not create strong or sharp shadows.
You don’t need to blend perfectly. Slight texture is completely fine and actually helps keep the pumpkin looking soft and natural.
Keep in mind:
- Use light pressure. Don’t press hard
- Build the shading slowly
- Leave the centre of each segment lighter so the pumpkin still looks round
- Avoid outlining the segments with dark lines
At this stage, the pumpkin should look gently shaped, not heavily shaded.
Step 12: Softly Blend the Pumpkin Shading
Lightly blend the shading across the pumpkin to soften the pencil texture and smooth out the lighter and darker areas.
You can blend using:
- A blending stump
- A cotton bud
- Or a folded tissue
Use very gentle pressure. Let the tool do the work rather than pressing hard.
Blend using small circular motions or short strokes, following the curve of each pumpkin segment. Start in the lighter areas and gently move toward the darker shading, softening the edge where they meet.
Avoid rubbing back and forth aggressively. If the shading starts to disappear or turn muddy, stop blending and move on.
The goal here is not to make the pumpkin perfectly smooth. You’re simply softening harsh pencil marks so the pumpkin looks more rounded and natural. If you’re unsure whether to blend more, that’s usually your cue to stop.
If some areas still look slightly patchy, that’s completely fine. We’ll add contrast and tidy things up in the next steps.
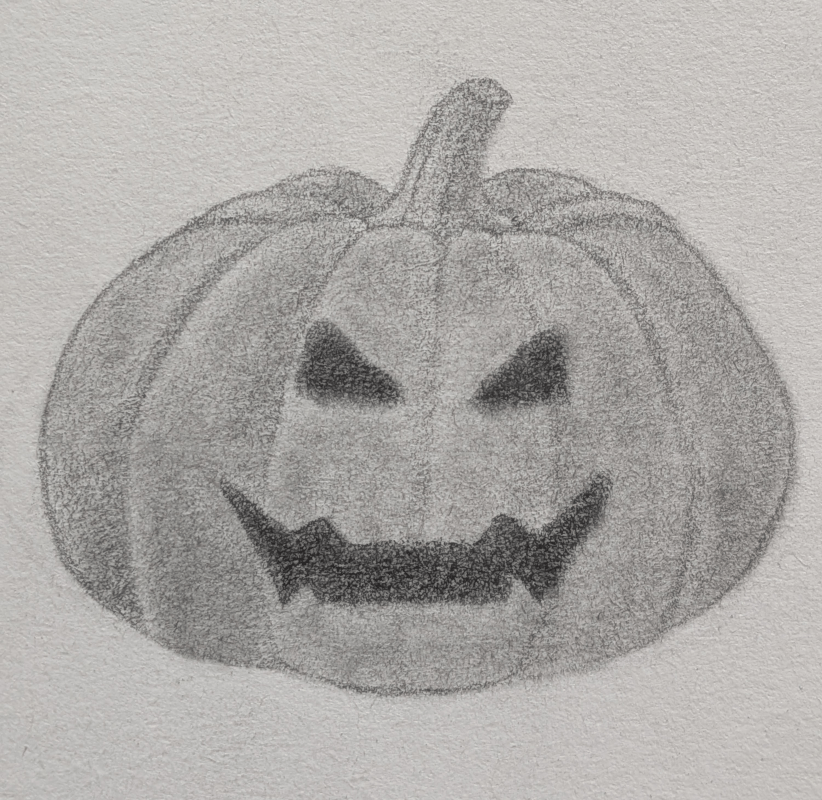
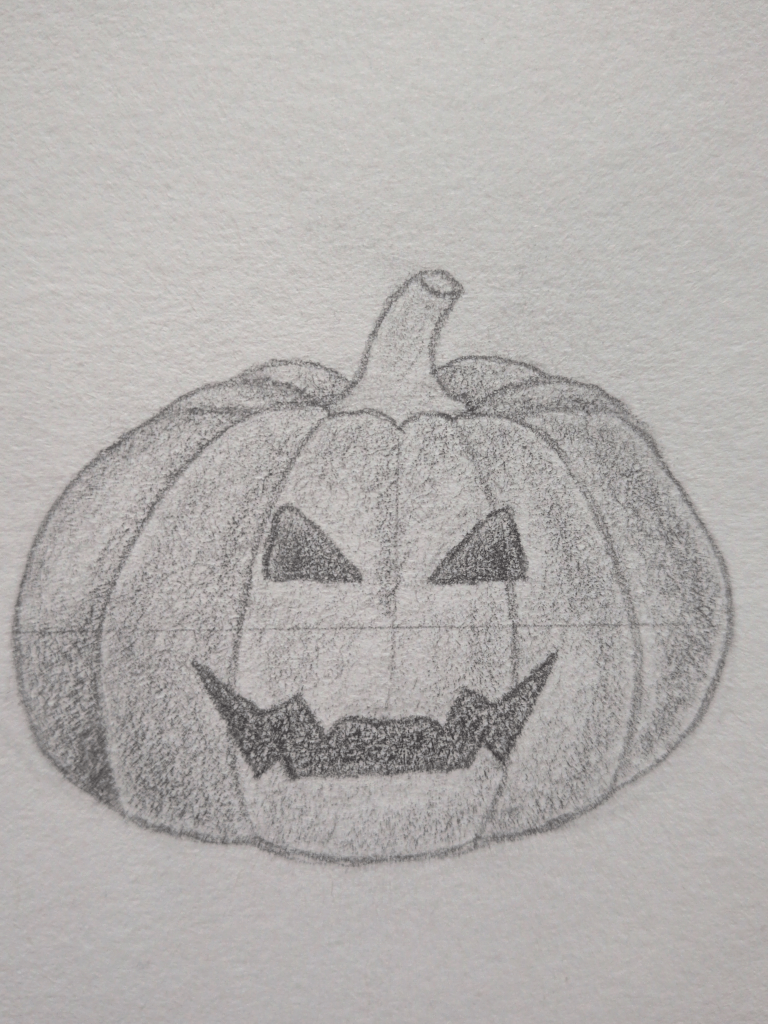
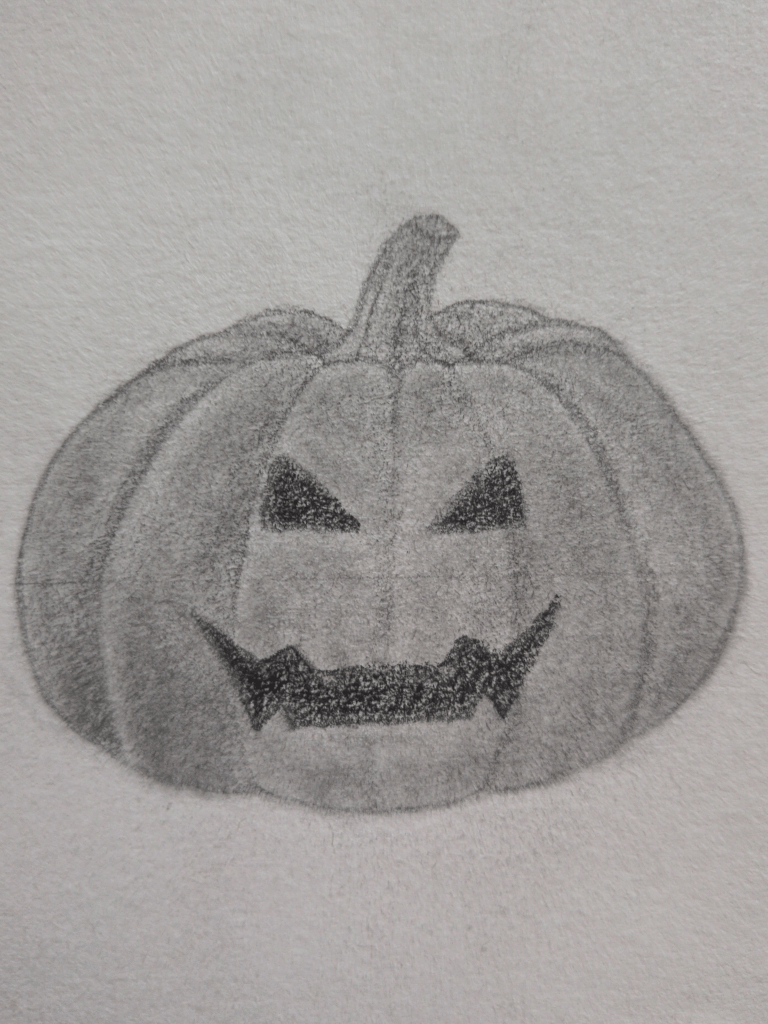
Step 13: Darken the Eyes and Mouth
For this step, use a 6B pencil.
Now that the pumpkin has been softly blended, the eyes and mouth may look a little faded. That’s completely normal, so don’t panic – we’re fixing that now.
Using your pencil, gently darken the inside of the eyes and the mouth, pressing slightly firmer than before. Focus on filling these areas evenly rather than adding lots of detail.
Take your time and build the darkness gradually. You want the face to stand out clearly against the lighter pumpkin, but it doesn’t need to be pitch black.
At this stage, avoid shading outside the carved shapes. Keep the edges clean and simple, so the face stays easy to read.
Step 14: Blend the Eyes and Mouth & Tidy the Edges
Now that the main pumpkin shading is finished, it’s time to gently blend the eyes and mouth and clean up the outer edges.
Lightly blend inside the eyes and mouth using very small, soft movements. Keep your pressure gentle and stop as soon as the shading looks smoother. You’re not trying to make these areas realistic, just even and dark enough to stand out clearly from the pumpkin.
Once you’re happy with the blending, use your eraser to carefully tidy around the outside edge of the pumpkin. Clean up any smudges, stray shading, or rough lines so the shape looks neat and well defined.
Take your time with this step. Small adjustments make a big difference here, and there’s no need to rush. When it looks clean and balanced, you’re done.
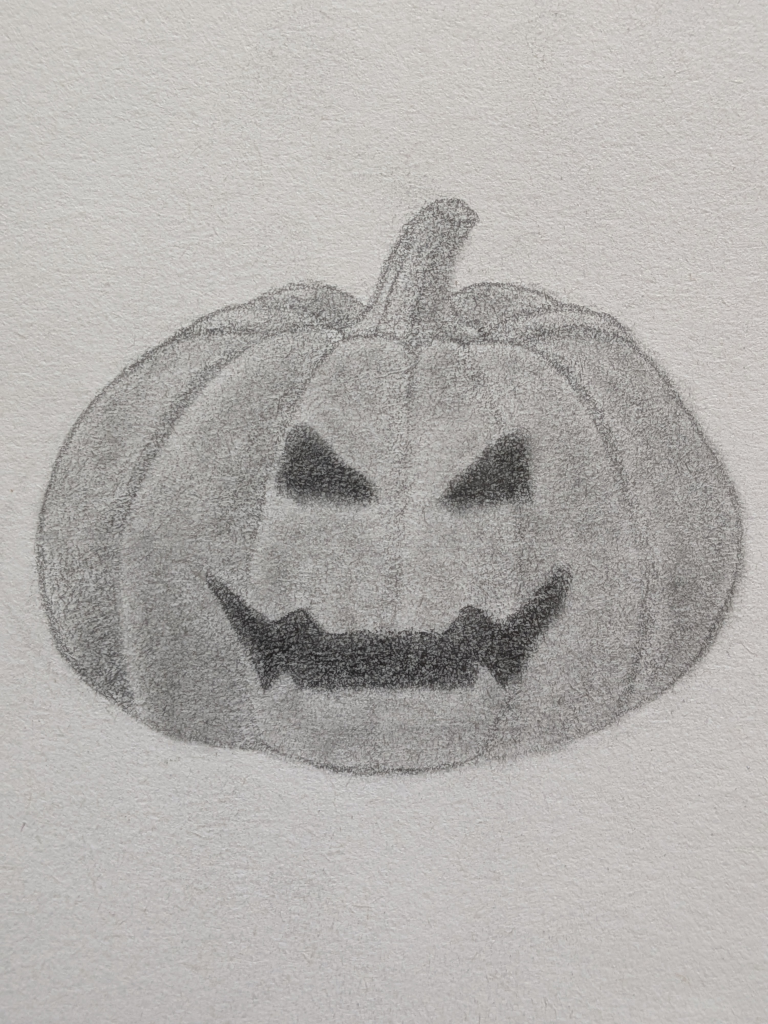
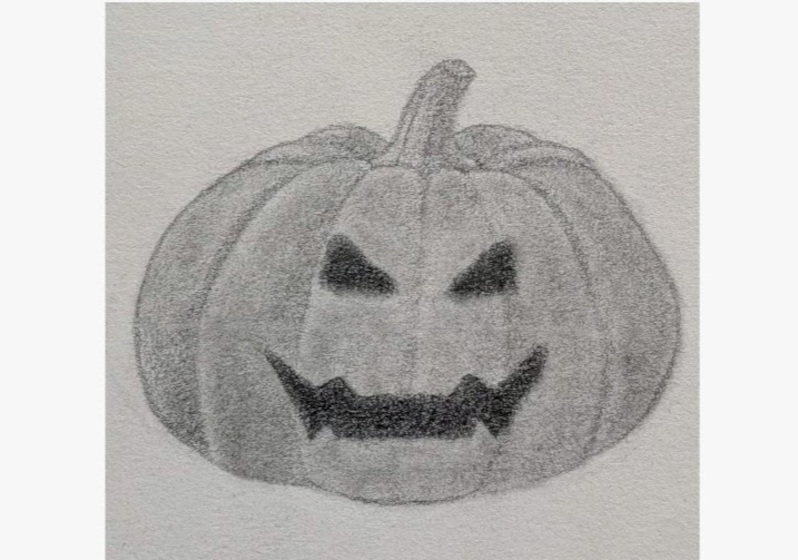
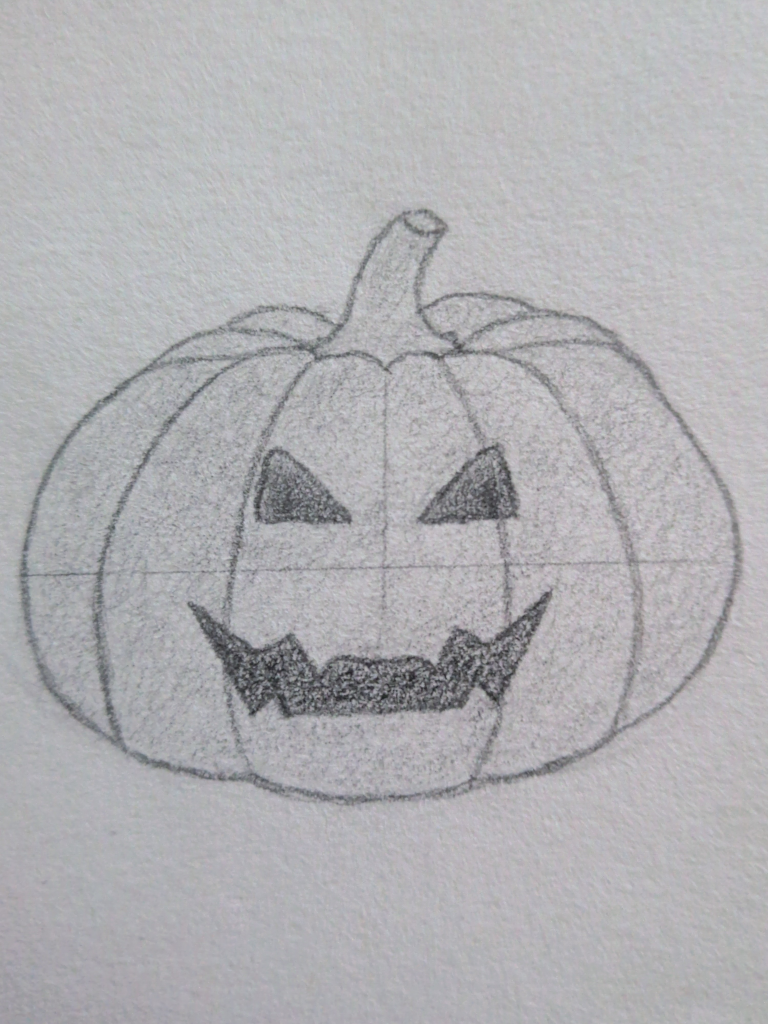
Your Creepy Pumpkin is Complete
By working through this step-by-step and building the shading gradually, you’ve created a solid, finished drawing without overcomplicating things. The goal here wasn’t perfection, but understanding how shapes, shading, and blending work together, and you’ve done exactly that.
Take a moment to look back at where you started and where you ended up. Even with simple tools and gentle shading, you can create depth, mood, and character. That’s a really strong foundation to build on. And yes, it’s absolutely allowed to be proud of this pumpkin.
Try Another Beginner Horror Drawing
Ready to explore a different style of spooky?
- Ghost Drawing Tutorial for Beginners
Practise soft shading, gentle gradients, and controlled blending to create a smooth, rounded form. - Haunted Doll Drawing Tutorial
Refine your precision with subtle features, delicate shadows, and small details that create an unsettling mood.