Mastering Pencil Pressure and Grades for Creepy Drawings

Learn how to control your tones, understand your pencils, and give your horror art the shading depth it deserves.
Ever feel like your pencil has a mind of its own – one that’s hell-bent on ruining your shadows?… Let’s fix that.
Pencil pressure and graphite grades control almost everything in shading – from soft foggy shadows to harsh, dramatic contrast. Even the creepiest drawings can end up looking flat if your tones aren’t working together properly.
Once you understand how pressure affects value and why different pencil grades behave differently, it becomes much easier to create smoother shading, deeper shadows, sharper highlights, and stronger atmosphere.
This tutorial breaks down exactly how pencil pressure and graphite grades work, how to control them, and how to build tone step by step – all with horror art in mind.
What You’ll Learn:
In this tutorial, you’ll learn how to control pencil pressure for smoother shading, stronger contrast, and richer horror textures.
- How to control pencil pressure for smoother, cleaner shading
- Why layering graphite creates richer shadows than pressing hard
- How different pencil grades affect tone and contrast
- Ways to create smooth gradients and soft tonal transitions
- How to build consistency and muscle memory through simple exercises
- Common pressure mistakes that cause patchy or uneven shading
- How to use pressure and layering for creepy textures and horror atmosphere
- Tips for improving shading depth without damaging your paper
Why Pencil Pressure Matters
Pressure control is what separates “I tried” from “I’m framing this.”
It determines:
- How light or dark your shading appears
- How smooth or patchy your transitions look
- How much texture, depth, and atmosphere you can create
- How well your paper survives your artistic enthusiasm
- How easily you can build soft gradients and deep contrast
In horror art, good pressure control makes shadows feel alive – soft where they fade, rich and heavy where darkness creeps in.
It also helps you create smoother blends, cleaner highlights, and more believable textures without damaging the paper underneath.
Without proper pressure control, you can end up with scratches, dents, muddy shading, and uneven tone that looks more “haunted homework” than horror masterpiece.
Understanding Pencil Grades (H vs B)
Your pencils are more than just sticks of graphite – they’re tools for controlling mood, contrast, and atmosphere.
The letters and numbers on them aren’t random; they tell you how hard or soft the graphite is, which directly affects how dark, smooth, textured, or sharp your shading appears.
Pencil | Hardness | Tone | Texture | Best Use |
2H | Hard | Very Light | Crisp | Outlines, Structure |
HB | Medium-Hard | Light-Medium | Smooth | Base Shading |
2B | Soft | Medium-Dark | Slightly Velvety | Main Shading |
4B | Softer | Dark | Rich | Deep Shadows, Folds |
6B | Very Soft | Very Dark | Creamy | Intense Contrast, Final Details |
Most horror artists use a combination of grades rather than sticking to one pencil throughout a drawing.
Understanding pencil grades helps you choose the right tool for the job instead of fighting against your materials halfway through a drawing. A soft pencil can create deep, rich shadows, while a harder pencil gives you cleaner structure and lighter detail.
Think of the H pencils as your precise scientists, and the B pencils as your dramatic poets – both essential for creepy art harmony.
The Quick Version:
- H pencils = lighter, cleaner, sharper marks. Perfect for outlines, structure, and soft base tones.
- B pencils = darker, softer, moodier shading and richer shadows. Perfect for shading, depth, and atmosphere.
If pencils were horror characters, H pencils would be the cautious scientist. B pencils? The brooding vampire who refuses to leave the shadows.
The Power of Pressure
Pressure is how you control your pencil’s personality.
You can create light misty shading, smooth mid-tones, and deep shadows from a single pencil – simply by changing how hard you press.
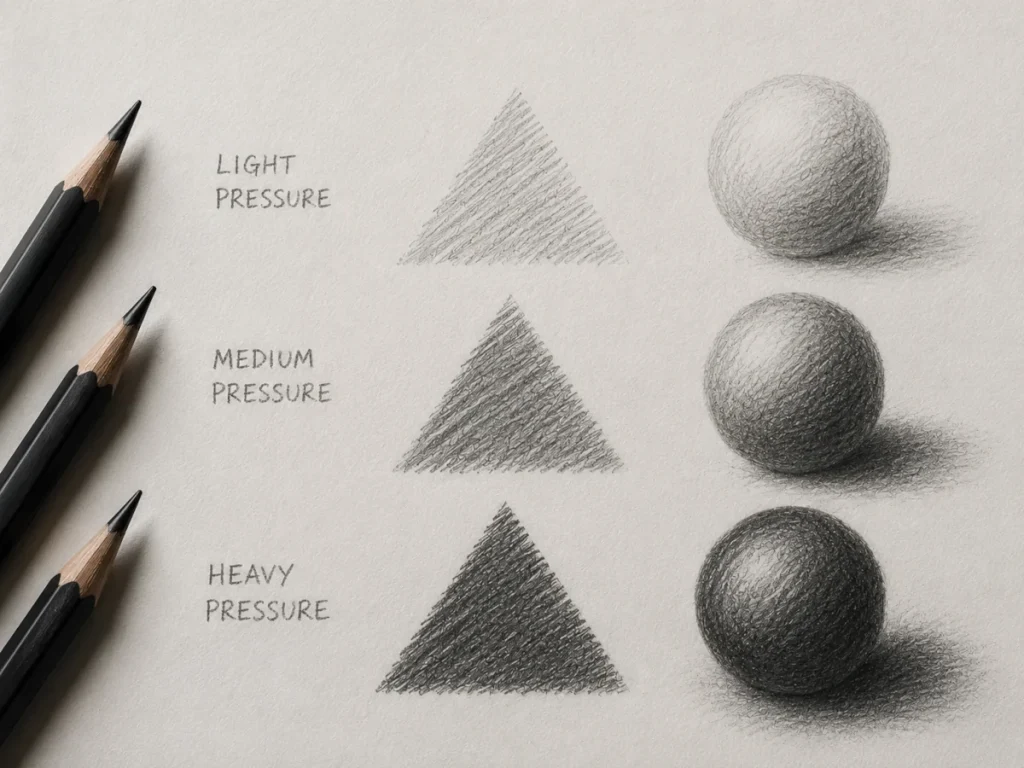
Light Pressure:
Barely touch the paper.
→ Creates soft, pale tones that are easy to erase and layer.
→ Perfect for fog, highlights, soft skin textures, or first shading layers.
Medium Pressure:
Firm but controlled.
→ Produces smooth mid-tones with balanced texture.
→ Best for general shading, building form, and gradual transitions.
Heavy Pressure:
Strong, confident pressure.
→ Creates rich, dark shadows and intense contrast.
→ Use sparingly – too much pressure can flatten the paper texture or create unwanted shine.
Think of pressure like a dimmer switch rather than an on/off button – you’re gradually controlling atmosphere and depth, not jumping from light to dark in one harsh step.
Step-By-Step: Mastering Pencil Pressure
If you’ve never practised pressure control before, don’t worry – everyone starts by snapping a few pencil tips. It’s practically a rite of passage.
Step 1 – Warm-Up: The Gradient Bar
Draw a long rectangle.
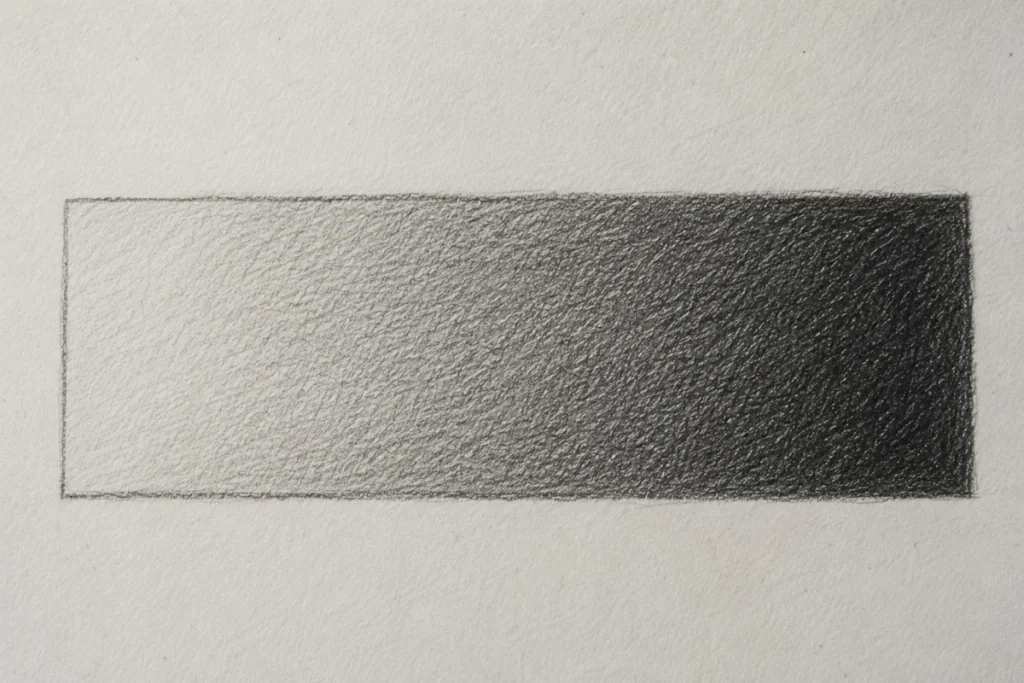
Start with the faintest pressure possible and gradually darken as you move across.
Focus on creating smooth transitions rather than rushing for dark tones too quickly.
- Keep your strokes light and overlapping.
- Use your arm, not just your wrist.
- Tilt your pencil slightly for smoother coverage.
Repeat this exercise regularly to build better pressure control and better sensitivity in your hand.
It’s the shading equivalent of lifting weights – not always exciting, but incredibly useful once your drawings start gaining real depth and atmosphere.
Step 2 – Experiment With Pencil Grades
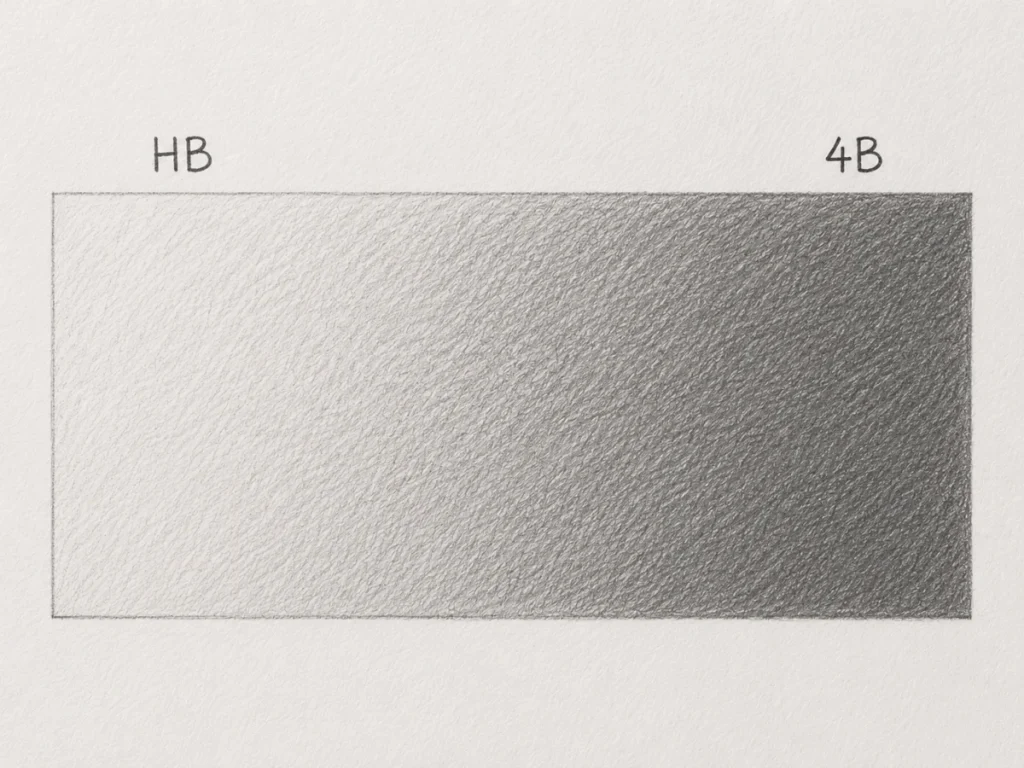
Repeat the gradient exercise with different pencils: HB, 2B, 4B, and 6B.
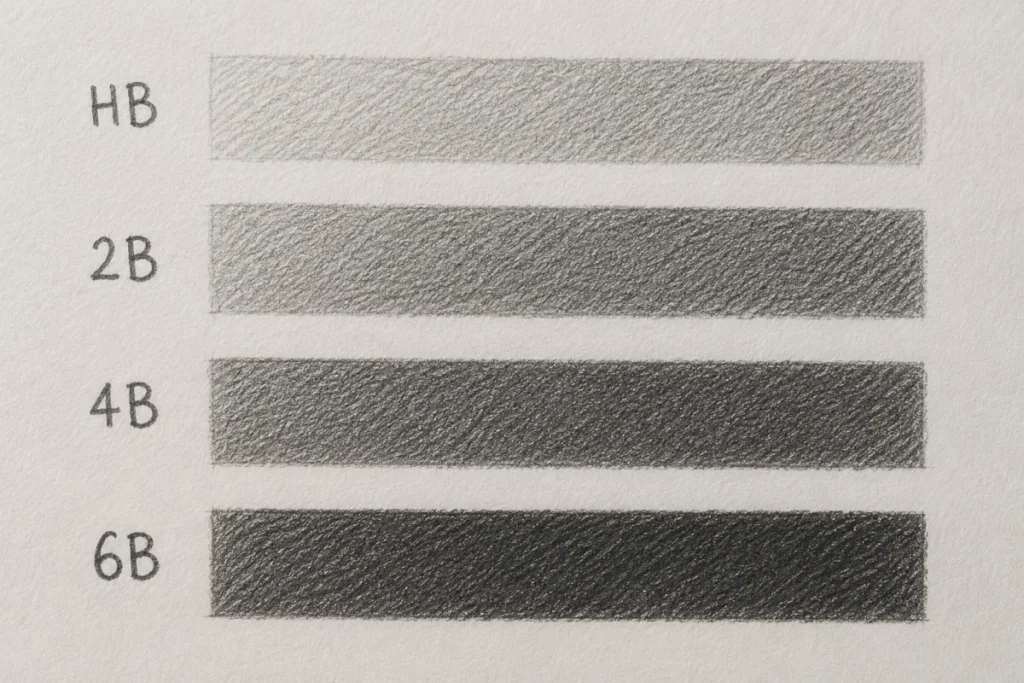
Notice how little pressure it takes to create darker tones as the pencils get softer.
- HB feels crisp and pale – great for sketching, outlines, and first shading layers.
- 2B glides more smoothly and darkens faster while still staying controlled.
- 4B and 6B create rich, deep shadows with very little pressure.
This exercise teaches you how to combine pencils like layers of atmosphere:
- Harder pencils help build structure, cleaner detail, and soft transitions.
- Softer pencils add mood, depth, and dramatic contrast.
Once you understand what each pencil naturally wants to do, shading becomes much easier to control – especially in horror art where atmosphere depends heavily on tone.
Step 3 – Layer, Don’t Press
Darkness doesn’t come from force – it comes from layers.
Build tone gradually with multiple passes, each one slightly darker than the last.
Use small circular or diagonal strokes so each layer settles smoothly into the paper texture.
Layering creates deeper, smoother shadows without scratching the paper or creating shiny graphite patches.
Mini Exercise:
1. Shade a patch lightly with HB.
2. Add a 2B layer using the same motion.
3. Deepen selective areas with 4B or 6B.
Notice how the tones build naturally instead of jumping abruptly from light to dark.
The result: rich shadows with smoother transitions and far more control.
Graphite works best when you whisper to it, not wrestle it.
Step 4 – Train Consistency
Draw five small boxes.
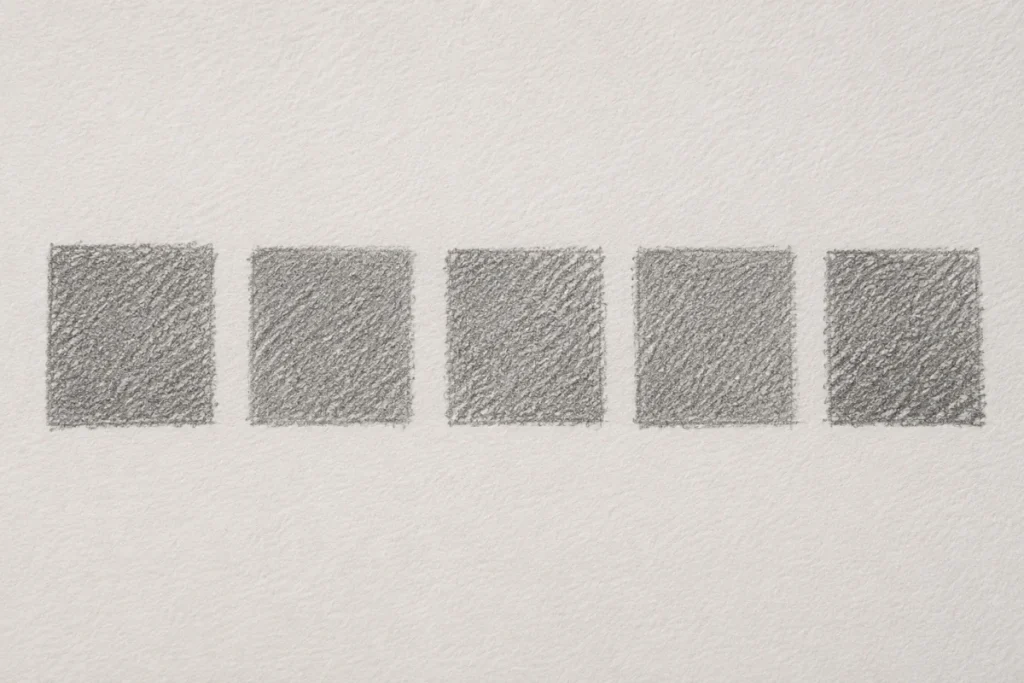
Try to shade all five to the same tone using only an HB pencil.
You’ll probably notice that a few look slightly darker or lighter than the others – that’s completely normal. This simple exercise reveals how even tiny changes in pressure can affect your shading.
The goal isn’t perfection – it’s awareness and control.
Once you’ve done it, repeat the exercise using a different pencil grade like 2B or 4B. Compare how each pencil reacts to the same amount of pressure. Over time, you’ll start building muscle memory for what “light,” “medium,” and “dark” pressure actually feel like.
Consistency takes time to master, but it’s one of the most valuable shading skills you can develop. When you can control your tones confidently, everything from zombie skin folds to eerie shadows will look smoother, creepier, and more intentional.
Strangely enough, some of the best shading skills are built from exercises this simple.
Step 5 – Apply It to Creepy Textures
Now it’s time to make it horror-worthy.
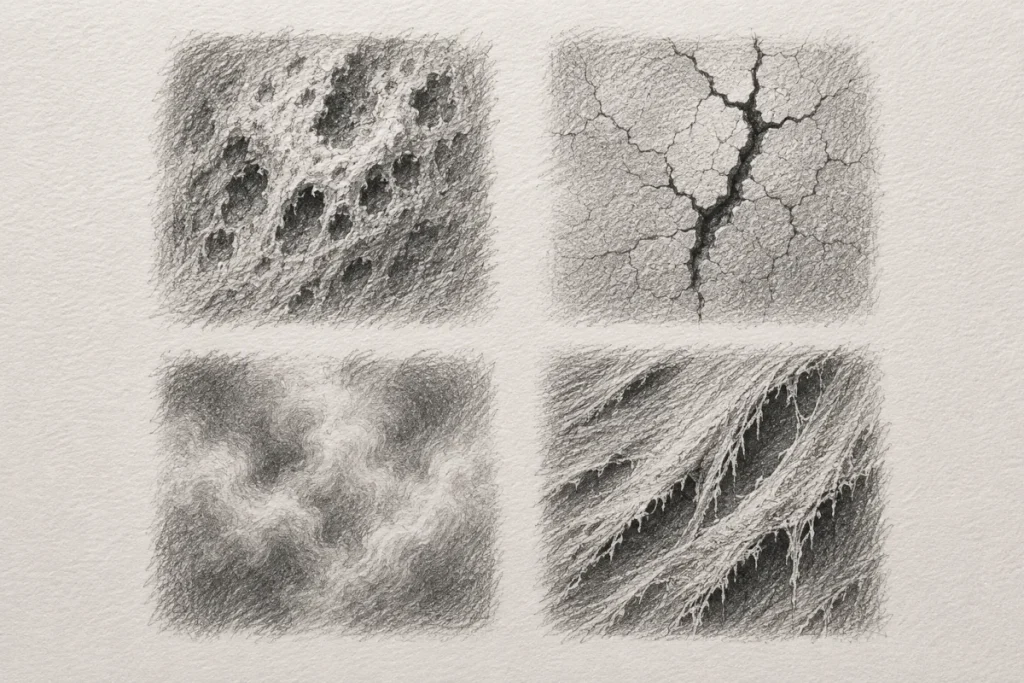
Try shading:
- Rotting Flesh: Start with light pressure, build layers gradually, and darken deeper folds and creases.
- Cracked Bone: Use heavier pressure inside cracks and lighter shading around raised edges.
- Misty Backgrounds: Use soft circular motions with very light pressure to create hazy atmosphere.
- Torn Fabric: Build a pale base layer first, then deepen seams, folds, and shadowed areas.
You’ll quickly start noticing how pressure alone can create believable texture and depth – even before blending.
Experiment with eerie surfaces like wrinkled zombie skin, drifting ghost fog, cracked porcelain faces, or old decaying cloth. The more you practise controlling pressure, the more convincing your shadows, textures and atmosphere will become.
Common Beginner Mistakes
Pressing Too Hard Too Early
One of the most common beginner mistakes is trying to achieve dark shadows immediately by pressing hard with the pencil. While this might seem faster, it usually damages the paper texture and creates shiny, uneven graphite patches that become difficult to blend smoothly later.
Heavy pressure also makes it harder to erase mistakes and limits how many layers you can build on top.
Fix:
Build your shading gradually using 3-4 light layers instead of one heavy pass. Start softly and gradually increase the darkness over time. This creates richer shadows, smoother transitions, and better texture control without damaging the surface of the paper.
Uneven Pressure
Inconsistent pressure often creates patchy, streaky shading with some areas appearing darker or rougher than others. This usually happens when beginners grip the pencil too tightly or rely only on wrist movement.
The result can make smooth surfaces look scratchy and textures appear accidental instead of intentional.
Fix:
Hold your pencil slightly farther back to naturally reduce pressure and create softer marks. Try using your arm more than your wrist when shading large areas, and focus on keeping your hand relaxed throughout the movement.
Light, overlapping strokes usually produce the smoothest results.
Relying on One Pencil
Many beginners try to complete an entire drawing using only one pencil grade, usually a darker one like 6B. While softer pencils are excellent for deep shadows, they can quickly overpower lighter areas and make drawings look muddy or flat.
Different pencil grades exist for a reason – each one handles tone, texture, and layering differently.
Fix:
Use a range of pencil grades throughout your drawing.
- HB pencils work well for lighter foundations and controlled shading.
- 2B pencils help build smoother mid-tones.
- 4B-6B pencils are best for deep shadows and dramatic contrast.
Using multiple grades gives you far more control over your values and textures.
Forgetting to Layer
Jumping straight to very dark tones often removes subtle transitions between light and shadow. This can make shading look flat, patchy, harsh, or unnatural.
Good graphite work usually comes from patience rather than force.
Fix:
Start with a light base layer and slowly deepen the darker areas over several passes. Allow each layer to build on the previous one rather than trying to finish the shading immediately.
Think of it like gradually building fog or smoke – soft layers create far more atmosphere than one solid dark patch.
Flat Edges From Overuse
If you keep drawing with the same side of the pencil tip for too long, the graphite can flatten unevenly. This often creates thick, blunt marks that are difficult to blend cleanly.
You may also notice rough, streaky edges appearing in areas that should look smooth.
Fix:
Rotate your pencil regularly while shading to keep the graphite tip rounded and consistent. This helps maintain cleaner strokes and more even coverage across the page.
A sharper, more balanced tip also gives you better control over texture details.
Skipping Pressure Tests
Many beginners move directly onto the final drawing without testing how dark their pencil actually is on the paper. Different papers, pencil grades, and sharpening styles can all affect the final result.
Even experienced artists test their pressure before committing to important areas.
Fix:
Before shading important sections, make a few quick test strokes on scrap paper. Check how light or dark the pencil appears and adjust your pressure before applying it to the drawing itself.
This small habit prevents a surprising number of shading mistakes.
Every artist struggles with pressure control at first. The important thing is learning to recognise these problems early so you can correct them before they affect the entire drawing. Once pressure starts becoming second nature, your shading will look smoother, cleaner, and far more atmospheric.
Practice Exercises
1. The Pressure Ladder
Draw four boxes stacked vertically in a column.
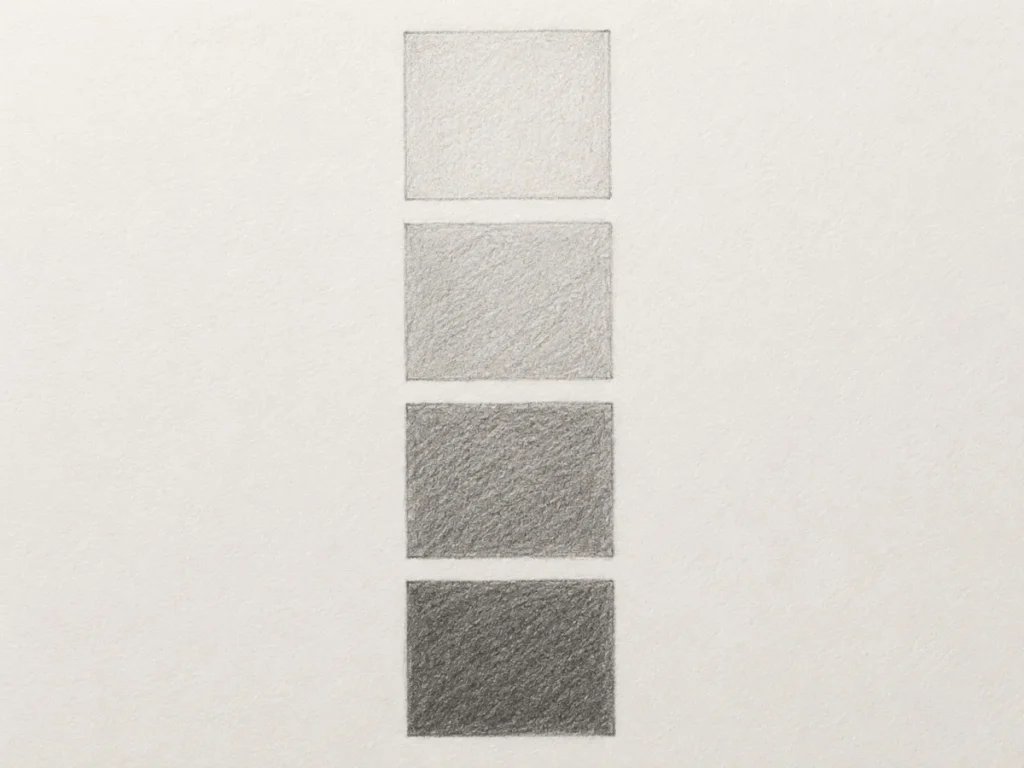
Using only an HB pencil, shade each box slightly darker than the previous one. Start with extremely light pressure in the first box, then gradually increase the darkness with each step down the ladder.
Focus on creating smooth, controlled transitions rather than rushing to make the boxes dark.
The goal isn’t perfect shading – it’s learning how small pressure changes affect tone. Even experienced artists occasionally create uneven transitions when working too quickly.
What To Watch For
- Are the tone changes gradual or sudden?
- Do some boxes look patchy or streaky?
- Are you pressing harder instead of layering more slowly?
- Does the graphite appear smooth or shiny?
If one box suddenly becomes much darker than the others, you’re probably increasing pressure too aggressively.
Try repeating the exercise over several sessions until the changes between each box feel more controlled and predictable.
This exercise trains your hand to recognise subtle differences in pressure – an essential skill for realistic shadows, soft fog effects, and smooth horror textures.
2. Pencil Grade Comparison
Create a small shading chart using HB, 2B, 4B, and 6B pencils.
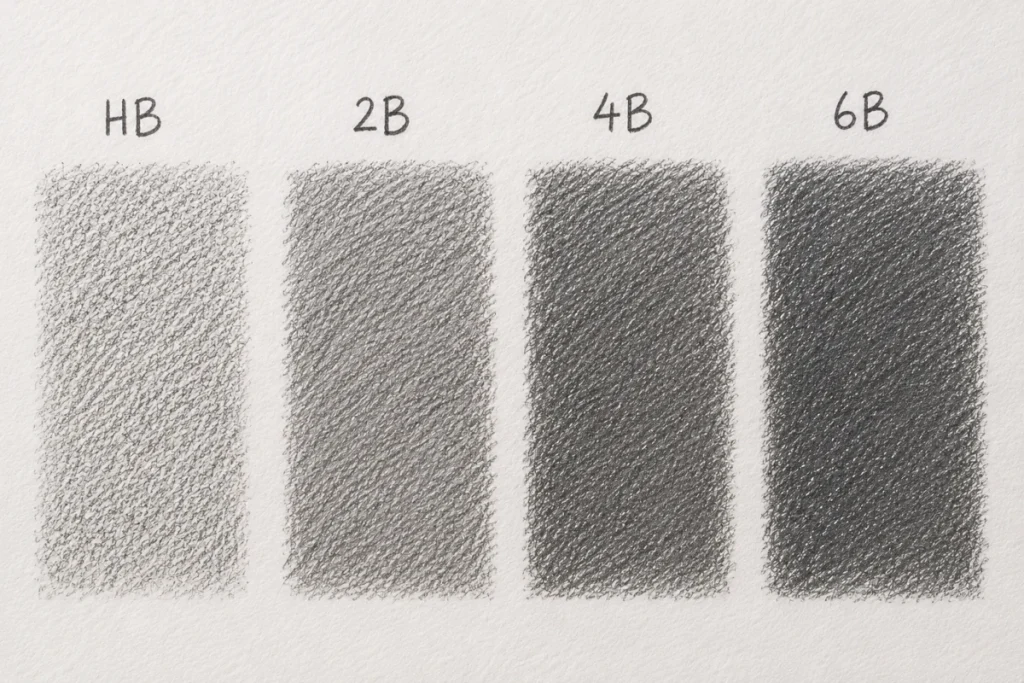
Shade each section using roughly the same amount of pressure so the only major difference comes from the softness of the graphite itself.
This exercise helps you understand how pencil grades naturally affect:
- darkness
- smoothness
- texture
- blending behaviour
You are not trying to force darker tones through pressure here – the pencils themselves are doing most of the work.
Softer graphite naturally deposits more tone onto the paper, even with a gentle touch. Harder pencils create lighter, cleaner marks that are easier to control during early shading stages.
What To Observe
- Which pencil reaches dark tones the fastest?
- Which one feels smoother across the paper?
- Which pencil creates the softest texture?
- Do some grades appear grainier or sharper than others?
- Which pencil feels easiest to control?
You’ll probably notice that:
- HB pencils feel lighter and more structured.
- 2B pencils begin producing richer mid-tones more quickly.
- 4B and 6B pencils create deep shadows quickly, but can also become muddy if overused.
Understanding these differences makes it far easier to choose the right pencil for different parts of a horror drawing – from soft foggy backgrounds to sharp cracks, folds, and deep shadows.
The better you understand your pencil grades, the more intentional your shading decisions become.
3. Layered Tone Exercise
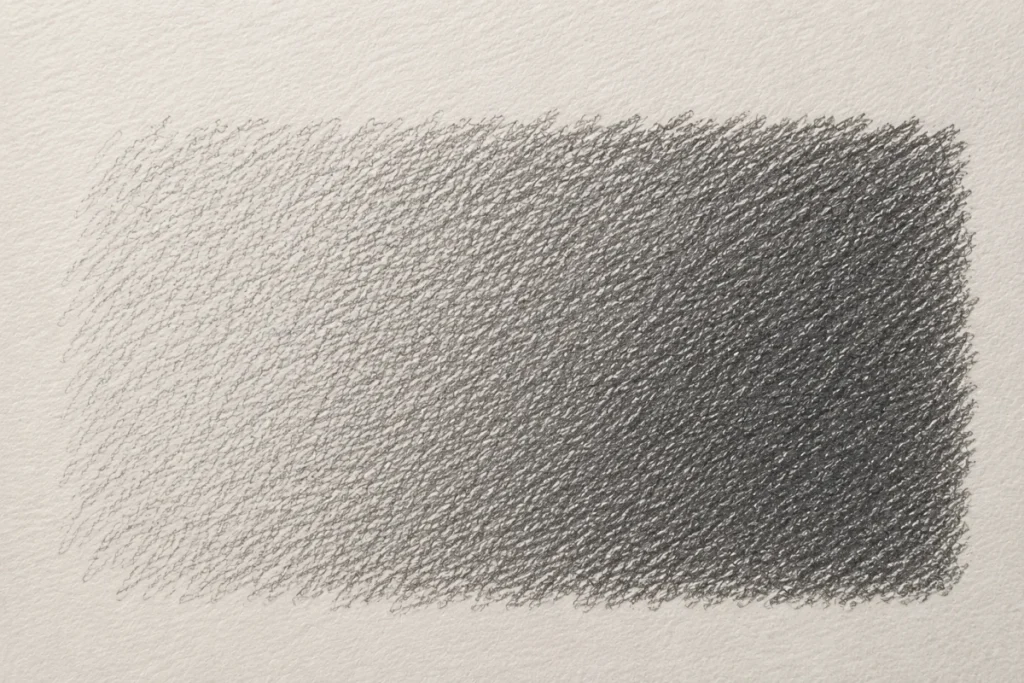
Shade a smooth gradient using two pencils: HB and 4B.
Start by creating a light foundation with the HB pencil. Keep the pressure soft and consistent while building the lighter half of the gradient.
Once the base layer is established, gradually introduce the 4B pencil into the darker areas. Allow the darker graphite to overlap slightly into the HB section so the transition blends naturally rather than creating a harsh dividing line.
The goal is to create a transition that feels smooth and atmospheric instead of suddenly jumping from light to dark.
What To Focus On
- Keep your strokes small and overlapping.
- Build darkness gradually instead of pressing harder immediately.
- Let the HB layer help soften the 4B graphite.
- Work slowly near the centre transition area where the tones blend together.
If the gradient looks streaky or rough at first, that’s completely normal. Most smooth shading comes from patiently layering rather than getting it perfect on the first pass.
What This Exercise Teaches
This exercise helps train:
- pressure control
- layering technique
- smooth blending transitions
- pencil grade control
- tonal patience
These skills are essential for creating believable horror shading such as fog, deep shadows, aged skin textures, cracked surfaces, and soft atmospheric backgrounds.
The smoother your transitions become, the more depth and realism your drawings will start to develop.
4. Creepy Challenge
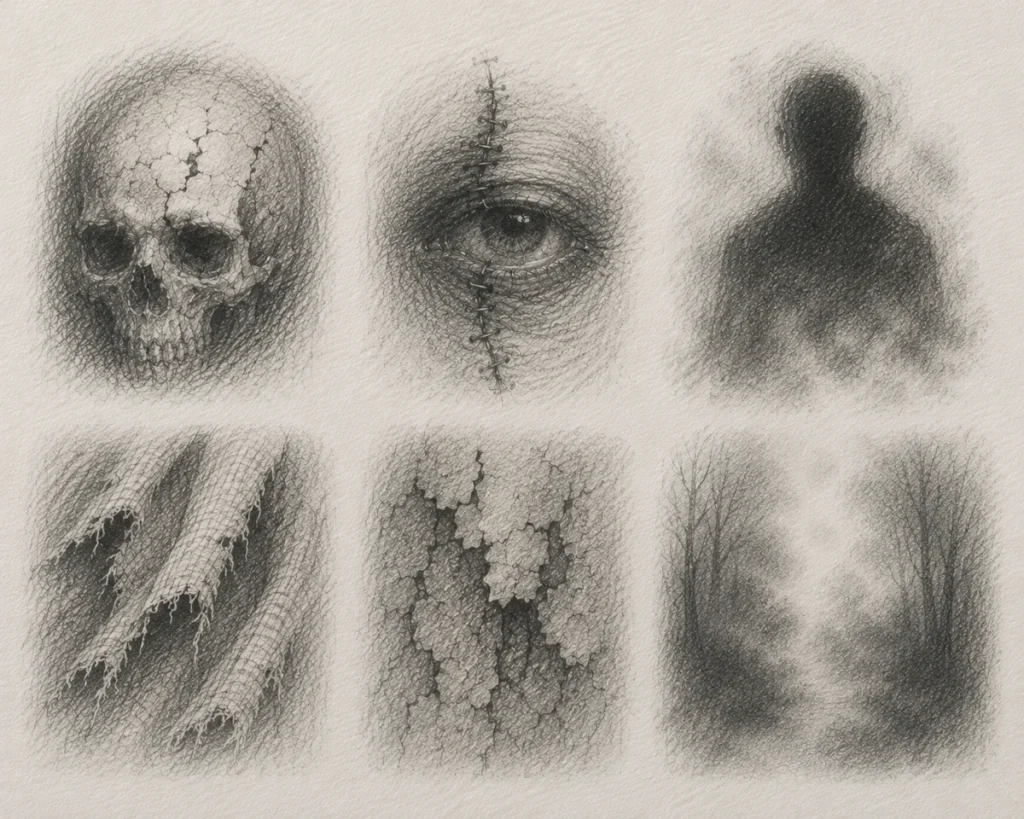
Sketch a small horror-themed subject such as:
- a cracked skull
- a stitched eye
- a ghostly silhouette
- torn fabric
- decayed skin
- misty shadows
Your goal is to rely on pressure control and pencil grades alone to create form, depth, and atmosphere.
Try avoiding blending tools for this exercise. Instead, let the graphite itself create the transitions through careful layering and controlled pressure changes.
Focus On:
- building shadows gradually
- softening edges with lighter pressure
- using darker pencils only where necessary
- creating smooth tonal transitions
- controlling contrast without damaging the paper texture
This exercise forces you to trust your pencil control rather than relying on smudging to hide uneven shading.
You may notice that certain textures become much more believable once your pressure control improves. Soft fog, cracked surfaces, hollow eye sockets, and shadowy silhouettes all rely heavily on gradual tonal changes.
The more subtle your tonal transitions become, the more atmospheric and realistic your horror artwork will feel.
Pro Tips
- Use light layers first to “find” your tones before committing to darker shadows. It’s much easier to deepen graphite gradually than to fix areas that became too dark too quickly.
- Keep your wrist relaxed while shading. Tension in your hand often creates stiff, scratchy marks and uneven pressure.
- Rest your pinky lightly on the page if you need extra stability during detailed shading. This can help steady your hand without pressing too hard into the paper.
- Layer your pencils logically:
HB → 2B → 4B → 6B
Starting lighter and gradually increasing softness usually creates cleaner transitions and better depth. - Keep your pencils reasonably sharp even during soft shading. A rounded but controlled tip produces smoother coverage than a completely blunt edge.
- Rotate your pencil often while shading to prevent flat graphite edges from creating harsh streaks or uneven texture.
- Take short breaks during long shading sessions. Tired hands often press harder without realising it, which can quickly affect tone consistency.
Good pressure control develops slowly through repetition and observation. Over time, your hand naturally starts recognising how different pressures and pencil grades interact.
That’s when shading begins to feel less mechanical – and much more intentional.
Final Thoughts
Learning to control your pencil pressure and understand your grades is one of the most powerful things you can do for your artwork. It may not seem dramatic at first, but it’s the quiet skill behind smooth gradients, believable textures, and atmospheric shading.
Don’t worry if it feels awkward in the beginning. Every smooth transition, realistic wrinkle, and convincing shadow starts with practice that looks a little rough at first. What matters most is consistent practice. Even a few minutes of focused shading practice each day helps build the muscle memory your hand needs.
Over time, you’ll start recognising exactly when to ease off pressure for soft, misty tones and when to deepen shadows for stronger contrast and depth.
The more you practise, the more natural your shading will begin to feel. Instead of fighting the pencil, you’ll start working with it instinctively – and that’s when your drawings really begin to improve.
Keep experimenting with layering, pencil grades, and pressure control. Your shadows will become smoother, your textures more believable, and your horror artwork far more atmospheric and intentional.
Before long, you’ll look back at older drawings and realise just how much control and confidence you’ve developed.
What You’ve Learned:
- Pencil pressure controls the smoothness and depth of your shading, and pressing harder doesn’t always create better shadows.
- Light pressure and gradual layering create smoother gradients and help protect the texture of your paper.
- Different pencil grades react differently to pressure, with softer pencils producing darker tones more easily.
- Layering graphite slowly builds richer, more atmospheric shadows than forcing dark tones too early.
- Consistent hand pressure helps create even shading, while uneven pressure leads to patchy or streaky tones.
- Small, overlapping strokes help smooth transitions and fill paper texture more naturally.
- Pressure control is essential for creepy textures and horror atmosphere, from soft misty effects to deep cracked shadows.
- Using multiple pencil grades together gives you greater tonal range without damaging the surface of the paper.
- Regular practice exercises train muscle memory, helping your hand recognise light, medium, and dark pressure more naturally over time.
Related Posts
If you want to keep improving your shading control and atmospheric drawing skills, these posts will help:
- Basic Shading Techniques for Beginners Overview
A beginner-friendly guide to building smoother shading, cleaner gradients, and better pencil control. - Shading and Lighting Techniques for Horror Art (Complete Guide)
Learn how shadows and lighting can create stronger atmosphere, depth, and tension in horror drawings. - Shading Techniques for Creepy Drawings
Explore shading methods for eerie textures, dark contrasts, and unsettling horror details.