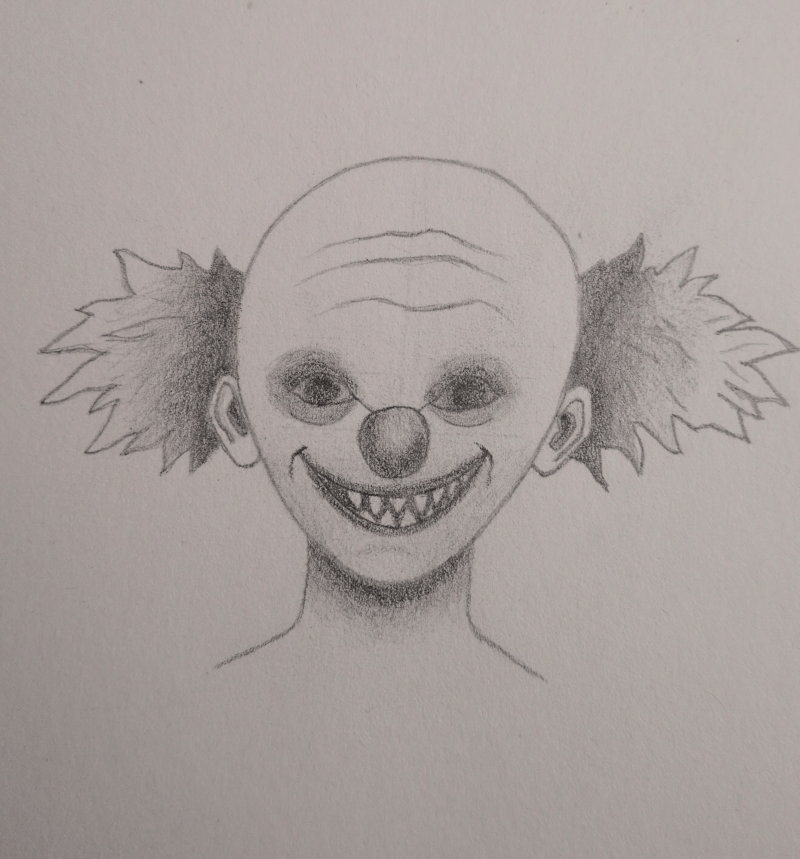
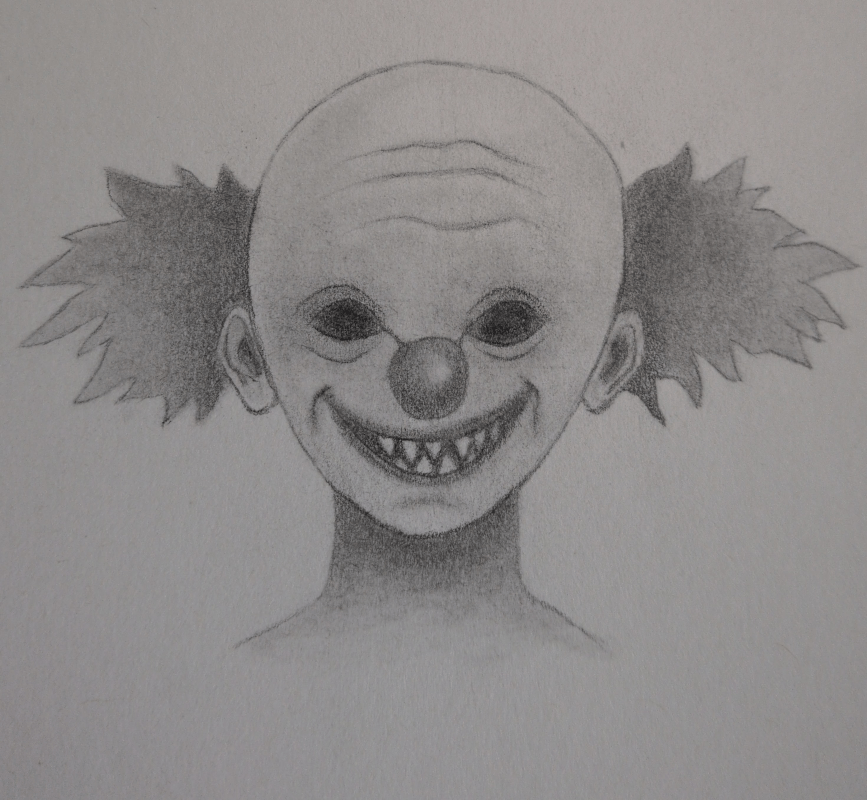
How to Draw a Scary Clown for Beginners (Step-by-Step Tutorial)
Learn to draw a scary clown using simple shapes, soft shading, and clear proportions. This tutorial walks you through creating a creepy clown face with hollow black eyes and sharp, unsettling teeth, giving your character that classic “this clown definitely doesn’t do birthday parties” energy without making things overly complicated. It’s perfect for beginners who want to explore horror art while keeping the process simple and manageable.
You’ll focus on exaggerated features like stretched smiles, dark eye sockets, and subtle distortions that turn an ordinary clown into something far more sinister. Small changes in shape and shading can completely shift the mood, taking your character from playful to deeply uncomfortable in just a few pencil strokes.
Whether your clown looks quietly menacing or like it’s about to ruin someone’s entire day, this guide will help you build confidence while learning the basics of expressive horror faces.
Tools You’ll Need:
You don’t need anything complicated to draw a scary clown. A few basic tools will do the job perfectly, especially if you’re just getting started.
- Pencil (HB or 2B)
Great for sketching your initial shapes and outlines. - Softer Pencil (4B)
Ideal for adding darker shadows, especially around the eyes and inside the mouth. This is where things start to get unsettling. - Eraser
Useful for cleaning up sketch lines and adding small highlights. - Blending Tool (or tissue/cotton bud)
Helps smooth out shading, especially around the eyes and face. Perfect for creating that soft, shadowy look that makes the features feel more hollow and eerie. - Paper
Any sketch paper will work. Smooth paper is great for clean shading, while slightly textured paper can add a bit of grit to your drawing.
Before You Start (Quick Tips)
Before jumping into the steps, a few small tips will make the process much easier:
- Keep your lines light at the beginning
You’ll be adjusting shapes as you go, so avoid pressing too hard early on. - Focus on shapes first, not details
Build the head, eyes, and mouth using simple shapes before adding anything creepy. - Don’t aim for perfection
Slight imperfections actually make horror characters look better. A wonky smile or uneven eyes can make your clown feel more unsettling.
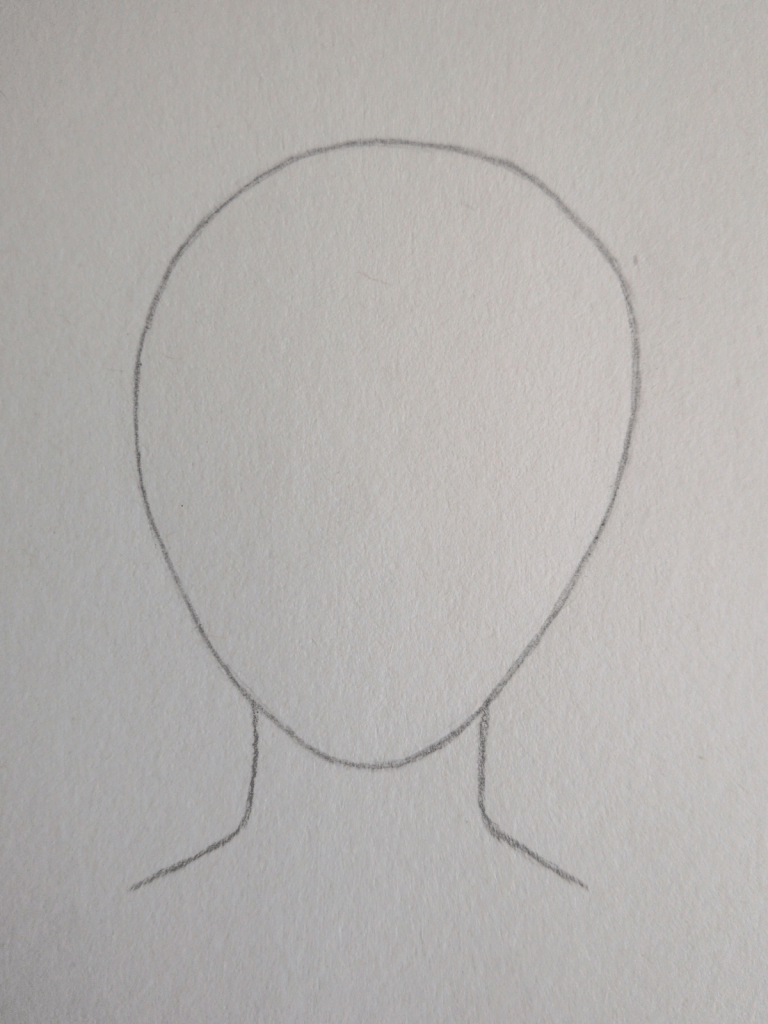
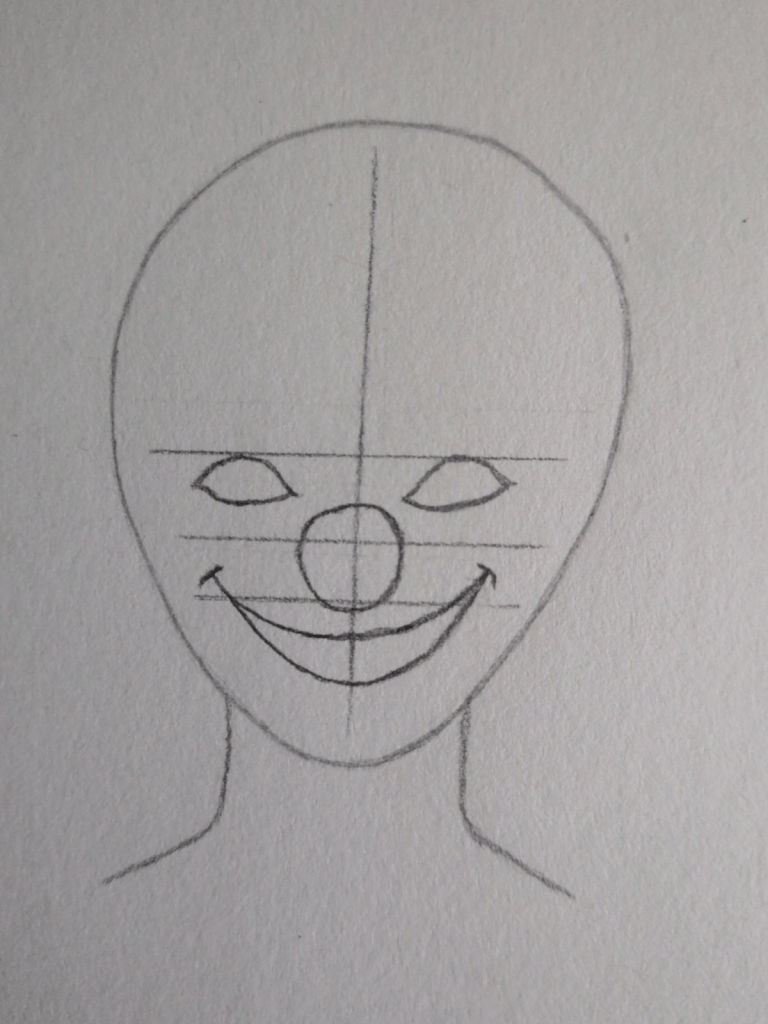
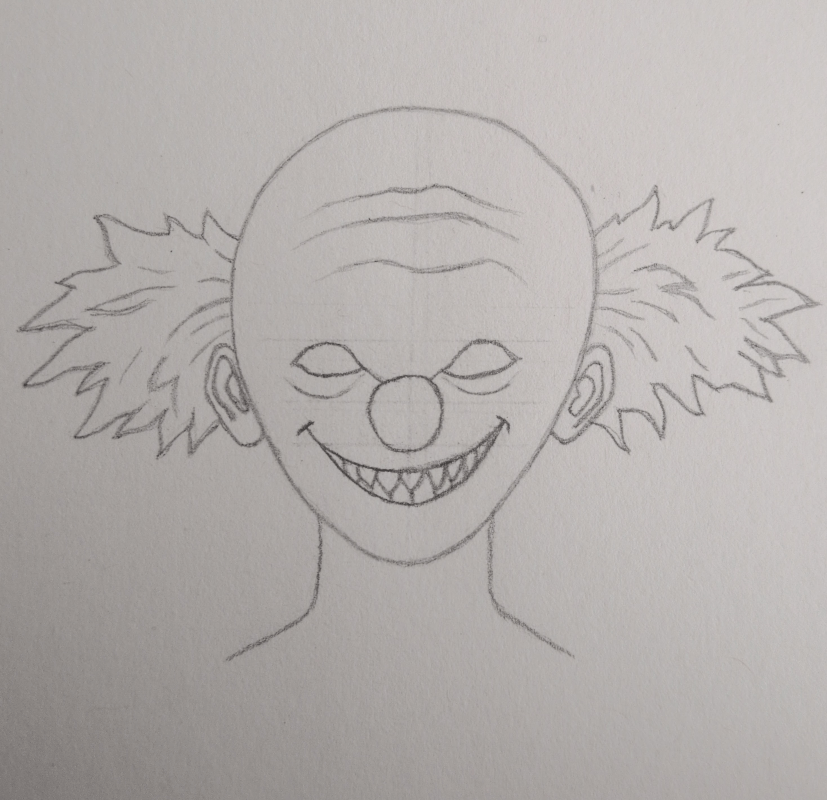
Step 1: Draw the Head and Neck Outline
Start by sketching a simple head shape using light pencil lines. Aim for a rounded shape at the top, then gently narrow it down towards the chin to create a slightly tapered face. Don’t worry about making it perfectly symmetrical; small imperfections will actually help later when we start adding creepy features.
Once you’re happy with the head shape, draw the neck by adding two lines coming down from just under the jaw. Let these lines curve slightly outward as they go down to keep the shape looking natural. You can then lightly suggest the shoulders with soft, shallow lines at the bottom.
Keep everything very light at this stage, as this is just your base structure and will be adjusted as you go.
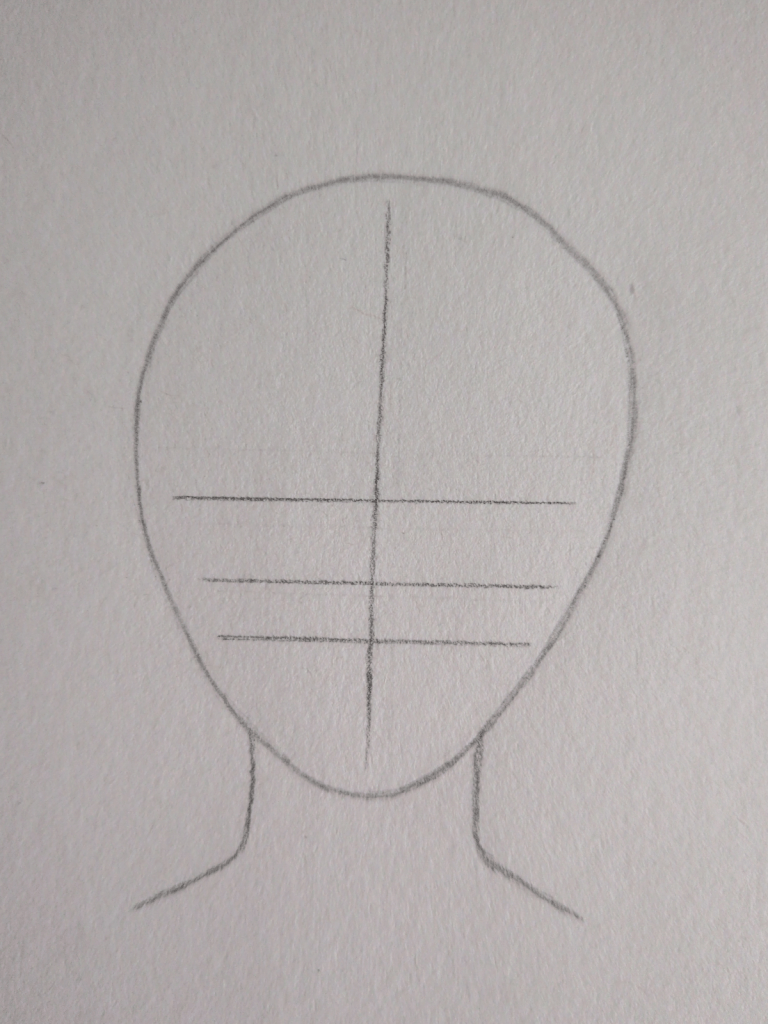
Step 2: Add Face Guidelines
Now that you have your head and neck outline, it’s time to add some simple guidelines to help position the facial features.
Start by drawing a vertical line down the centre of the face, running from the top of the head to the chin. This will help keep everything aligned as you build your character.
Next, draw a horizontal line across the middle of the face for the eyes. This should sit roughly halfway down the head.
Below that, add a second horizontal line to guide the placement of the nose, leaving a small gap between the two lines.
Finally, draw a third horizontal line lower down to mark where the mouth will go later on.
Keep all of these lines light and simple, as they’re only there to guide you. You can adjust them as needed while building the rest of the face.
Step 3: Add the Eyes, Nose, and Mouth
Now it’s time to start bringing your clown to life by adding the basic facial features.
Start with the eyes by sketching two simple curved shapes along the top guideline. Keep them slightly angled rather than perfectly round, as this helps avoid a cute look and gives your clown a more eerie feel. Don’t worry about details yet; focus on the overall shape and placement.
Next, draw a circle in the centre of the face for the nose, using the middle guideline as a reference. Keep it simple and centred on the vertical line.
For the mouth, use the lowest guideline to sketch a wide, curved smile. Let the corners lift slightly upwards and extend out a little to create that classic clown expression. You can add a second, softer curve underneath to suggest the lower part of the mouth, but keep everything light and adjustable for now.
At this stage, focus on placing the shapes in the right place rather than making them perfect. You can refine and exaggerate everything later to make your clown look more unsettling.
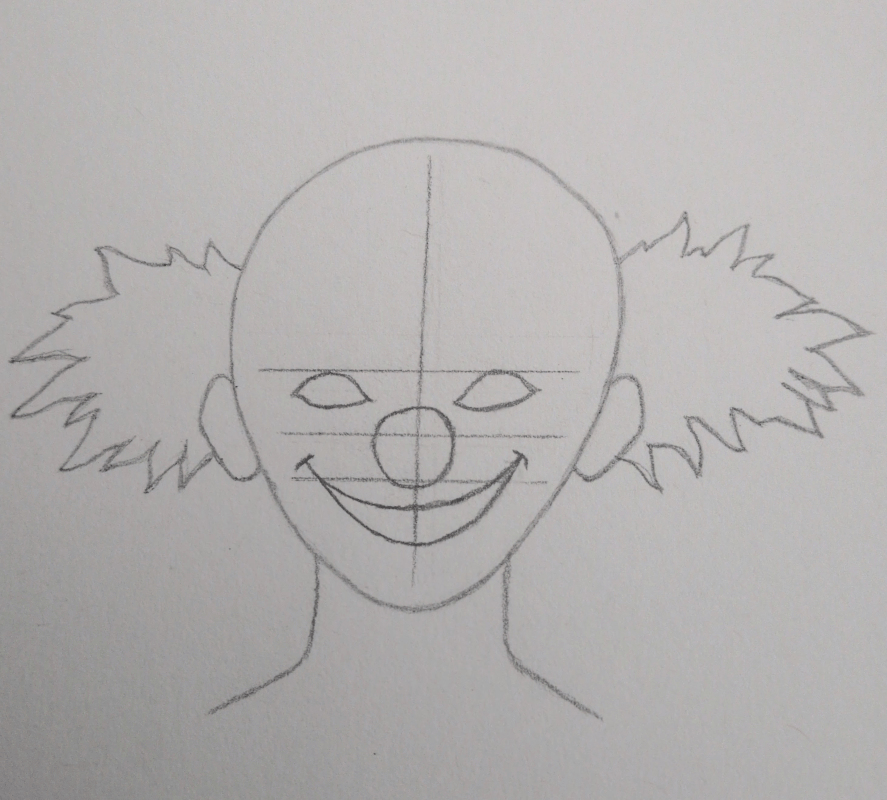
Step 4: Add the Ears and Hair
Now it’s time to build out your clown’s silhouette by adding the ears and hair.
Start by sketching the ears on each side of the head. Place them roughly between the eye line and the nose line, keeping the shapes simple and slightly rounded. You don’t need to add much detail here, just a basic outer shape and a light inner curve to suggest the structure.
Next, add the hair by drawing loose, jagged shapes on either side of the head. Begin where each ear meets the side of the head and work outward using quick, uneven strokes to create a messy, fluffy look. Try to avoid making both sides perfectly identical, as slight differences will make the hair feel more natural and a bit more chaotic.
Keep your lines light and sketchy so you can adjust the shape as you go. At this stage, you’re just building the overall form rather than focusing on fine details.
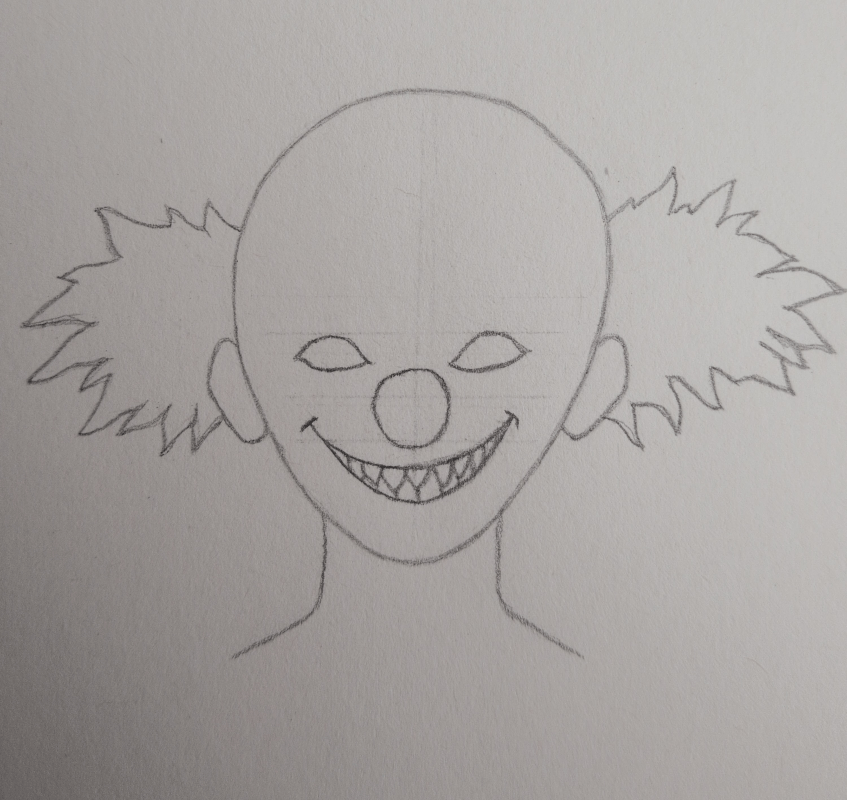
Step 5: Add the Teeth and Remove the Guidelines
Now it’s time to add the teeth and clean up your sketch.
Start by drawing a light horizontal line inside the mouth area to separate the top and bottom teeth. Then add small vertical or slightly angled lines to suggest individual teeth. Keep these shapes simple and don’t worry about making them perfectly even, as slight variations will make the smile look more natural and more eerie.
Once you’re happy with the teeth, begin lightly removing the facial guidelines, starting with the horizontal lines and leaving the centre line in place for now if it still helps with alignment.
Take your time with this step. Keeping your lines clean and simple will make the next stages much easier.
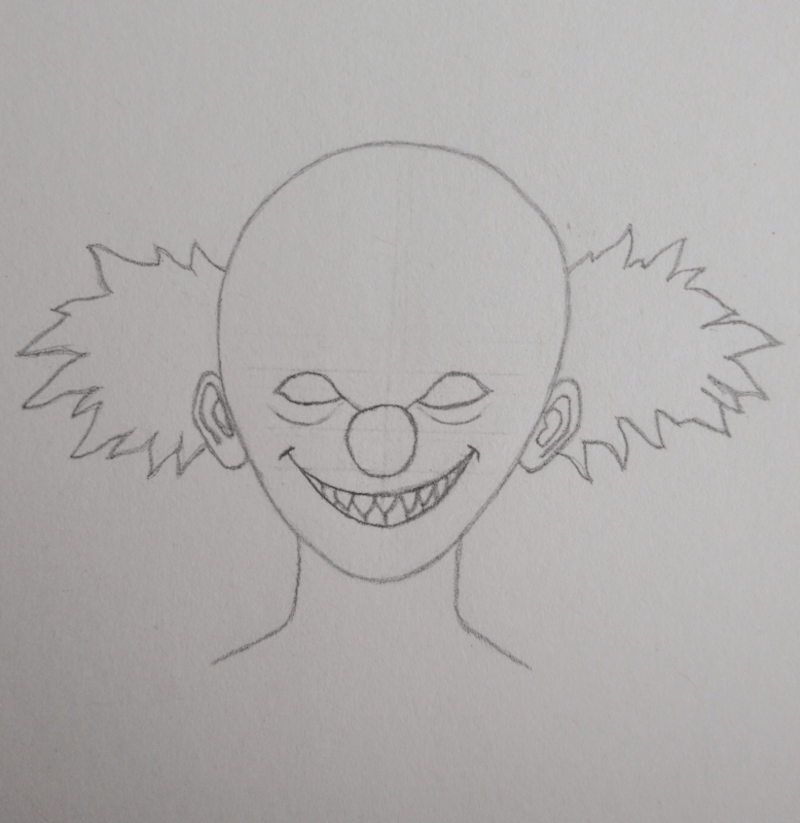
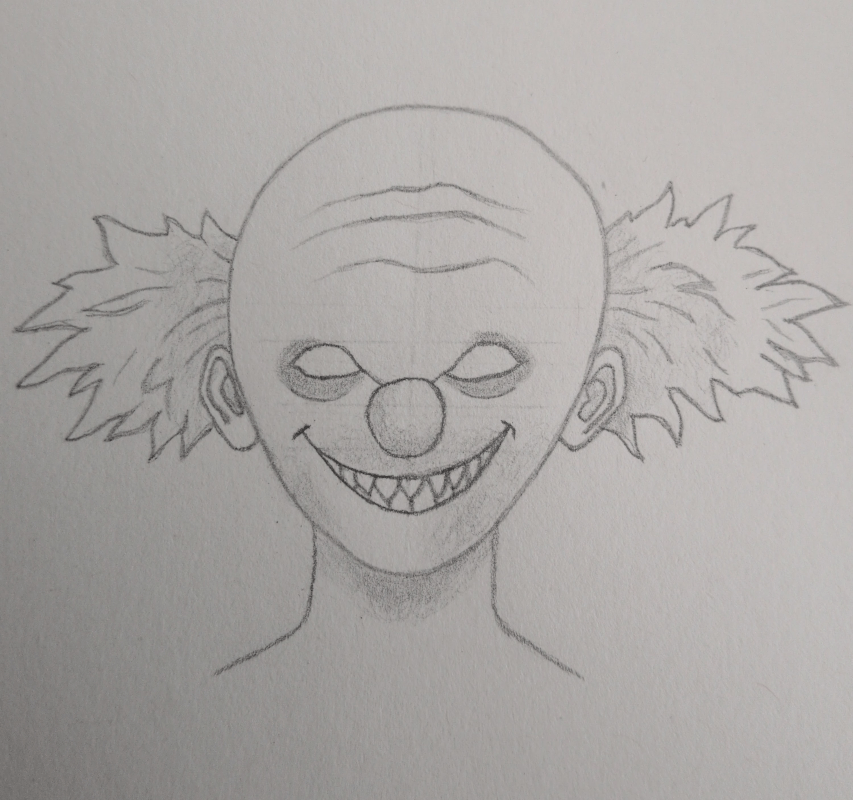
Step 6: Add Subtle Face and Ear Details
Now we’re going to add a few small details to give the face a little more personality.
Start by drawing a light line underneath each eye. Keep these lines soft and close to the eyes, following their shape. To make them look more natural, let the lines be slightly darker in the middle and fade out toward the ends. This creates a subtle, slightly tired look without needing any shading.
Next, draw a light line from the inner corner of each eye, letting it curve gently down toward the sides of the nose. Keep these lines soft and simple. They don’t need to be perfectly curved, just lightly placed to suggest the natural structure of the face.
Then, add simple inner ear lines using one or two gentle curves inside each ear to suggest structure. Don’t overthink it, we’re just hinting at detail here.
Step 7: Add Wrinkles and Hair Texture
Now we’re going to add a little extra detail to bring the clown to life.
Start by drawing 2-3 light, slightly curved lines across the forehead. These should be soft and uneven rather than perfectly straight, to give a more natural look.
Make the lines slightly darker in the middle and lighter toward the sides, so they fade out gently instead of stopping abruptly.
Next, add a few short lines inside the hair on each side. Follow the direction of the spiky shapes, drawing the lines outward from the head. Keep these lines light and spaced out. You’re just suggesting texture, not filling everything in.
Try not to overdo it here. A few simple lines will make a surprisingly creepy difference.
Step 8: Add Light Shading (HB Pencil)
Now we’re going to add some very light shading to give the face more depth. Use an HB pencil and keep your pressure soft so everything stays easy to adjust.
Start by adding gentle shading under each eye, using small circular motions. This helps define the eye area without making it too dark.
Next, lightly shade around the nose, focusing on the sides and a small amount underneath to give it a more rounded shape.
Add a soft layer of shading around the mouth, including a small amount above the top lip. Keep this very light so the smile and teeth still stand out clearly.
Then, add subtle shading to the cheek areas, keeping it smooth and faint so it blends naturally into the face.
You can also add a little shading inside the hair near the face, keeping it light and following the direction of the hair to suggest depth without fully shading it in.
Add a soft shadow inside the ears to give them a bit more structure, and finally, shade under the chin, making it slightly darker in the centre and lighter as it fades out.
⚠️ Keep in mind:
This shading should be very light and buildable. If it looks too obvious straight away, it’s probably too dark.
Step 9: Deepen Your Shading (2B Pencil)
Now we’re going to build on the shading you added in the previous step and give it a bit more depth.
Using a 2B pencil, gently go over all the areas you already shaded with your HB pencil. This helps strengthen the shadows without starting from scratch.
Focus on:
- Around the eyes (keeping it soft, not fully filled in)
- The sides of the nose
- Under the top lip and around the mouth
- The ears (especially the inner areas)
- The hair closest to the face
- Under the chin and along the neck
You can also lightly go around the mouth to define the shape a bit more.
Blending Tip:
To keep everything looking smooth and beginner-friendly, go back over the areas where your HB and 2B shading meet using your HB pencil.
Use light pressure and small circular motions to soften the transition so it blends nicely rather than looking patchy or harsh.
👉 Think of it as merging the two shades together rather than layering more on top.
⚠️ Keep It Soft
At this stage, your drawing should still look:
- Light overall
- Smooth and blended
- Not too dark or high contrast yet
We’re building depth, not jumping straight to the final darkness.
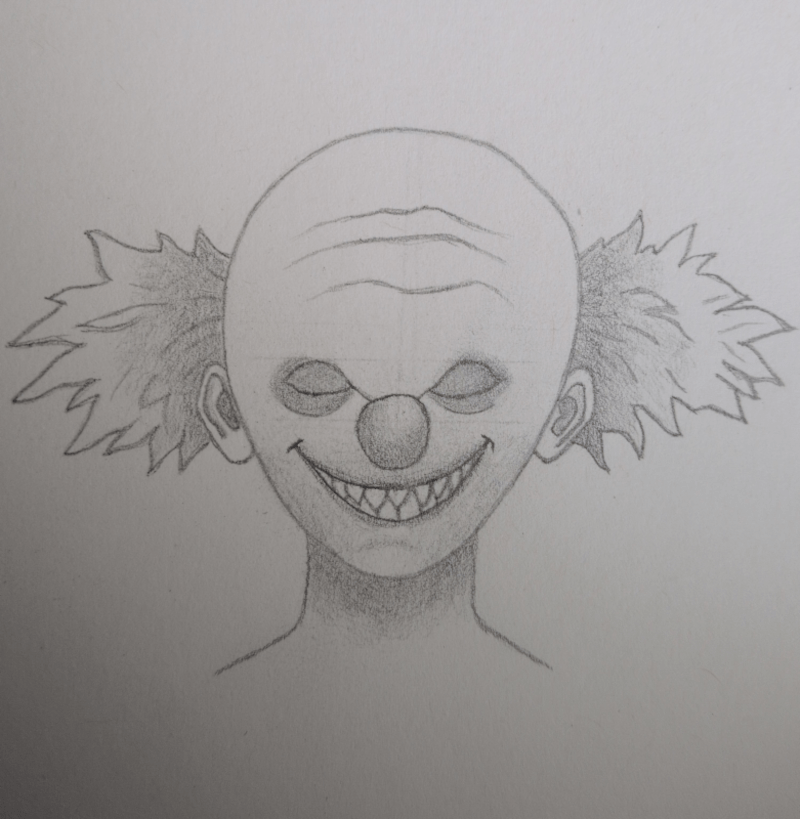
Step 10: Build Up Darker Shading for Depth
Now we’re going to deepen the shading to add stronger contrast and make the features stand out more.
Using a 2B pencil, go over the areas you previously shaded to make them darker. Focus on the hair near the head, the eyes, the nose, around the lips, inside the ears, and under the chin.
Build the shading gradually and keep your pressure controlled so it doesn’t become too harsh too quickly.
If any areas start to look too strong or patchy, lightly go back over them with your HB pencil to soften the transition and blend everything together. This helps keep the shading smooth and prevents harsh edges.
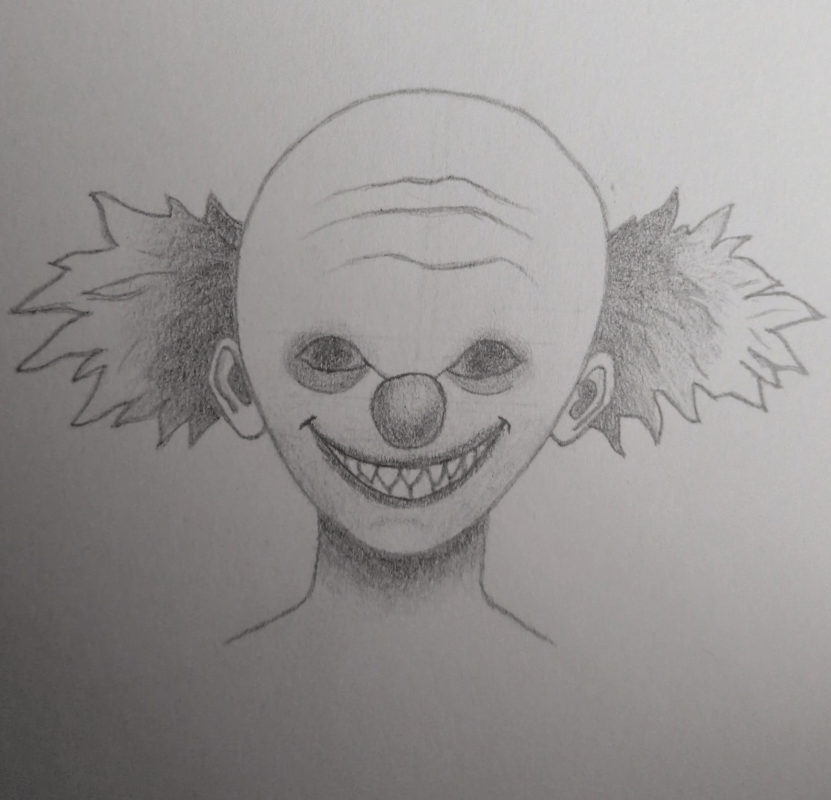
Step 11: Strengthen Shadows (4B Pencil)
Using a 4B pencil, go over the areas you already shaded to deepen the shadows and add more contrast.
Focus on:
- Above the eyes (to create a hollow look)
- Inside the eyes (these should be the darkest areas)
- Around the mouth and corners of the smile
- Between the teeth (keep this light so they don’t blend together)
- Inside the ears (darker in the inner parts, lighter toward the edges)
- Hair closest to the face
- Under the chin and along the neck
You can also slightly extend the ends of the smile using light pressure to make the expression look more unsettling.
Keep It Controlled:
Use light pressure and build up the shading slowly. You can always go darker, but it’s harder to fix areas that are too heavy.
⚠️ Too Dark?
If areas start to look too dark, especially around the eyes:
👉 Gently use an eraser to lift a bit of graphite and bring back some light.
Step 12: Blend the Shading (Including the Forehead)
Using a blending tool (blending stump, tissue, or cotton bud), gently blend all your shaded areas to smooth the transitions.
- Start in the darker areas (eyes, hair, under the chin)
- Then blend outward into the lighter areas
What to Blend:
- Eyes: soften the edges to create that sunken look
- Neck shadow: blend upward so it fades naturally
- Cheeks and around the mouth: remove any harsh pencil lines
- Hair (near the face): lightly soften where it meets the head
- Forehead: Lightly blend across the forehead as well so that it isn’t left plain white.
Keep it very soft and light, just enough to match the rest of the face without losing highlights.
⚠️ Important Tip
- Use very light pressure on the forehead and upper face
- Don’t fully blend out your darkest areas, or you’ll lose contrast
Step 13: Refine and Sharpen the Details
After blending, your drawing may look soft. Now we bring back definition.
Using a 2B pencil (and optionally 4B), lightly go back over the areas you already shaded to make them clearer and more defined.
What to Focus On:
- Eyes
Darken the centres slightly and keep the edges soft - Mouth, Nose & Teeth
Darken between the teeth, sharpen the smile a little, and gently reinforce the nose shading while keeping a soft highlight - Hair & Neck Shadows
Deepen the shading closest to the face and under the chin to add contrast
⚠️ Tip:
Don’t redraw everything. Just refine what’s already there.
Keep your lines soft, not heavy outlines.
A slight darkness above the eyes is normal and helps create that sunken, eerie look.
Step 14: Refine Edges & Add Definition
Now it’s time to bring back clarity and sharpen the details.
Start by cleaning up your edges using an eraser, removing any shading that’s gone outside the outline of the head, hair, and neck.
Next, go in with your pencil and redefine your outlines:
- Head shape
- Hair edges
- Ears
- Neck
- Mouth and teeth
Keep your lines light and controlled, not heavy. You want them to guide the eye, not overpower the shading.
Then refine the eyes:
- Darken the inner eye areas slightly
- Define the line under the eyes
- Add a soft line above the eyes to give them more form
This step sharpens everything and helps the features stand out clearly again.
Step 15: Add Highlights & Final Adjustments
Now it’s time to finish your drawing by adding highlights and making a few small adjustments to balance everything.
Use an eraser to gently lift graphite and create highlights:
- Add a highlight on the nose to give it a rounded look
- Lighten a few areas on the teeth so they stand out more
- Add a soft highlight to the centre of the forehead to reduce flatness
Next, make a final adjustment to your shading:
- Lightly soften or lift the neck shading if it feels too dark
- Keep the darkest area just under the chin so the head still stands out
Take a step back and check your drawing. You’re looking for a good balance between light and dark, with no area overpowering the rest.
Keep everything subtle. Small changes at this stage make a big difference.
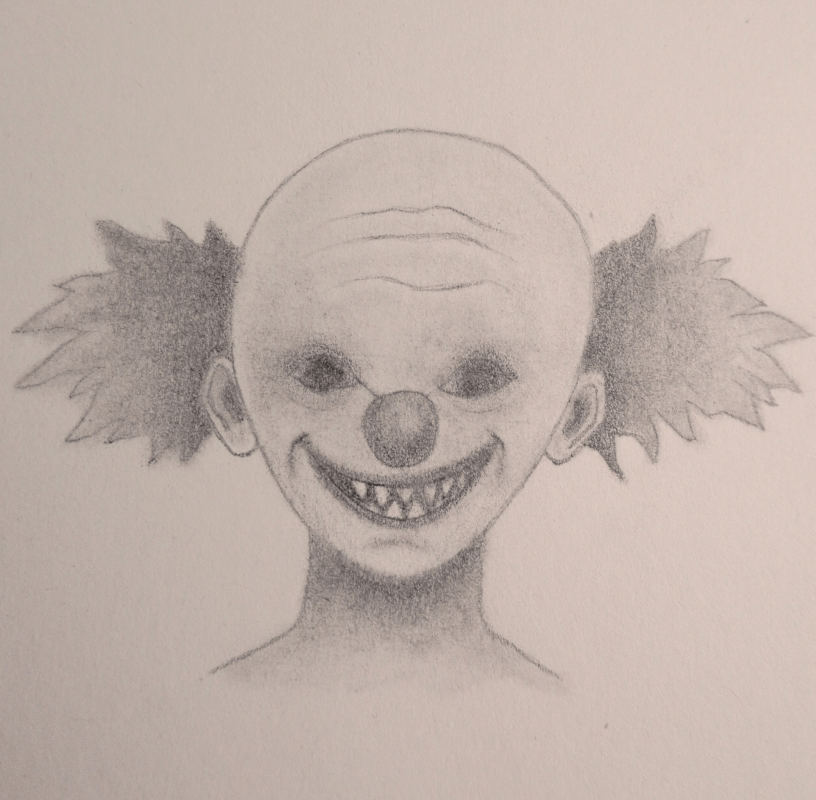
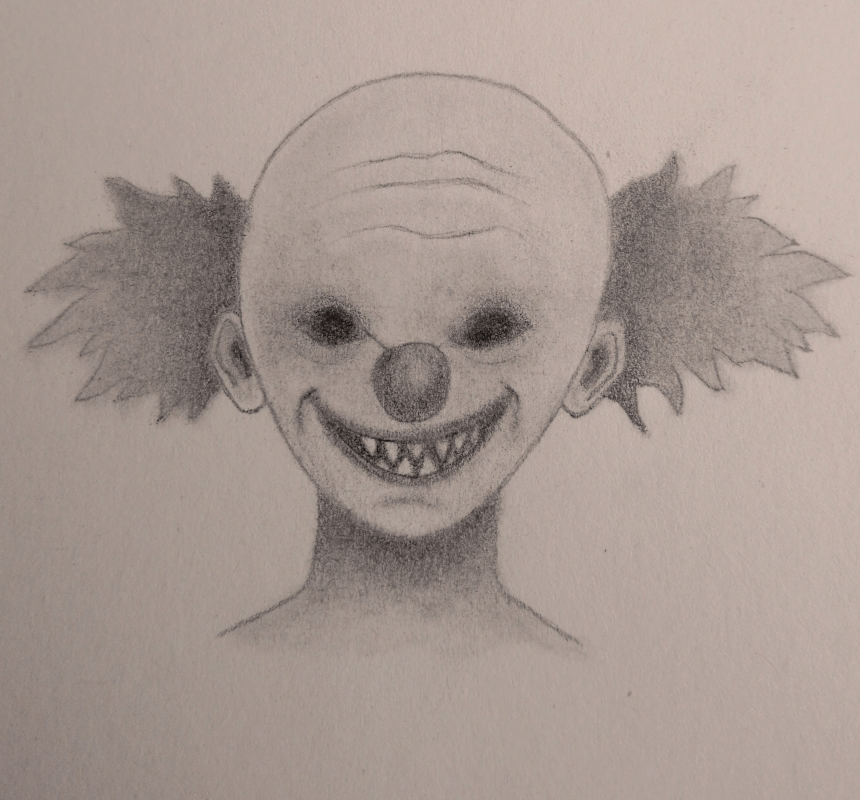
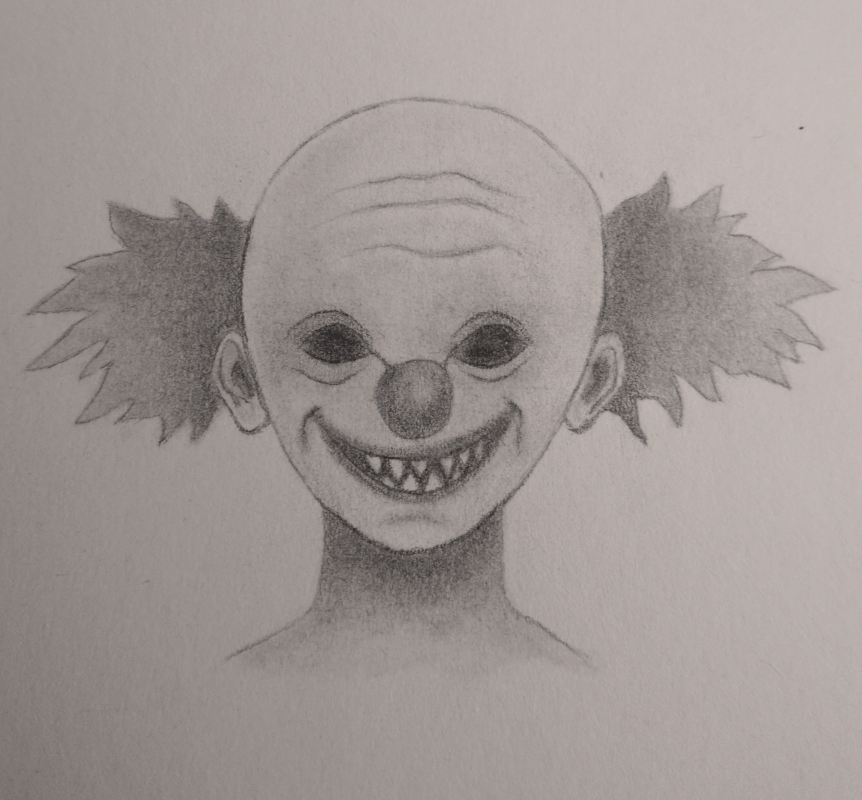
Final Thoughts
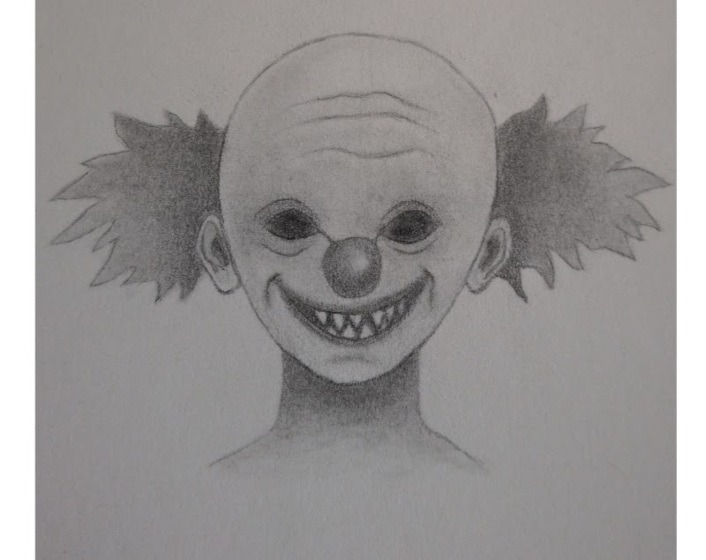
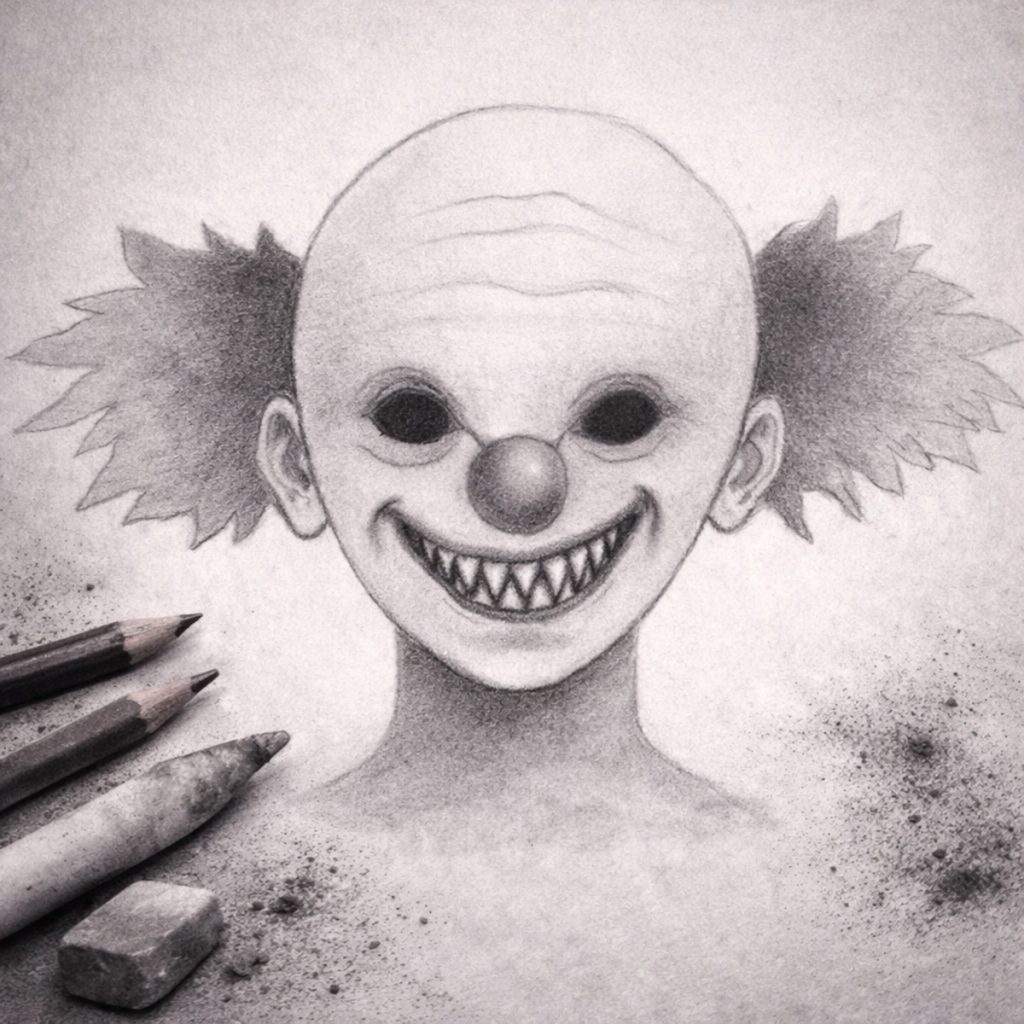
And there we have it, your creepy clown is complete🎈
From the first light sketch lines to the final shadows and highlights, you’ve built this drawing step by step and brought it to life with depth, contrast, and detail. If your clown turned out a little different, that’s completely okay. Those small differences are what make your artwork unique and help give it its own eerie character.
Don’t worry if some parts felt tricky, especially the shading and blending stages. Those are often the steps that take the most practice, and every drawing helps build your confidence and improve your technique.
The most important thing is that you stayed with it all the way to the end, and now you have a finished horror drawing to be proud of. What started as a few simple pencil lines has somehow become the sort of face that looks like it knows exactly where you live and still insists it’s “just here to entertain the children.”
Keep practising, keep experimenting with darker shadows and highlights, and most of all, enjoy the process. Every drawing teaches you something new, and each one gets you a little closer to the style and atmosphere you want to create.
Stay spooky, and keep those pencils sharp ✏️🖤
More Beginner Horror Character Tutorials
If you enjoyed drawing this creepy clown and want to keep building your confidence with simple horror characters, here are a few more beginner-friendly tutorials to try next. Each one focuses on easy shapes, soft shading, and spooky personality without overwhelming detail.
- Haunted Doll Drawing Tutorial
Create an eerie doll character using soft facial features, empty eyes, and subtle shading. This is perfect for practising proportions and adding quiet, unsettling expression to your horror characters. - Creepy Pumpkin Drawing Tutorial
Draw a classic spooky pumpkin with bold shapes, carved features, and an eerie grin. A great way to practise contrast, symmetry, and expressive horror details. - Ghost Drawing Tutorial for Beginners
Follow along with a simple ghost drawing that focuses on smooth outlines, soft shadows, and gentle blending. Ideal for practising clean shading transitions and soft gradients.