Circle Templates (Stencils) for Horror Art
Because Drawing Perfect Circles by Hand Is Harder Than It Looks
Drawing circles by hand can be surprisingly difficult. What looks simple often turns into uneven shapes that can throw off the rest of your drawing.
Circle templates solve that problem by letting you create clean, accurate circles quickly and consistently. Instead of worrying about getting the shape right, you can focus on adding the details, shading, and atmosphere that bring your artwork to life.
In horror art, circles appear everywhere. They can be used for monster eyes, ritual symbols, moons, clocks, potion bottles, portals, and countless other details. Circle templates help keep these shapes neat and symmetrical while still allowing plenty of room for creative textures, cracks, shadows, and other horror effects.
They’re simple tools, but they can save time, improve accuracy, and make drawing circular shapes far less frustrating.
What You’ll Learn:
In this guide, you’ll learn how circle templates can help you create cleaner, more accurate horror artwork while still keeping your drawings atmospheric and full of character.
- What circle templates are and how they work
- Why circle templates are useful for monster eyes, ritual circles, moons, potion bottles, and machinery
- The differences between standard, ellipse, large circle, and mixed-geometry templates
- How to use templates without making your artwork feel stiff or overly perfect
- Ways to combine accurate shapes with texture, damage, and atmosphere
- Common mistakes to avoid when working with templates
- Simple tips for caring for your templates and keeping them accurate
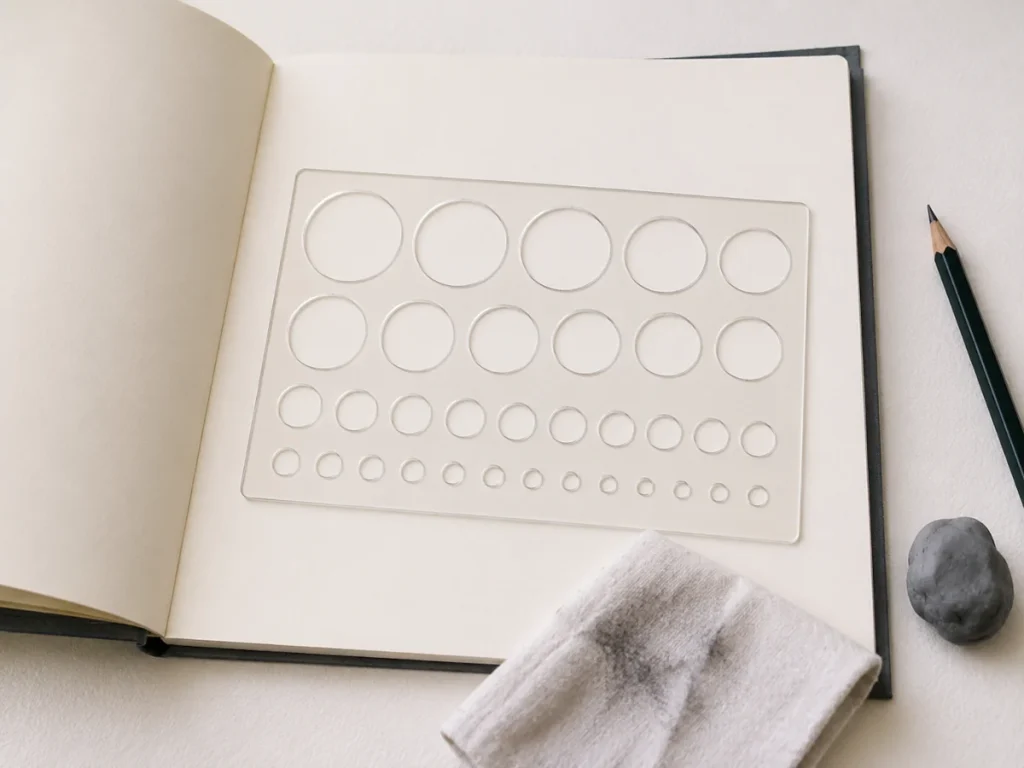
What Are Circle Templates?
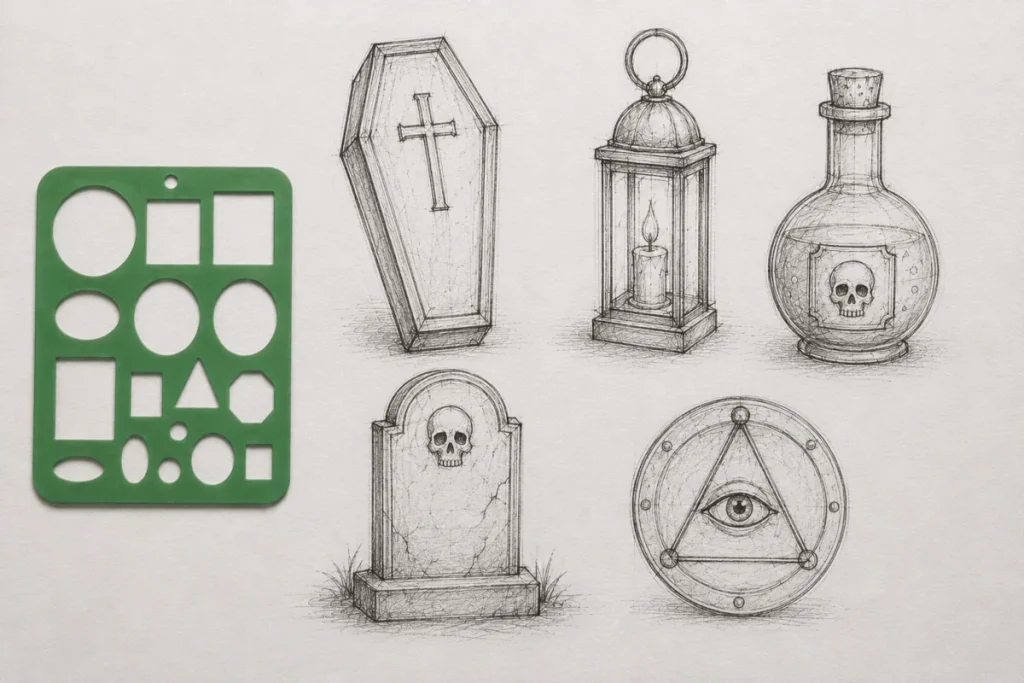
Circle templates are thin plastic sheets with pre-cut circular holes in a range of sizes. Simply place the template on your paper, choose the circle that fits your needs, and trace around it to create a clean, accurate circle.
They’re simple, beginner-friendly tools that help artists create consistent circular shapes quickly and easily. Since circles appear in many areas of horror art, circle templates can be surprisingly useful additions to your drawing kit.
There are several types available, including standard circle templates, ellipse templates for angled shapes, and larger templates designed for technical or decorative work. However, a basic circle template is more than enough for most artists getting started.
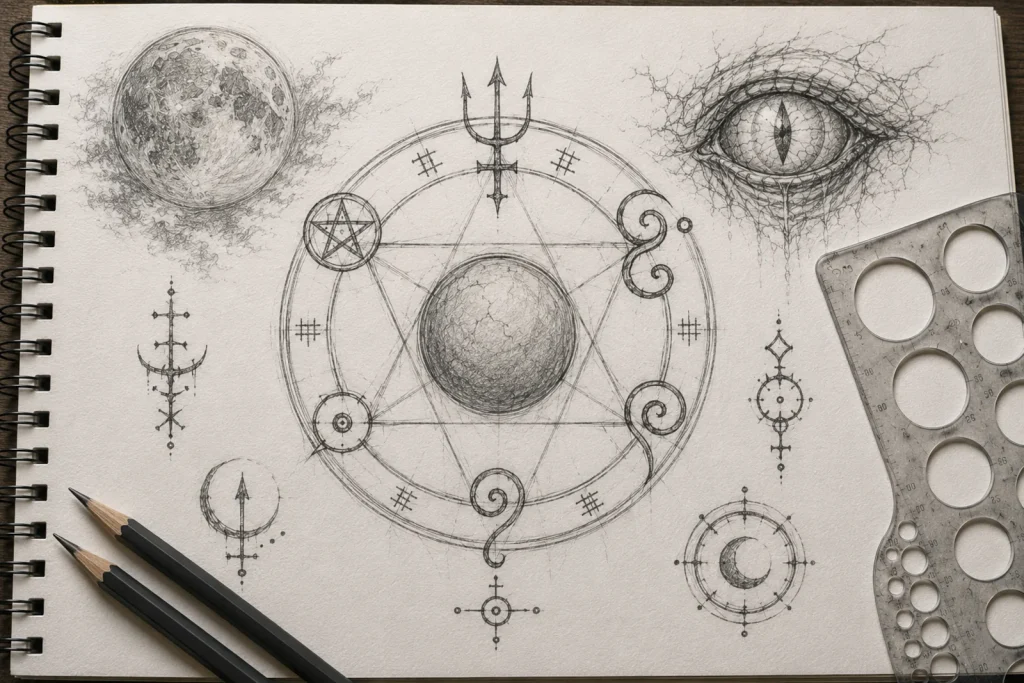
Circle templates are useful for drawing monster eyes, moons, bottle tops, ritual circles, glowing orbs, and countless other circular elements that appear throughout horror artwork.
Why Horror Artists Love Circle Templates

Circle templates are incredibly versatile and can be used in many areas of horror art:
- Monster Eyes
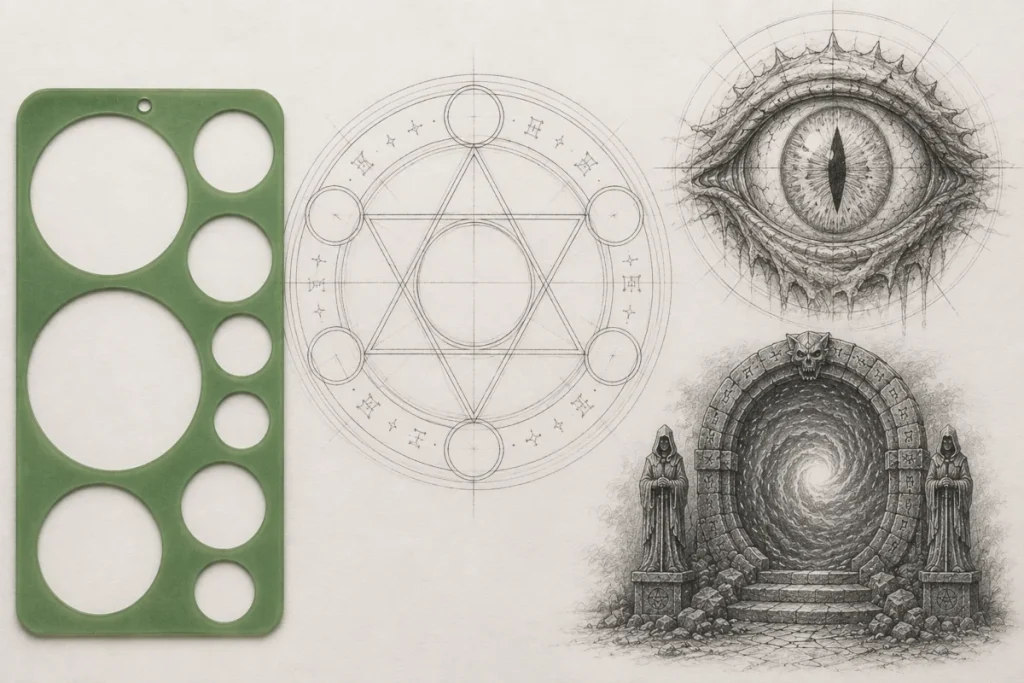
Clean circular shapes help keep both eyes the same size, making glows and highlights look more intentional. - Ritual and Occult Symbols
Perfect circles provide a strong foundation for sigils, summoning circles, and magical designs. - Moons and Celestial Shapes
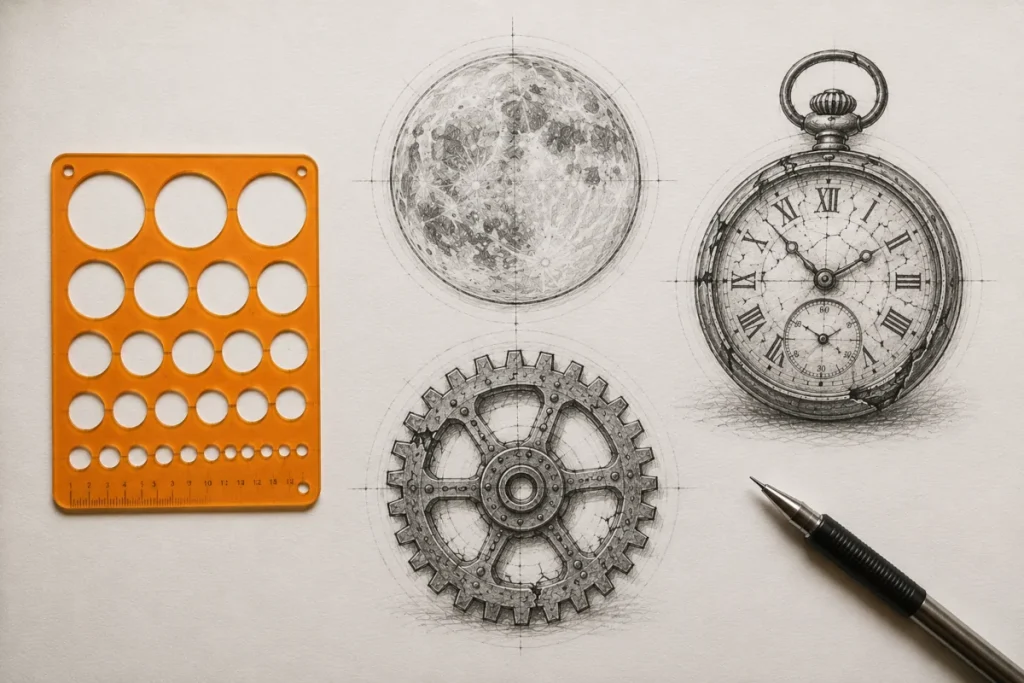
Templates help create smooth moon shapes and other circular elements for night scenes. - Potion Bottles and Mechanical Details
They’re useful for bottle tops, knobs, gears, clock faces, and similar circular objects. - Compositions and Layouts
Circles can help guide the viewer’s eye and create stronger visual balance within a drawing.
Circle templates can also save time, improve consistency, and reduce frustration. Instead of repeatedly redrawing circles and making corrections, you can create clean, consistent shapes quickly and focus more on the creative aspects of your artwork.
Types of Circle Templates
Most artists can get started with a simple circle template. However, there are several different types available, each with its own strengths and uses:
1. Standard Circle Templates
These are the most common and versatile circle templates you’ll find. They contain a range of circular openings of various sizes, making them suitable for everything from simple sketches to detailed artwork.
For most horror artists, this is the only type you’ll need when starting out. A single template can help you create accurate circles quickly without constantly redrawing and correcting shapes by hand.
They’re particularly useful for:
- Monster eyes and pupils
- Potion bottle tops
- Ritual circles and occult symbols
- Moons and celestial objects
- Clock faces and mechanical details
- Circular compositions and design elements
Because the circles are consistent and precise, they help your drawings look cleaner and more professional while still allowing you to add texture, damage, shadows, and other horror details afterwards.
2. Ellipse Templates
Ellipse templates contain oval-shaped openings rather than perfect circles. These shapes are extremely useful whenever you’re drawing circular objects from an angle, because objects rarely appear perfectly round once perspective is involved.
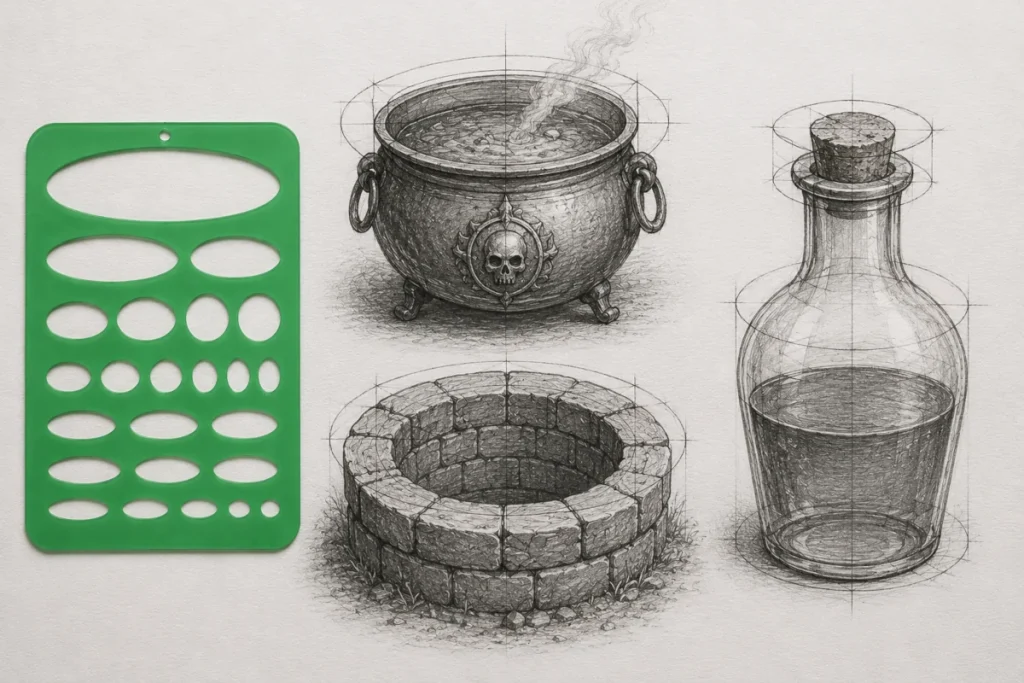
While a circle template is ideal for straight-on views, ellipse templates help you create realistic openings, rims, and curved surfaces that look properly positioned in space.
They’re particularly useful for:
- Cauldrons viewed from above
- Potion bottles and jars
- Bowls and containers
- Candles and candle holders
- Wells and stone pits
- Any circular object seen at an angle
Using ellipse templates can dramatically improve the realism of your drawings, especially when drawing objects viewed from above, below, or at an angle. They help maintain consistent curves and save you from repeatedly correcting uneven freehand shapes.
3. Large Circle Templates
Large circle templates are designed for projects that require larger, more prominent circular shapes than you’ll typically find on standard templates. They’re particularly useful when working on larger drawings or creating design elements that need to dominate the composition.
These templates can save a huge amount of time and frustration when drawing large circles accurately. Freehand circles become increasingly difficult to control as they get bigger, making templates a useful shortcut for achieving clean, consistent results.
They’re especially useful for:
- Ritual and summoning circles
- Large moons and planets
- Spell diagrams and magical symbols
- Portal designs
- Decorative borders and frames
- Large-format illustrations and posters
Because these shapes often act as major focal points within a drawing, keeping them accurate helps the entire composition feel more balanced and professional.
4. Mixed Geometry Templates
Mixed geometry templates contain a variety of different shapes on a single sheet, including circles, squares, rectangles, triangles, and ovals. Rather than focusing on one specific shape, they provide a collection of useful guides that can help with a wide range of drawing projects.
While they’re not as essential as standard circle templates, they can be extremely useful when designing complex scenes that combine multiple types of shapes and structures. Having multiple shapes available on one sheet makes it easy to sketch accurate forms without constantly switching between different tools.
They’re particularly useful for:
- Potion bottles and containers
- Mechanical devices and gadgets
- Architectural details
- Occult symbols and magical diagrams
- Frames, signs, and decorative elements
- Background props and environmental details
Because horror art often combines organic and geometric shapes, mixed geometry templates can be a convenient way to build solid foundations before adding texture, damage, shadows, and other atmospheric details.
How to Use Circle Templates Without Making Your Art Feel Stiff
Circle templates can sometimes feel a little too perfect if every shape in your drawing is perfectly clean and precise. While templates are excellent for creating accurate circles, horror art often relies on texture, atmosphere, and imperfections to feel convincing.
The key is to use templates as a guide rather than letting them control the entire drawing. When combined with freehand details and natural textures, circle templates can help your artwork look both accurate and atmospheric.
Start with a Rough Sketch
Before reaching for your template, lightly sketch your composition freehand. This allows you to explore ideas, adjust proportions, and establish the overall layout without worrying about precision too early.
Once you’re happy with the basic design, use the template to refine only the elements that benefit from precision, such as eyes, moons, ritual symbols, bottle tops, or mechanical details.
A rough sketch keeps your drawing feeling natural and expressive. The template should support your design, not replace your own creative decisions.
Use a Light Touch
When tracing around a template, use gentle pressure and allow the pencil to glide smoothly around the edge. Pressing too hard can leave dents and grooves in the paper that become visible later when you shade.
These indentations often catch graphite, creating unwanted dark lines that can be difficult to remove. Using a light touch keeps your paper surface clean and gives you more flexibility as the drawing develops.
Remember that the template is simply helping you establish the shape. You can always strengthen and darken the lines later once you’re confident everything is in the correct position.
Add Texture Afterwards
A perfectly clean circle can sometimes feel out of place in a horror drawing. Once you’ve established the basic shape, you can begin adding the details that create atmosphere and character.
Depending on your subject, this might include cracks, chips, uneven shading, scratches, grime, glowing effects, smoke, ink splatters, or weathered edges. These imperfections help horror artwork feel older, darker, and more believable. The template provides the structure, while your freehand details bring the drawing to life.
This approach allows you to enjoy the template’s accuracy without sacrificing the organic quality that makes horror art so effective.
Layer Circles for Impact
Combining several circles of different sizes can create much more interesting designs than relying on a single shape. This technique is especially useful for occult symbols, magical diagrams, portals, clocks, and decorative compositions.
By layering inner rings, outer rings, and additional details between them, you can build complex designs that feel deliberate and visually striking.
Circle templates make this process much easier because each ring remains evenly spaced and symmetrical, giving your designs a clean foundation before you begin adding textures, symbols, shading, and atmospheric details.
Horror-Friendly Ways to Use Circle Templates
Ritual Circles & Sigils
Circle templates are one of the easiest ways to create convincing ritual circles and occult symbols. A clean, accurate ring provides a strong foundation for the rest of the design and helps the finished piece look deliberate rather than accidental.
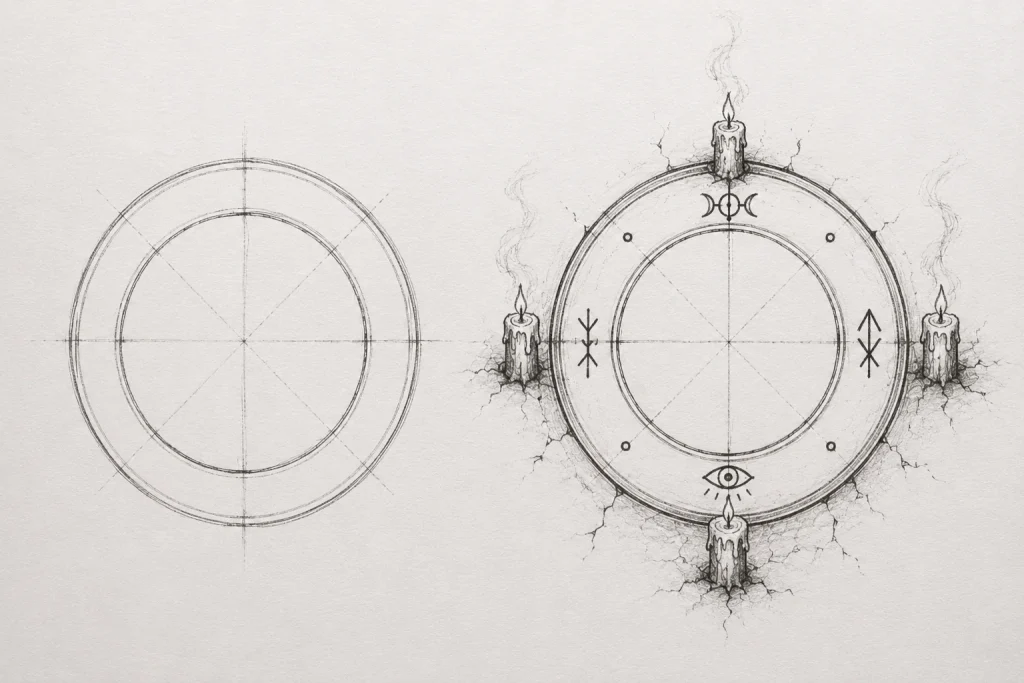
Once the main circle is in place, you can build complexity around it by adding runes, sigils, symbols, candles, cracks, blood trails, chalk marks, smoke, or other supernatural details. The circle provides the structure, while the freehand additions create the atmosphere.
Using multiple circles of different sizes can also help create more elaborate designs. Inner rings, outer rings, and carefully placed symbols can transform a simple shape into a dramatic focal point for your composition, helping draw the viewer’s eye exactly where you want it to go.
Monster Eyes
Monster eyes are often one of the first things viewers notice, which means uneven pupils can accidentally distract from the atmosphere you’re trying to create. Circle templates help keep both pupils and irises consistent, making the creature feel more believable and intentional.
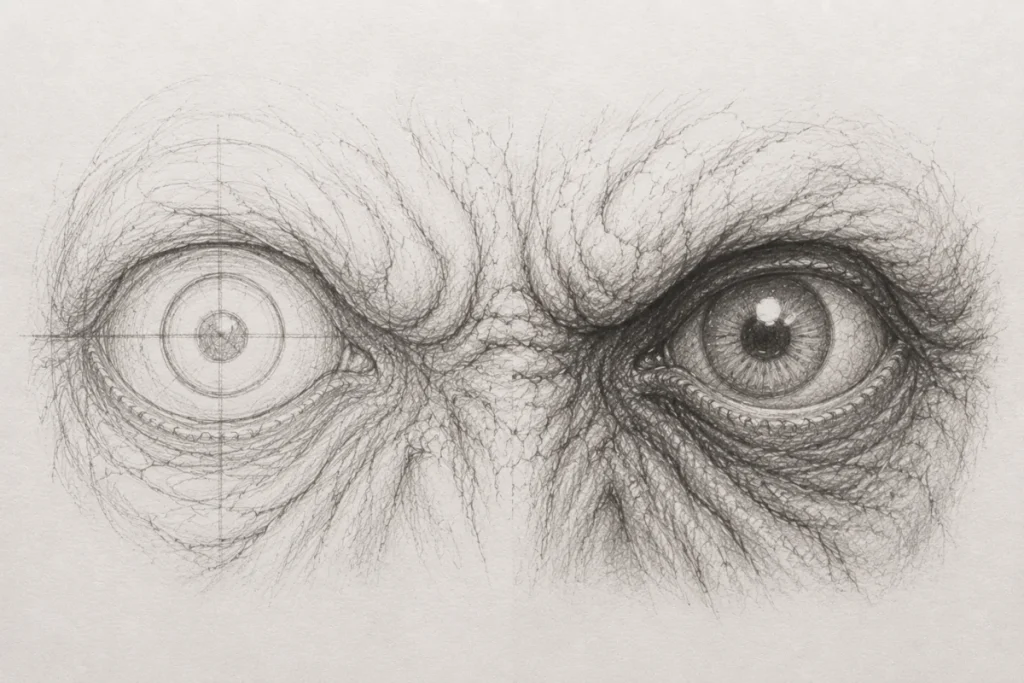
They’re especially useful when drawing large staring eyes, glowing eyes, insect-like eyes, or creatures with exaggerated facial features. Even subtle size differences can make a monster look unintentionally cross-eyed or lopsided, which can weaken the impact of an otherwise strong design.
Once the basic circles are established, you can switch back to freehand work. Add veins, reflections, wrinkles, shadows, highlights, strange textures, or glowing effects to give the eyes personality and make them feel alive (or undead).
Moons & Celestial Designs
A well-drawn moon can instantly strengthen the mood of a horror scene, often becoming one of the most important focal points in the composition. Whether you’re drawing a full moon above a haunted forest, a crescent moon behind a gothic castle, or a glowing celestial object in a supernatural landscape, a clean circular base helps everything feel more convincing.
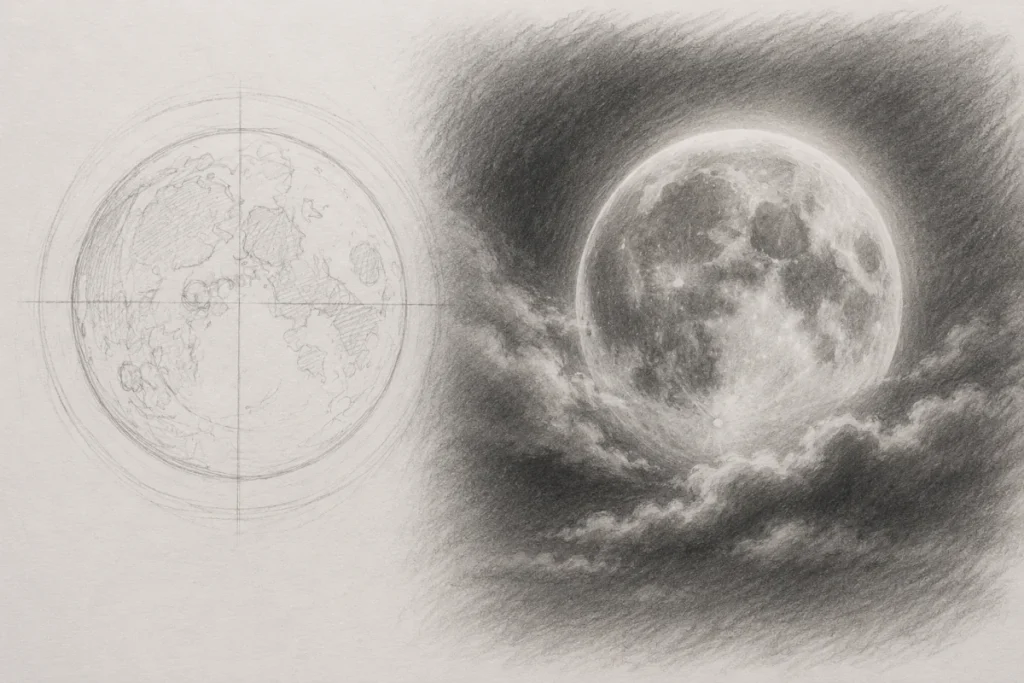
Circle templates remove the guesswork from drawing large circular shapes. Instead of repeatedly correcting uneven curves, you can establish a perfect foundation immediately and spend your time focusing on atmosphere and detail.
Once the basic shape is in place, switch back to freehand techniques. Add craters, glowing halos, drifting clouds, mist, scratches, shadows, or eerie light effects to give the moon character and help it blend naturally into the scene.
The template creates the structure, but the shading and textures are what bring the mood to life.
Potion Bottles & Vials
Potion bottles are full of circular and curved shapes, making circle templates surprisingly useful when designing them. They help create clean bottle bases, symmetrical glass bodies, cork openings, labels, stoppers, and decorative seals without constantly correcting uneven curves.
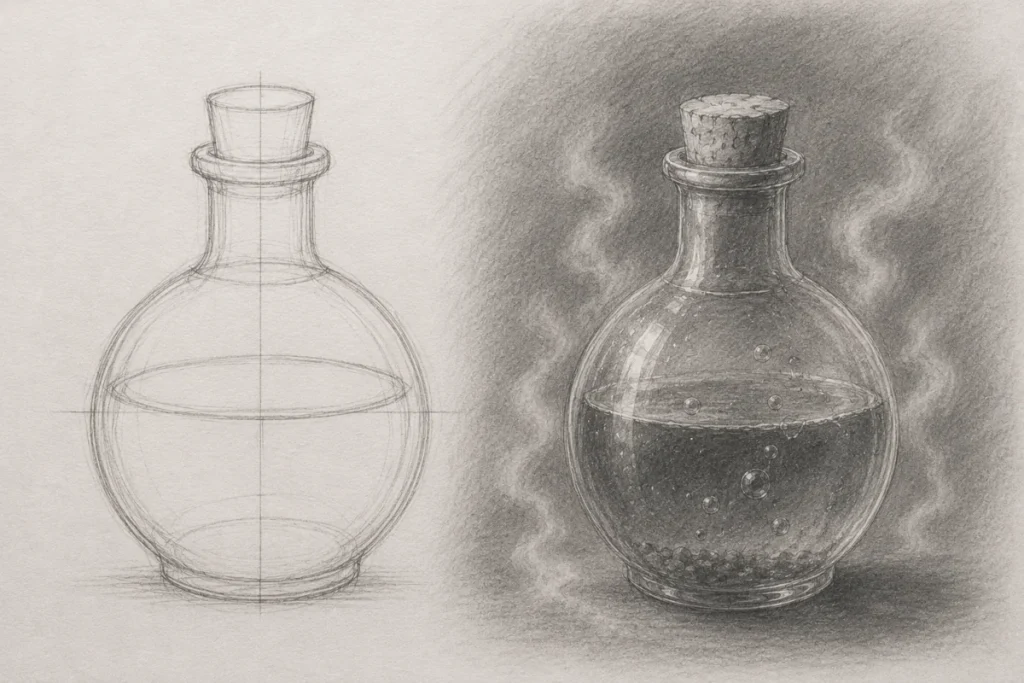
This is especially helpful when drawing multiple bottles in the same scene. Consistent shapes make collections of potions feel more believable and professionally designed rather than accidentally distorted.
Once the basic structure is complete, switch back to freehand detailing. Add scratches, cracks, bubbles, sediment, foggy glass, dripping wax, strange symbols, glowing liquids, or mysterious contents lurking inside the bottle.
The template provides the structure, while the textures and imperfections create the story.
Gears, Clocks & Strange Machinery
Circular shapes appear constantly in clocks, gears, gauges, mechanical devices, and strange horror contraptions. Circle templates help create clean foundations for these elements, making them feel deliberate and functional before you begin adding damage, decay, and atmosphere.
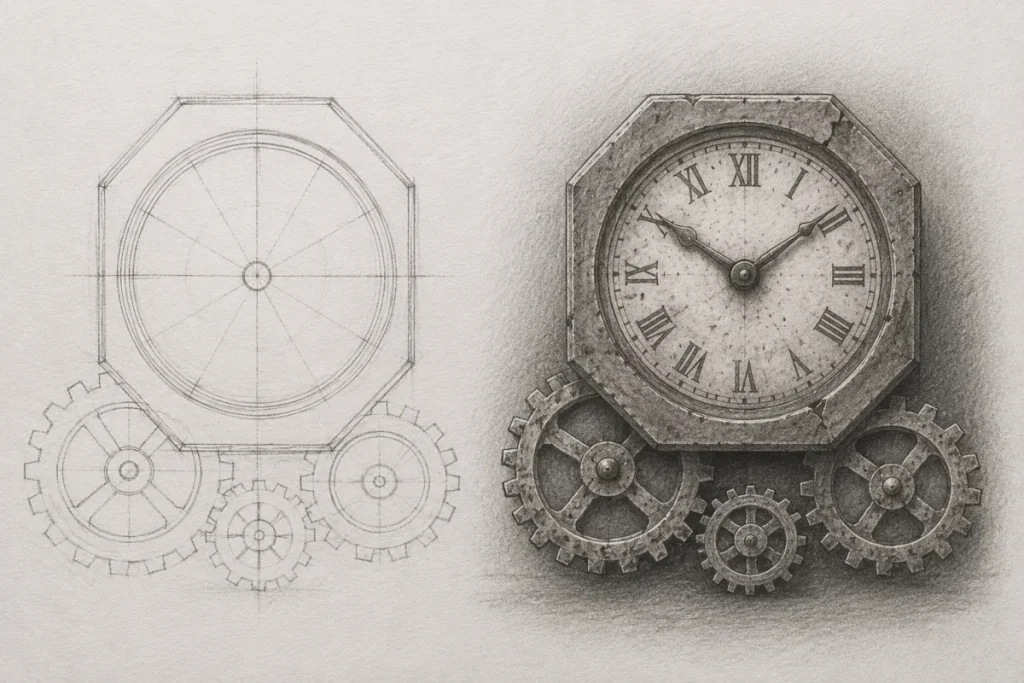
They’re particularly useful for steampunk horror, haunted machinery, cursed inventions, clockwork creatures, and abandoned industrial settings. Consistent circles make mechanical objects look believable, while uneven freehand circles can accidentally make them feel distorted in the wrong way.
Once the basic shapes are established, switch back to freehand detailing. Add rust, grime, broken gear teeth, cracks, scratches, leaking fluids, glowing runes, exposed wires, or strange organic growths spreading through the machinery.
The clean geometry creates structure, while the damage and decay create the horror.
Common Mistakes (And How to Avoid Them)
Pressing Too Hard
The Mistake:
Pressing too hard when tracing around the template.
Why it Matters:
Heavy pressure can leave grooves in the paper that remain visible even after you’ve erased the guideline. These dents often catch graphite later, creating unwanted dark lines, strange shadows, and marks that can be surprisingly difficult to remove, even with careful erasing.
This becomes especially noticeable when shading smooth areas such as moons, monster eyes, potion bottles, or glowing effects where clean gradients are important.
Fix:
- Trace with a light, controlled touch
- Let the pencil glide around the template rather than forcing it into the paper
- Build up darker values later through shading instead of trying to create dark outlines immediately
- If you’re unsure, make several light passes rather than one heavy pass
A light guideline is easy to darken later. A deep groove in the paper is much harder to hide.
Making Everything Perfect
The Mistake:
Leaving every circle perfectly clean, smooth, and untouched after using the template.
Why it Matters:
Horror art rarely feels unsettling because everything looks flawless and untouched. Perfect circles can sometimes make objects look sterile, artificial, or disconnected from the atmosphere you’re trying to create.
A ritual circle covered in cracks feels more ancient. A moon surrounded by fog feels more mysterious. A monster eye filled with veins and uneven reflections feels more alive. The circle itself may be perfect, but the world around it shouldn’t be.
Fix:
- Add cracks, scratches, grime, chips, or weathering
- Break up smooth surfaces with texture and shading
- Add fog, smoke, shadows, stains, or glowing effects
- Let the imperfections tell part of the story
Use the template for structure, then use freehand details for atmosphere.
Choosing the Wrong Size
The Mistake:
Choosing the first circle that looks “close enough” without checking how it fits into the overall composition.
Why it Matters:
The size of a circle can have a huge impact on the final drawing. A moon that’s too small may lose its visual impact. A monster pupil that’s too large can make a creature look unintentionally cartoonish. A ritual circle that’s too big can overwhelm everything else on the page. Even a perfectly drawn circle can look wrong if its size doesn’t support the composition.
Even when the circle itself is perfectly drawn, the wrong size can throw off balance, proportions, and focal points throughout the artwork.
Fix:
- Hold the template over your sketch before tracing
- Compare several nearby sizes instead of immediately choosing the first option
- Consider how the circle relates to the surrounding objects and composition
- When in doubt, lightly sketch the size first before committing
A perfectly drawn circle is only useful if it’s the right size for the drawing.
Smudging the Pencil
The Mistake:
Sliding your template across the paper after tracing or placing it down on top of freshly shaded areas.
Why it Happens:
Graphite transfers surprisingly easily. As you work, small amounts of graphite can build up along the edge of the template. If you drag the stencil across the page, that graphite can smear into highlights, fog effects, or other clean areas of the drawing.
This is especially noticeable in horror artwork, where large dark backgrounds and smooth shading are common.
Fix:
- Lift the template straight up instead of sliding it
- Check the underside occasionally for graphite buildup
- Wipe the edges with a soft tissue if they become dirty
- Avoid placing the template directly onto freshly shaded graphite whenever possible
A clean stencil helps create clean circles. A dirty stencil can create mystery smudges that nobody invited.
Caring for Your Templates
Circle templates are low-maintenance, but treating them well will help them stay accurate and last for years.
Circle templates don’t require much upkeep, but a little care goes a long way. Because they’re made from thin, flexible plastic, they can bend, warp, or collect graphite over time. Looking after them properly helps ensure they continue producing clean, accurate circles whenever you need them.
- Store them flat
- Keep them away from high temperatures
- Don’t bend them
- Wipe off any graphite buildup occasionally
- Keep them somewhere they won’t get crushed or damaged
Templates can warp surprisingly easily. Even a slight bend can stop them from sitting flat against the paper, making it harder to trace clean, accurate circles. This can lead to uneven lines, gaps, or circles that aren’t quite as precise as they should be.
Regularly wiping away graphite buildup also helps prevent accidental smudges. Over time, graphite can collect along the stencil’s edges and transfer onto your drawing when you least expect it.
If you store your templates flat and handle them carefully, a good stencil can easily last for many years.
Conclusion
Circle templates might not be the most exciting tool in your art kit, but they’re one of the most useful. They help you create clean, accurate circles quickly and consistently, allowing you to focus on the creative side of your artwork rather than struggling with basic shapes.
For horror artists, that means more believable monster eyes, stronger ritual circles, more convincing potion bottles, cleaner moons, and better overall compositions. A well-placed circle can become the foundation for some of the most memorable elements in a drawing.
The key is to use templates as a starting point rather than a finished solution. Let the stencil create the structure, then add cracks, shadows, textures, grime, glowing effects, and other details that give your artwork personality and atmosphere.
Use templates for precision. Use your creativity for the horror.
With a simple circle template and a bit of imagination, you can create everything from eerie eyes and occult symbols to haunted landscapes and unsettling creatures.
What You’ve Learned:
- Circle templates are plastic stencils that help you draw accurate circles quickly and consistently.
- Circle templates help create clean, accurate foundations for monster eyes, ritual circles, moons, potion bottles, gears, and other circular elements.
- Standard circle templates are the most versatile option, while ellipse templates help with objects viewed at an angle.
- Large circle templates are useful for moons, ritual designs, and larger compositions where freehand circles can become uneven.
- Mixed geometry templates provide additional shapes that can be useful for props, machinery, gadgets, and background elements.
- Templates work best as a refinement tool within a sketch, rather than as a replacement for the drawing process.
- Adding texture, cracks, shading, grime, and other details prevents template-based artwork from feeling stiff or overly perfect.
- Common mistakes include pressing too hard, choosing the wrong size, creating overly perfect shapes, and accidentally smudging graphite.
- Proper storage and cleaning help keep templates accurate and prevent warping or unwanted smudges.
- Combining precision, atmosphere, and texture creates more effective and visually interesting horror artwork.
More Horror Art Tools
If you’re building up your horror art toolbox, these guides can help you create cleaner shapes, stronger compositions, and more atmospheric effects:
- Pastels for Horror Art
Learn how soft pastels can be used to create mist, fog, smoke, glowing effects, and atmospheric backgrounds. Oil pastels can also add rough textures, grime, and other unsettling details to horror artwork. - Rulers & French Curves: The Unsung Heroes of Horror Art
Discover how rulers and French curves can help you create clean straight lines, smooth curves, architectural details, and structured designs without losing the organic feel of your artwork. - Using Craft Knives in Drawing
Find out how craft knives can be used to create sharp highlights, scratchy textures, weathered surfaces, and fine details that are difficult to achieve with pencils alone.