Coloured Gel Pens in Horror Art
When the gel pen comes out, your highlights suddenly stop hiding and start showing off.
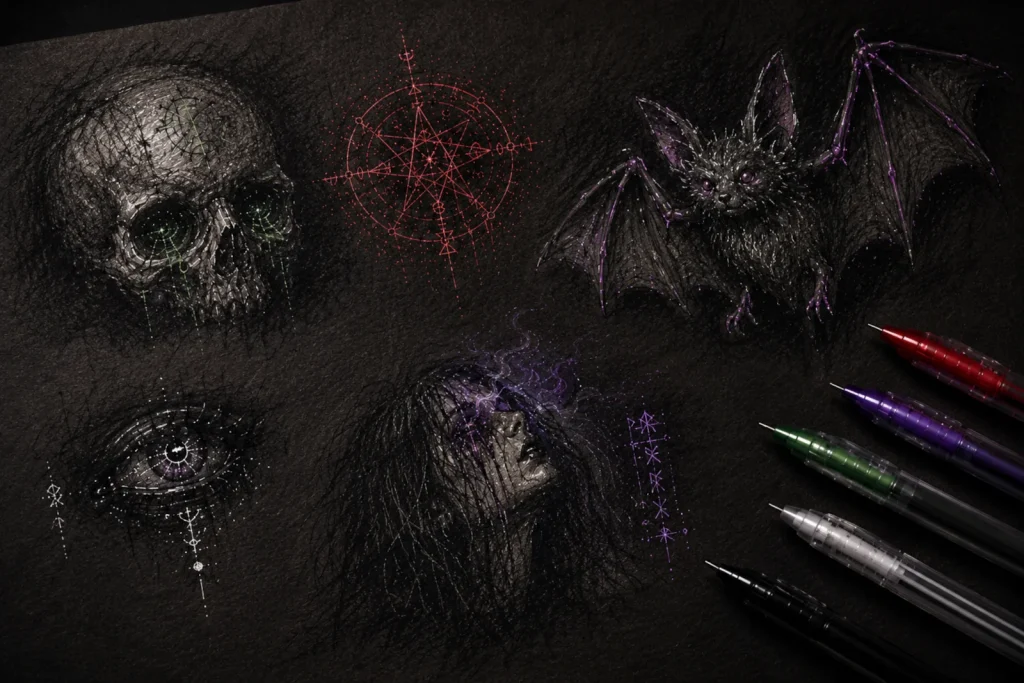
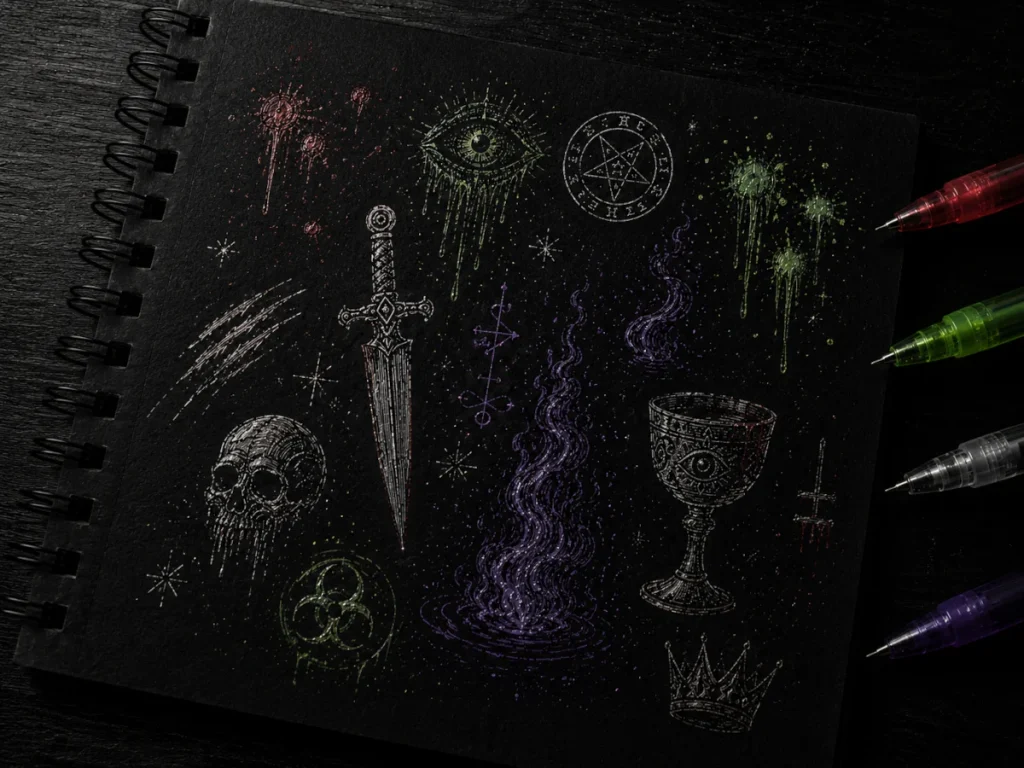
Coloured gel pens aren’t just for school notes or cheerful doodles – in horror art, they work best as small, high-impact details that instantly pull attention. Their bold, opaque ink stands out sharply against dark shading, making them perfect for glowing eyes, blood splatters, eerie symbols, reflections, and supernatural effects that graphite or charcoal alone can’t create.
They’re especially effective when layered over deep shadows, smoky textures, or dark backgrounds. A single streak of bright gel ink can create contrast that makes certain parts of a drawing feel wet, glowing, reflective, or unnaturally alive. Even tiny highlights can completely change the mood of a piece. Tiny pen. Massive drama. Bit like a haunted gremlin with a torch.
The key is using them carefully. Too much bright colour can overpower the atmosphere and make the drawing feel less unsettling. Gel pens work best as accent tools rather than full shading tools, adding controlled flashes of colour or light that guide the viewer’s eye without overwhelming the darker areas of the artwork.
Coloured gel pens are one of the easiest ways to add glowing highlights, blood effects, reflections, and supernatural details to horror drawings.
What You’ll Learn:
Learn how to use coloured gel pens to create glowing effects, eerie highlights, and supernatural details in horror artwork.
- How different gel pen colours affect mood and atmosphere in horror art
- Ways to create glowing eyes, runes, blood effects, and supernatural highlights
- How to combine gel pens with graphite and charcoal for stronger contrast
- Practical tips for layering, paper choice, and preventing smudging
- Simple horror art experiments and prompts to practise glowing effects
- How to build a small but effective gel pen colour selection for horror drawings
Why Gel Pens Work in Horror Art
Gel pens deliver something pencils can’t: bright, opaque colour that sits on top of the paper instead of blending into it. Because the ink reflects light differently from graphite and charcoal, even small details can suddenly feel glowing, wet, reflective, or unnervingly alive against dark shading.
Think about:
- Highlighting cursed runes so they appear to glow unnaturally in the darkness.
- Adding veins of blood or ichor that instantly pull the viewer’s eye.
- Marking occult symbols so they look hot, burning, or freshly carved into the page.
Gel pens work best as accent tools rather than main drawing tools. If every part of the drawing glows, nothing stands out anymore. Using small amounts of bright ink creates contrast and helps important details feel more dramatic and unsettling. Like a horror jump scare, they’re most effective when used sparingly and at the right moment.
The real strength of gel pens is their ability to create focused highlights and sharp points of attention that guide the viewer’s eye exactly where you want it to go.
Creepy Colours & Their Powers
1. Red Gel Pens
Red gel pens are one of the most effective colours in horror art because the human brain naturally associates red with blood, danger, injury, warnings, and violence. Even tiny amounts of bright red instantly attract attention, which makes it perfect for creating disturbing focal points in darker drawings.
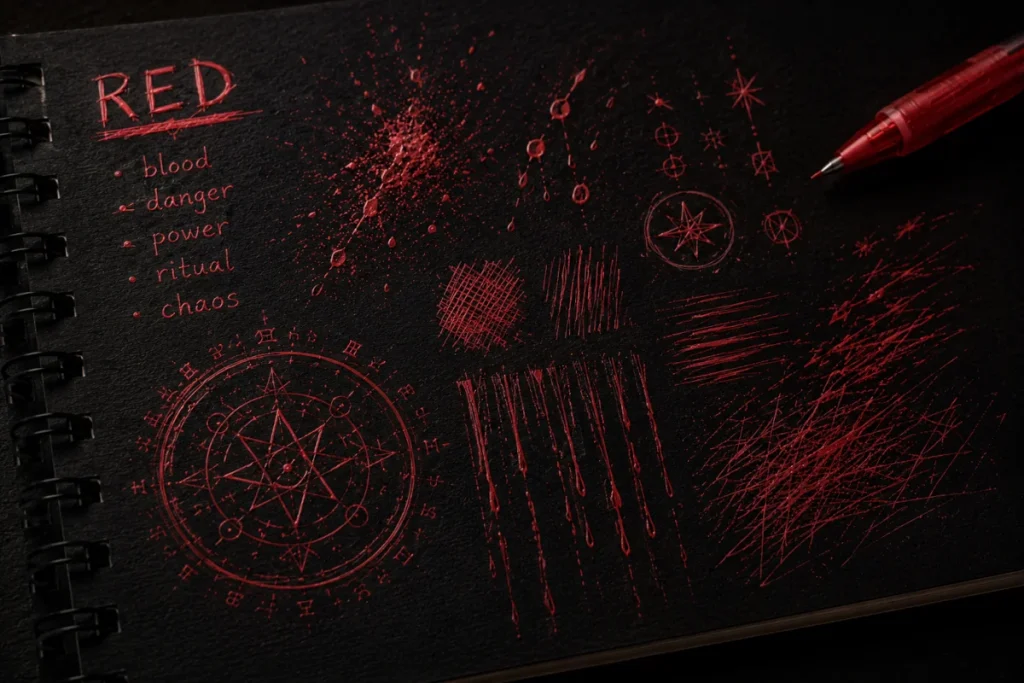
- Use red for blood splatters, scratches, drips, or fresh wounds that need to stand out sharply against graphite or charcoal shading.
- Perfect for ritual symbols, occult markings, or glowing runes, especially when layered over rough charcoal textures or smoky backgrounds.
- Works well for tiny highlights and unsettling details, like glowing eyes, veins, reflections, or the glint of blood in a creature’s mouth.
Because red naturally grabs attention so quickly, it works best in small, controlled amounts. Too much bright red across the page can flatten the mood and make the artwork feel less atmospheric. A few carefully placed marks usually feel far more intense than covering everything in crimson chaos.
Try to avoid sneezing during a splatter test. Otherwise, your sketchbook starts looking less “artistically disturbing” and more “evidence locker.”
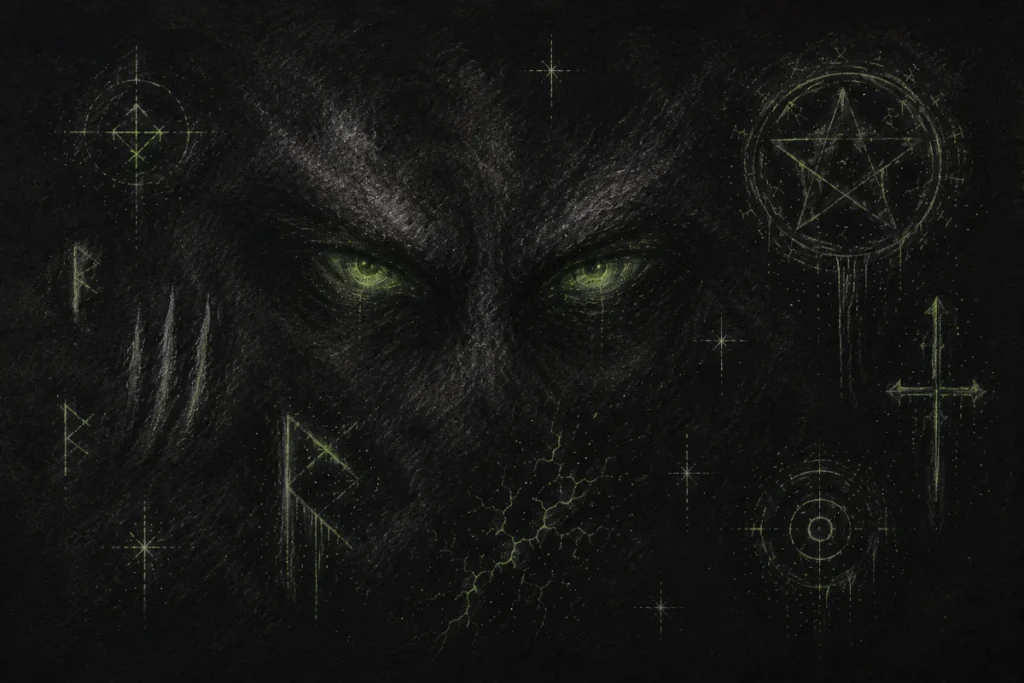
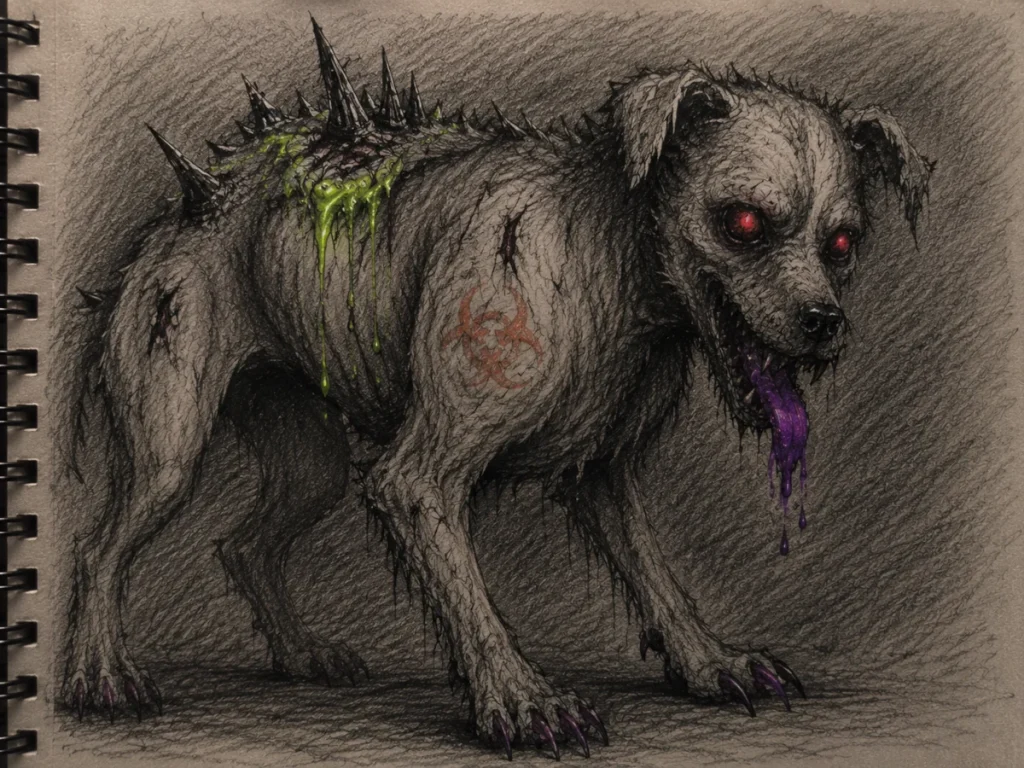
2. Green & Purple Gel Pens
Green and purple gel pens are perfect for creating artwork that feels unnatural, supernatural, toxic, cursed, or otherworldly. Unlike red, which immediately suggests violence or danger, these colours create a slower, creepier kind of unease that makes viewers feel like something is deeply wrong without always knowing why.
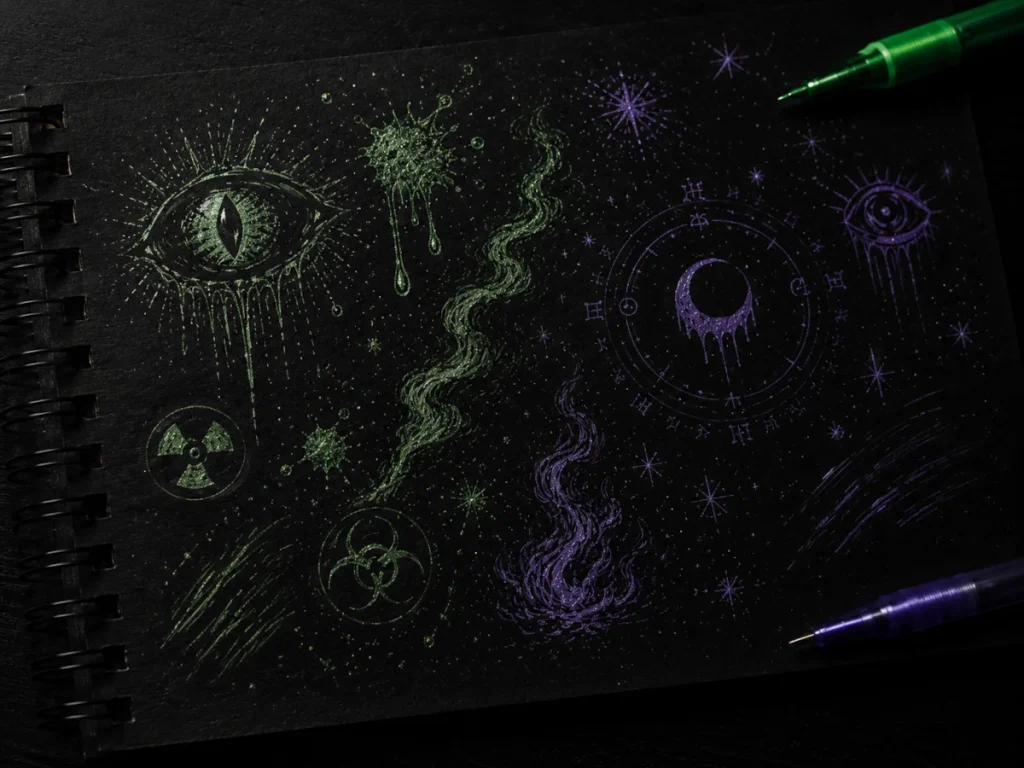
- Green gel pens work brilliantly for toxic slime, glowing ectoplasm, infected wounds, radioactive effects, monster eyes, or anything meant to feel poisonous and inhuman.
- Purple gel pens are strongly associated with mysticism, witchcraft, curses, magic, and ghostly energy, making them ideal for enchanted smoke, occult symbols, haunted objects, or supernatural lighting effects.
Both colours are especially effective when used over dark graphite shading or smoky charcoal textures, where the bright ink can suddenly appear glowing or electrically charged against the darkness. Tiny flashes of colour can completely change the atmosphere of a drawing.
These shades work best when you want your artwork to feel uncanny rather than outright violent. They add tension, mystery, and that uncomfortable “something definitely lives in this basement” energy without overpowering the rest of the piece.
3. Metallics & Brights
Metallic and neon gel pens are designed to catch light, which makes them incredibly useful for creating details that feel magical, radioactive, reflective, or unnaturally alive. Unlike normal matte shading, these inks shimmer and stand out sharply against dark horror artwork.
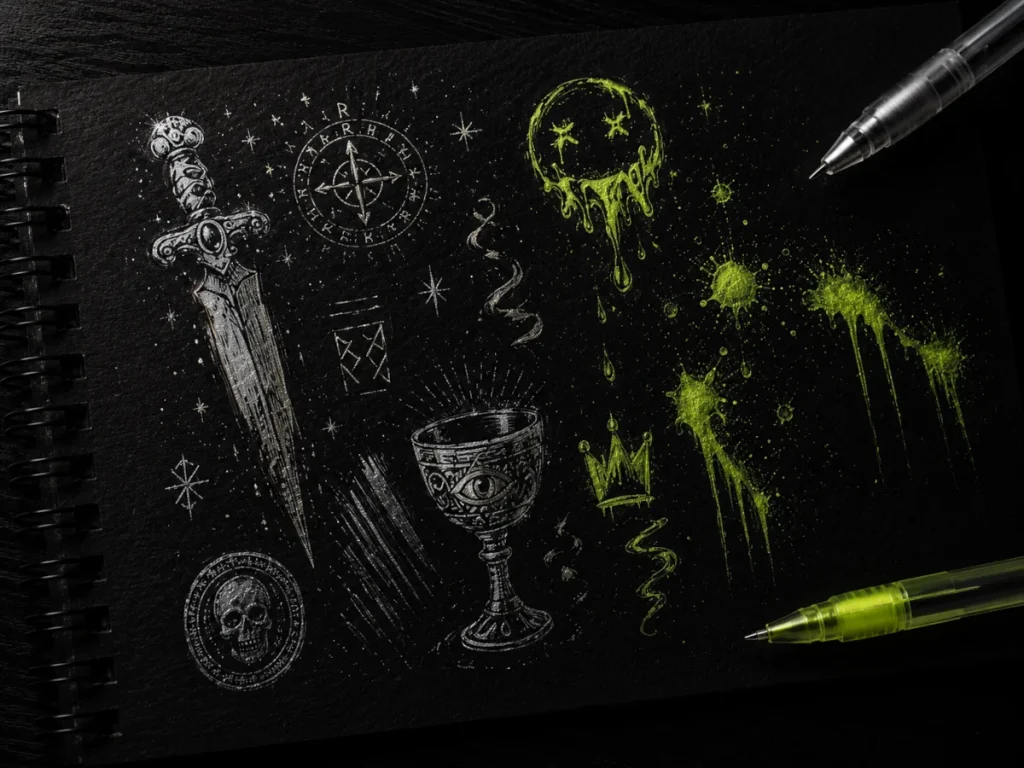
- Use metallic silver or gold for enchanted runes, cursed jewellery, ritual daggers, ancient symbols, or reflective highlights on weapons and armour.
- Bright neon colours work especially well for modern horror themes, including flickering signs, toxic graffiti, glowing slime, cyberpunk horror, or unnatural lighting effects.
- Metallics are excellent for contrast because their reflective finish bounces light differently from graphite and charcoal, helping important details immediately stand out from darker areas.
These pens work best when used to create small focal points and reflective accents rather than covering large sections of the drawing. A tiny metallic highlight can make an object feel cold, polished, magical, or dangerous without overwhelming the atmosphere of the piece.
And yes, somehow metallic ink can make even a shopping list look vaguely cursed. “Bread. Milk. Souls.”
Practical Horror Artist Tips
- Paper choice matters – Gel pens work best on smooth, heavier paper because the ink sits cleanly on the surface. Rough or heavily textured paper can make the pen skip, creating broken lines and uneven highlights.
- Layering order is important – Always apply your graphite or charcoal first and use gel pens near the end of the drawing. Gel ink sits on top of the page, so trying to shade over it afterwards usually causes smudging and messy textures.
- Test pens before using them – Different gel pens behave differently depending on the brand, paper, and ink flow. Some create smooth, bright lines, while others can scratch, blob, or stop unexpectedly. Testing them first helps avoid ruining finished areas of your artwork.
- Allow the ink to dry properly – Gel pens smudge very easily while wet, especially over dark shading. Giving the ink a little time to dry helps keep highlights sharp, clean, and bright instead of turning them into blurry streaks.
- Use gel pens sparingly for stronger impact – Small highlights and glowing accents usually look far more effective than covering large areas in bright ink. Too much gel pen can flatten the atmosphere and make the artwork feel cluttered instead of eerie.
Build Your Cursed Gel Pen Kit
You don’t need an entire rainbow to create effective horror art effects. A small, carefully chosen set of gel pens can cover glowing highlights, occult symbols, blood effects, eerie lighting, and supernatural details without overwhelming your artwork.
- Starter essentials: Red, green, white, and metallic silver are some of the most versatile colours for horror art. Together, they cover blood effects, toxic glows, bright highlights, and reflective details.
- Add-ons for atmosphere: Neon yellow or pink work well for unnatural lighting, radioactive effects, glowing signs, or surreal horror scenes. Purple is especially useful for occult symbols, magical energy, cursed smoke, and supernatural accents.
- Metallic pens for contrast: Silver and gold gel pens can help details stand out sharply against dark graphite or charcoal backgrounds, making runes, weapons, jewellery, and symbols feel more dramatic.
- White gel pens for highlights: White gel pens are perfect for adding tiny reflections, eye shines, sharp teeth highlights, mist effects, and small details that need to immediately catch attention.
- Use specialty pens sparingly: Glitter and highly reflective pens can be fun for certain horror styles, but too much sparkle can weaken the eerie atmosphere. A few subtle accents usually work far better than covering large areas.
Even horror monsters occasionally deserve a dramatic little shimmer. Just… maybe not full disco crypt mode.
Gel Pen Experiment Ideas for Horror Art
Gel pens can create glowing highlights, eerie effects, and strange textures that are difficult to achieve with pencils alone. These quick horror-themed experiments will help you practise different techniques before using them in finished artwork.
Reverse Horror Glow
Start by covering part of the page with heavy graphite or charcoal shading until the area looks almost completely black. Smooth the shading slightly with a tissue or blending stump so the background feels soft and smoky. Once the dark base is finished, use a bright gel pen to draw glowing symbols, eyes, runes, or cracks over the top. Try keeping the lines clean and sharp so they stand out clearly against the darkness. The stronger the contrast between the dark background and the bright ink, the more the designs will appear to glow unnaturally.
Drip Illusions
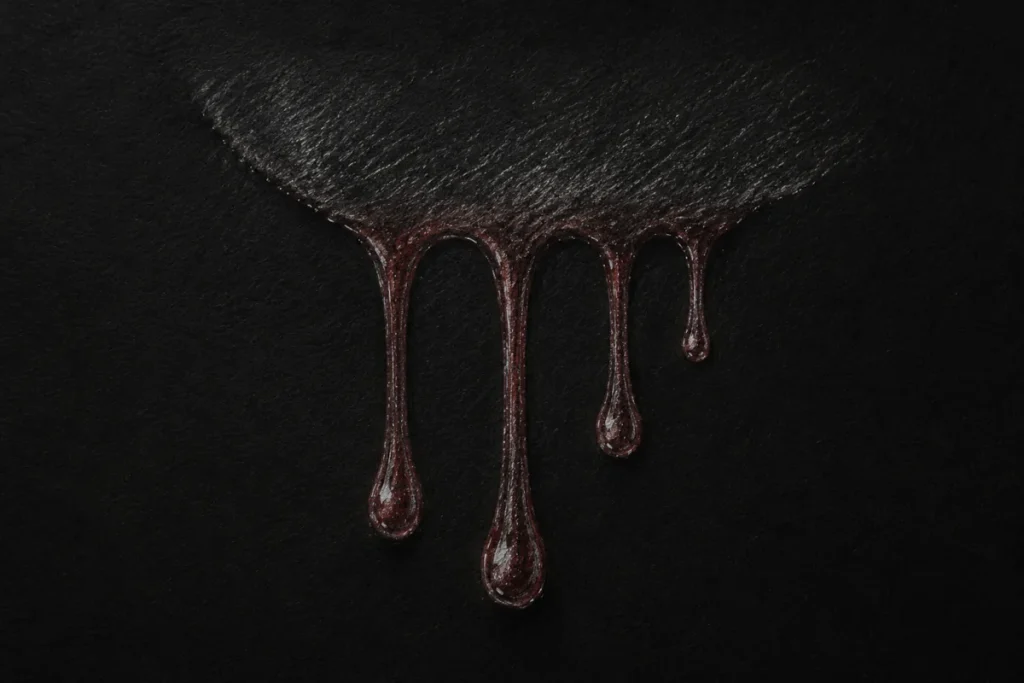
Start by sketching a dark shaded area using graphite or charcoal, such as a crack, shadow, or wound. Once the base is in place, use your gel pen to slowly pull downward lines from the edge of the shading to create smooth, glossy drips. Vary the length and thickness of each drip so they don’t all look identical, and slightly round the ends to give them a heavier liquid appearance. The shiny surface of the gel ink helps the drips look freshly wet, especially when contrasted against dark shading. For even more realism, add a tiny white or metallic highlight along one edge of the drip to create the illusion of reflected light.
Secret Messages
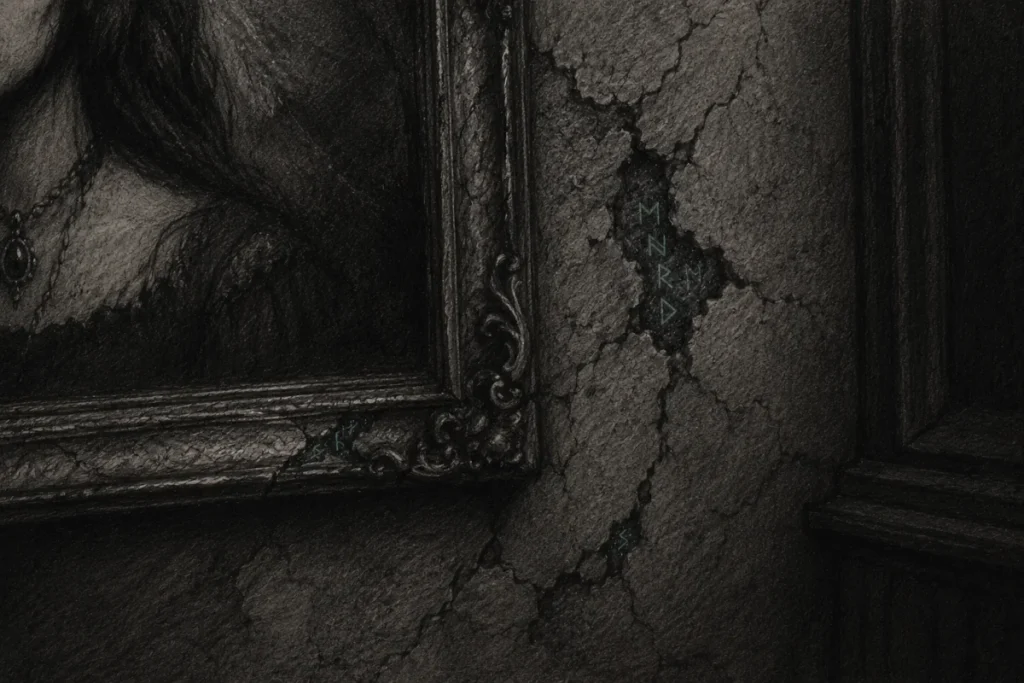
Start by creating a full graphite or charcoal drawing with plenty of deep shadows and dark corners. Once the main artwork is finished, use a bright gel pen to hide tiny runes, symbols, words, or warning marks throughout the piece. Tuck them into shaded areas, cracks, folds, or background objects so they aren’t immediately obvious. Keeping the symbols small and partially hidden makes the drawing feel layered and unsettling, as if something is secretly lurking beneath the surface. The contrast between the dark shading and the glowing gel pen details helps the hidden elements slowly reveal themselves when viewers look closer.
Fabulous Monsters
Take a creature sketch you’ve already finished and deliberately add a few absurd or over-the-top gel pen details that clash with the horror theme in the best possible way. Try glowing pink claws, neon slime, metallic horns, glittery wounds, or radioactive eyes. Start small by choosing just one or two areas to highlight so the bright colours stand out against the graphite shading instead of overwhelming it. This experiment helps you practise using gel pens confidently and creatively, while also teaching you how contrast, colour placement, and unexpected details can completely change the mood of a drawing. Sometimes the weirdest additions end up being the most memorable part of the piece.
Horror Practice Prompts
If you want quick ways to practise with gel pens, these horror-themed prompts are designed as simple mini exercises. Each one focuses on a different effect, helping you experiment with glow, contrast, highlights, and atmosphere without needing to plan a full drawing.
The Haunted Skull
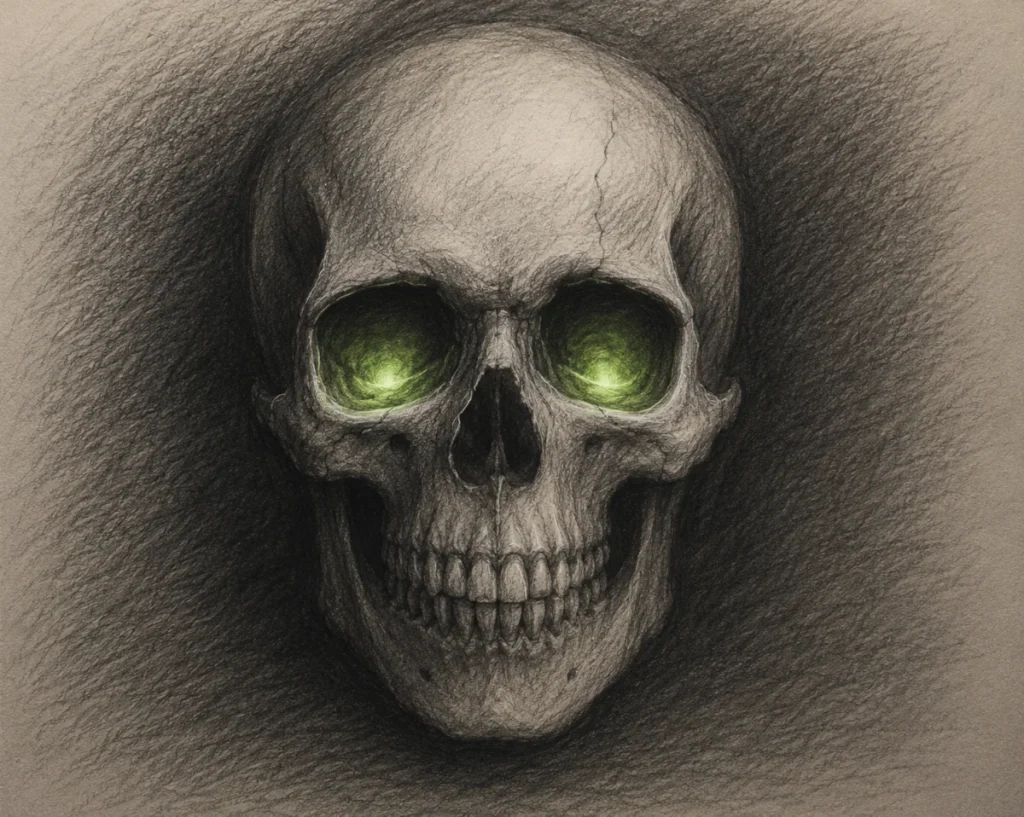
Start by sketching a simple skull using graphite, focusing on strong shadows around the eye sockets, cheekbones, and jaw to give it depth. Once the shading is finished, use a neon green gel pen to carefully fill the eyes, keeping the brightest colour near the centre so they appear to glow from within. Add a faint white gel pen outline or soft highlights around the sockets to push the glow effect even further. The contrast between the dark graphite shading and the vivid gel pen colour makes the eyes feel unnatural and eerie, as if the skull is staring back out of the page.
The Doll’s Curse
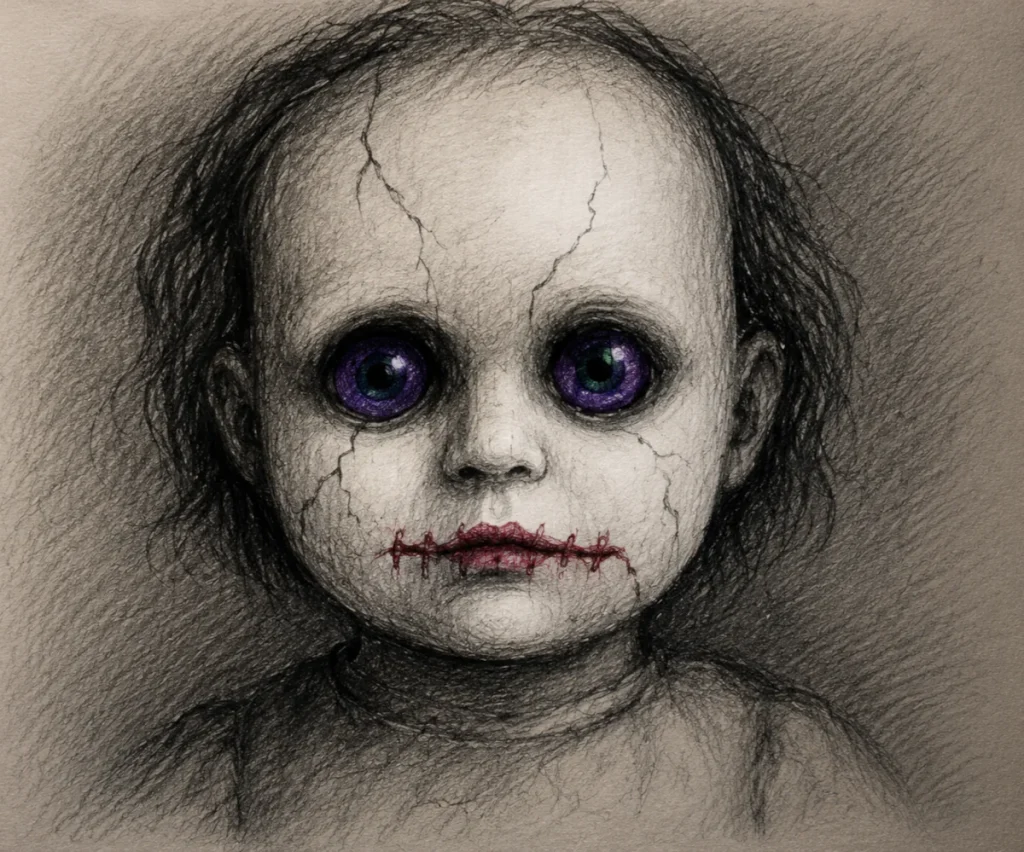
Begin by sketching a simple porcelain doll face with soft graphite shading and large dark eye sockets to give it an eerie, lifeless expression. Add small cracks around the forehead, cheeks, or chin so the face feels aged and fragile. Once the graphite work is finished, use a red gel pen to draw rough stitched lines across the mouth, keeping the stitches uneven so they look unsettling rather than neat. You can then add faint purple or green gel pen highlights inside the eyes to create a subtle supernatural glow. The combination of realistic shading and sharp bursts of colour helps the doll feel unnatural, as though something inside it is still awake and watching.
The Rune in the Dark
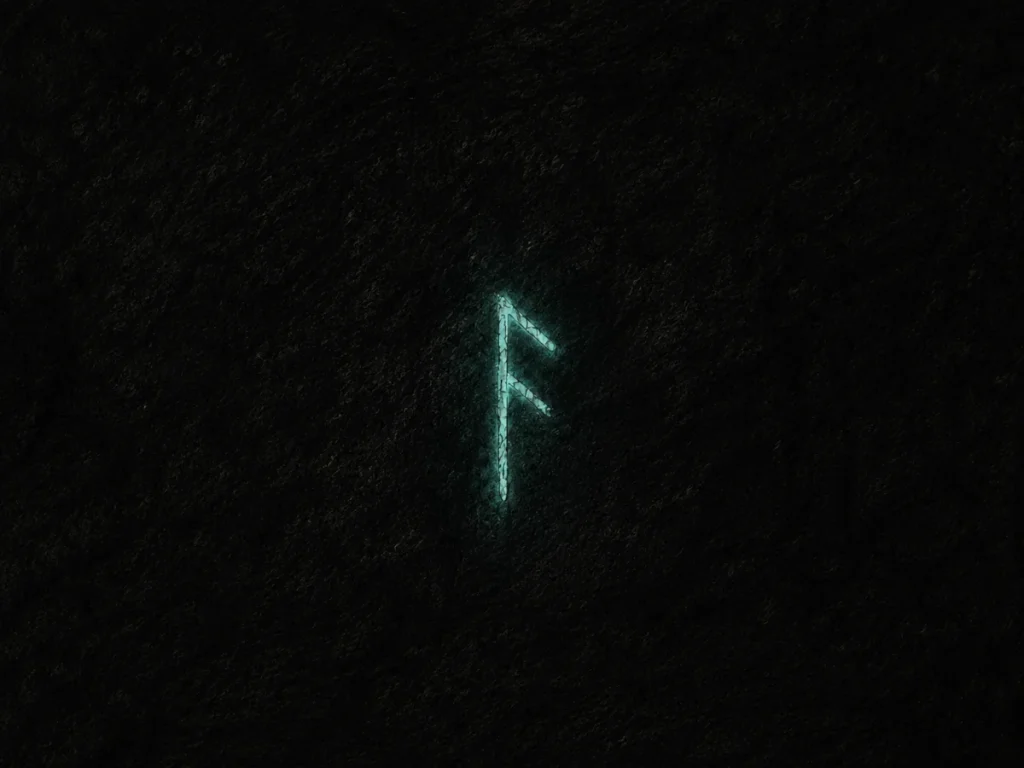
Cover an entire section of the page with heavy graphite or charcoal until the background is almost completely black. Smooth out the shading so the darkness feels even and deep, with very little visible texture. Once the page is dark enough, use a metallic or glowing gel pen to draw a single rune or symbol in the centre, keeping the lines clean and bright. Avoid adding extra details around it – the empty darkness is what makes the symbol feel powerful and unnatural. This exercise teaches restraint and contrast, showing how one glowing mark can create far more tension and atmosphere than a crowded page full of effects.
The Glam Bat
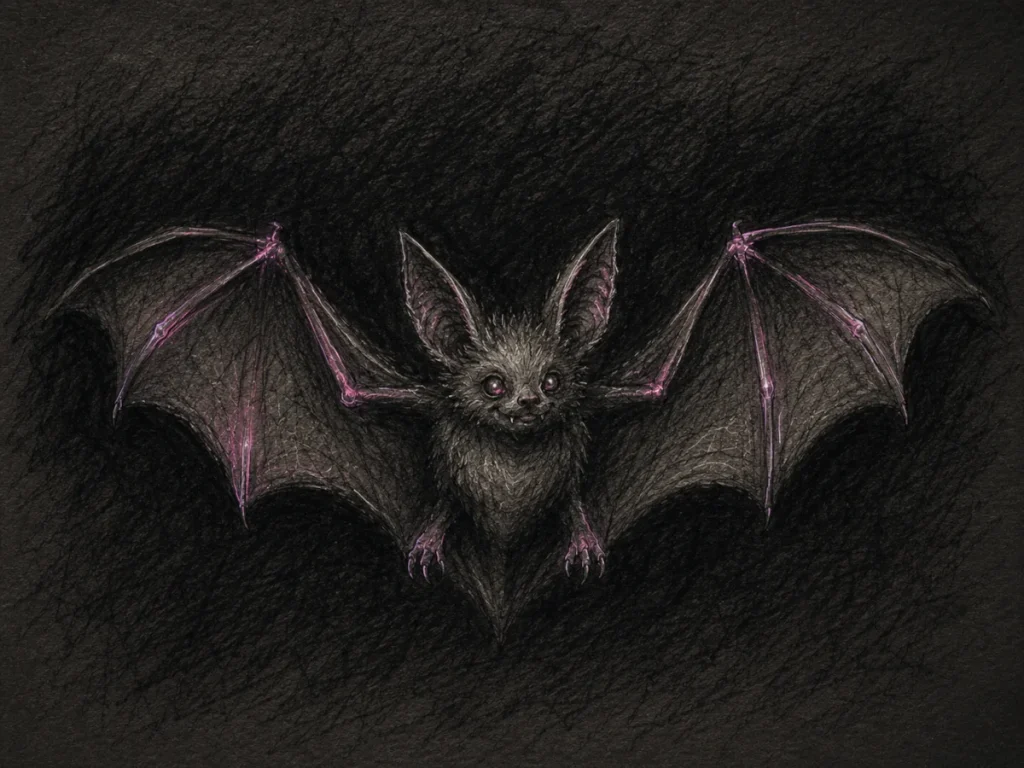
Sketch a simple bat shape in graphite first, keeping the shading soft and dark so the creature still feels creepy underneath the brighter details. Once the pencil work is finished, use neon pink, purple, or metallic gel pens to trace parts of the wings, ears, or eyes instead of outlining the entire bat. Keeping the glowing details selective helps the colour stand out more dramatically against the grey shading. You can also add tiny highlights along the wing edges or claws to create a subtle glowing effect. This prompt is great for experimenting with contrast and colour placement while learning how humour and horror can work together without completely losing the spooky atmosphere. Think less “terrifying cave monster” and more “fashionably cursed crypt goblin.”
Final Thoughts
Coloured gel pens might seem like small additions, but they can completely transform a horror drawing. A few glowing highlights, eerie symbols, metallic scratches, or blood-red splatters can instantly pull attention toward the darkest parts of your artwork and create effects that graphite alone simply can’t achieve.
The key is knowing when to use them. Gel pens work best as finishing touches – small bursts of colour, glow, or shine that stand out against heavy shading instead of overpowering it. Whether you’re drawing cursed runes, supernatural eyes, toxic slime, or suspiciously fashionable bats, they’re one of the easiest ways to make horror art feel more atmospheric and alive.
And one final warning: let the ink dry before touching the page. Nothing ruins a perfectly eerie glow effect faster than an accidental thumb smear across your carefully crafted horror masterpiece.
What You Learned:
- Coloured gel pens can add glowing highlights, supernatural effects, and sharp contrast to horror drawings with very little effort.
- Red gel pens work well for blood effects, wounds, stitched details, and dripping textures that look glossy and freshly wet.
- Green and purple gel pens create occult, toxic, ghostly, and supernatural moods that instantly make artwork feel more unsettling.
- Metallic and neon gel pens help create magical symbols, eerie lighting, glowing runes, and futuristic horror effects that stand out against dark shading.
- White gel pens are useful for highlights, reflections, glowing eyes, and crisp finishing details that stand out against dark shading.
- Gel pens work best over smooth graphite or charcoal shading, especially when used as a finishing layer rather than a starting tool.
- Dark backgrounds increase the illusion of glowing ink, making neon and metallic colours appear brighter and more dramatic.
- Limiting your colour palette creates stronger visual impact, especially when using one bright colour against heavy shadows.
- Allowing gel ink to dry fully helps prevent smudging and keeps highlights crisp and clean.
More Tools for Your Horror Art
Coloured gel pens are just one weapon in your haunted toolkit. If you want to experiment with more creepy drawing materials, these guides will help you create everything from eerie textures to glowing supernatural effects:
- Coloured Pencils for Horror Art: Turning Sweet Tools into Nightmare Fuel
Learn how to create eerie bruises, sickly skin tones, and cursed glows that blend beautifully with graphite shading. - Pastels for Horror Art
Perfect for dusty fog, ghostly atmospheres, soft lighting, and dreamlike horror backgrounds. - Using Craft Knives in Drawing
Use craft knives to sharpen pencils with precision, scratch unsettling textures into paper, or carve rough highlights and damaged surfaces into your artwork.