Mastering Pencil Pressure and Grades for Creepy Drawings
Learn how to control your tones, understand your pencils, and give your horror art the shading depth it deserves.
Ever feel like your pencil has a mind of its own – one that’s hell-bent on ruining your shadows? Let’s fix that.
Getting your pencil pressure right changes everything. Every stroke, shadow, and eerie little highlight depends on it. Combine that with understanding your pencil grades, and you’ve got the power to turn flat sketches into beautifully shaded nightmares.
This tutorial breaks down exactly how pressure and pencil grades work, how to control them, and how to build tone step by step – all with horror art in mind.
Why Pencil Pressure Matters
Pressure control is what separates “I tried” from “I’m framing this.”
It determines:
- How light or dark your marks appear
- How smooth or patchy your shading looks
- How well your paper survives your artistic enthusiasm
- How much texture you can create for eerie surfaces
In horror art, good pressure control makes shadows look alive – soft where they fade, rich and inky where darkness creeps in.
Without it? You get dents, scratches, and uneven tone that looks more “haunted homework” than horror masterpiece.
Understanding Pencil Grades (H vs.B)
Your pencils are more than just sticks of graphite – they’re tools for storytelling.
The letters and numbers on them aren’t random; they tell you how dark and soft the graphite is.
Pencil | Hardness | Tone | Texture | Best Use |
2H | Hard | Very Light | Crisp | Outlines, Structure |
HB | Medium-Hard | Light-Medium | Smooth | Base Shading |
2B | Soft | Medium-Dark | Slightly Velvety | Main Shading |
4B | Softer | Dark | Rich | Deep Shadows, Folds |
6B | Very Soft | Very Dark | Creamy | Intense Contrast, Final Details |
Think of the H pencils as your precise scientists, and the B pencils as your dramatic poets – both essential for creepy art harmony.
The Quick Version:
- H pencils = lighter, cleaner, sharper. Perfect for outlines and soft base tones.
- B pencils = darker, softer, and moodier. Perfect for depth and atmosphere.
If pencils were horror characters, H pencils would be the cautious scientist. B pencils? The brooding vampire who refuses to leave the shadows.
The Power of Pressure
Pressure is how you control your pencil’s personality. You can get light mist, mid-tone shading, and pitch-black darkness from a single pencil – just by changing how hard you press.
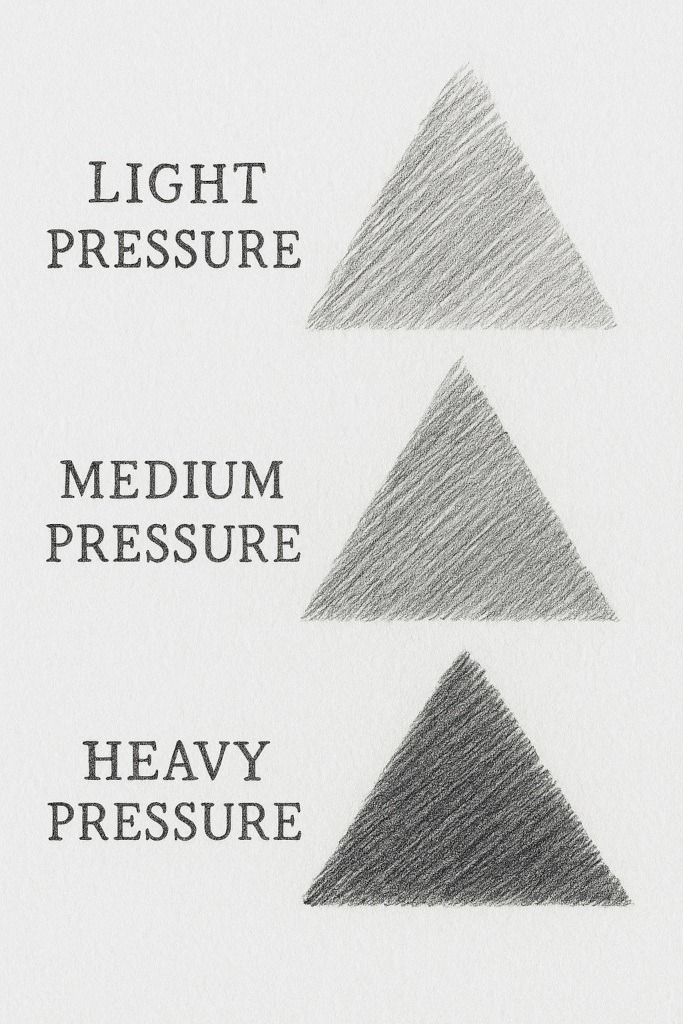
Light Pressure:
Barely touch the paper.
→ Gives a pale tone, easy to erase.
→ Perfect for fog, highlights, or first shading layers.
Medium Pressure:
Firm but not forceful.
→ Smooth mid-tone with soft texture.
→ Best for general shading and form building.
Heavy Pressure:
Strong, confident push.
→ Bold shadows with darker tones.
→ Use sparingly – too much can dent or shine the paper.
Think of pressure as a dimmer switch rather than an on/off button – you’re gently sliding between tones, not jumping from light to dark in one go.
Step-By-Step: Mastering Pencil Pressure
If you’ve never practised pressure before, don’t worry – everyone starts by snapping a few pencil tips. It’s a rite of passage.
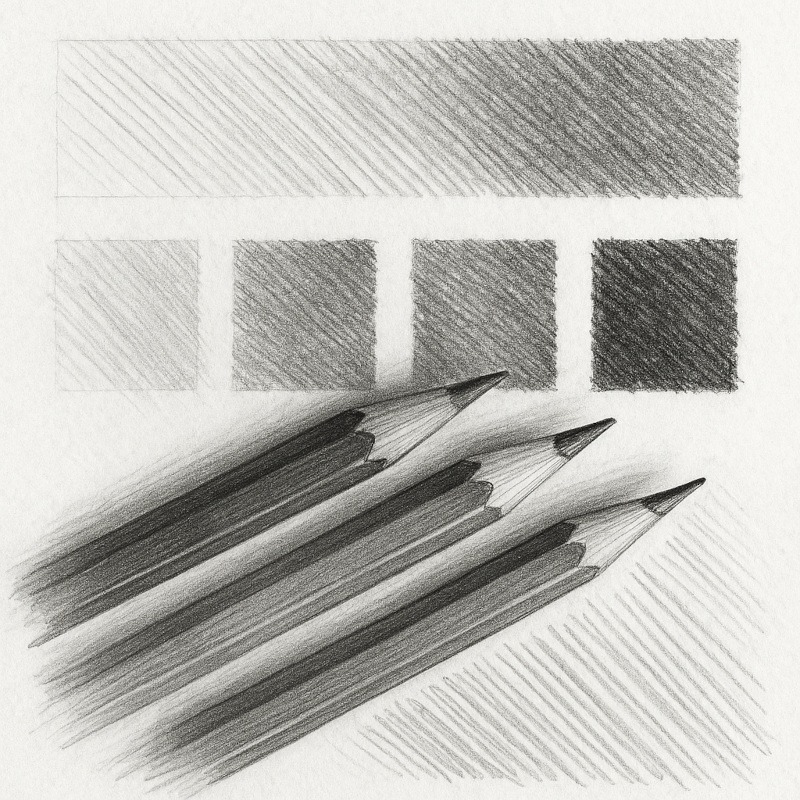
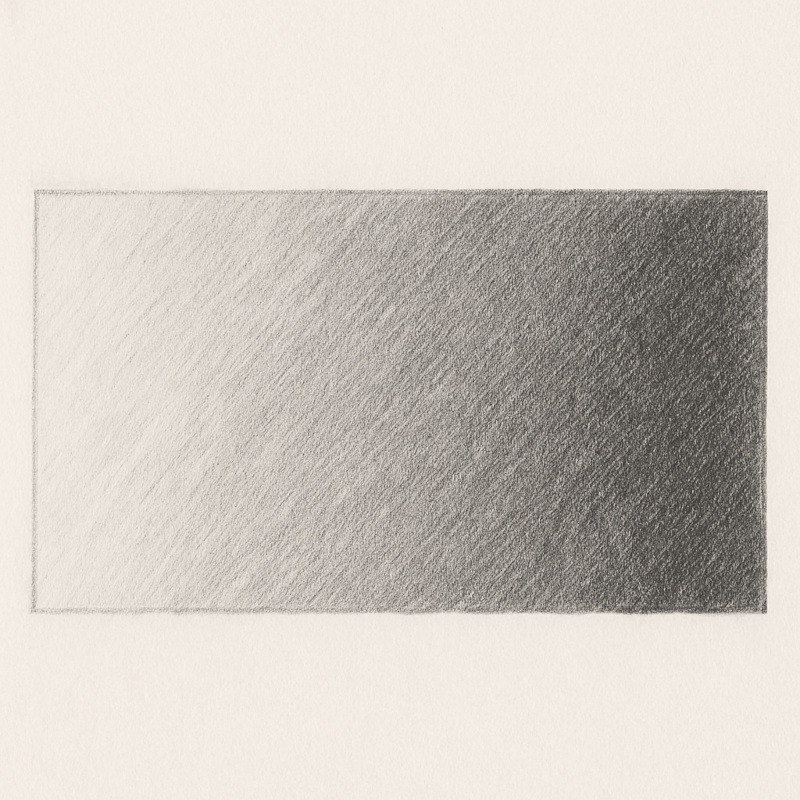
Step 1 – Warm-Up: The Gradient Bar
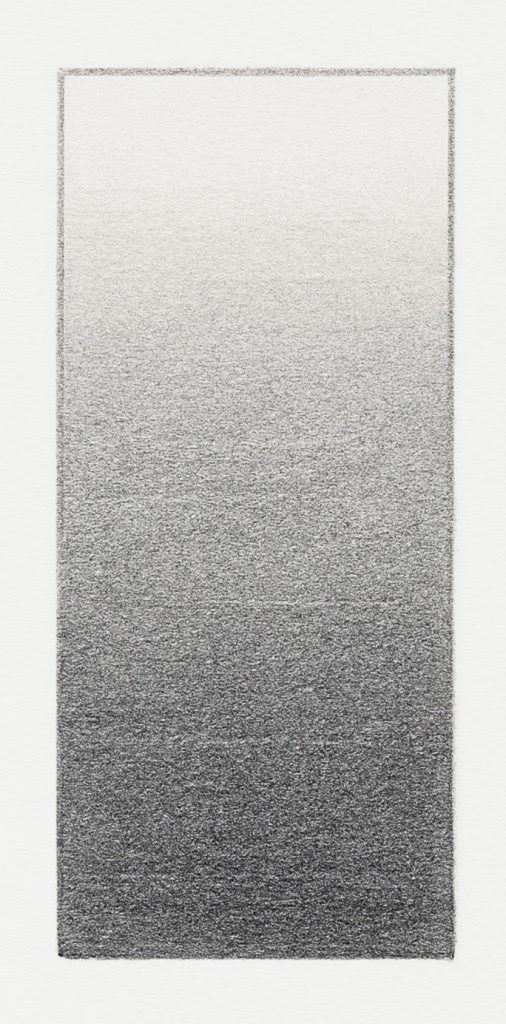
Draw a long rectangle.
Start with the faintest pressure possible and gradually darken as you move along.
Focus on smooth transitions – not speed.
- Keep your strokes light and overlapping.
- Use your arm, not just your wrist.
- Tilt your pencil slightly for smoother coverage.
Do this regularly to build sensitivity in your hand.
It’s the shading equivalent of lifting weights – boring but totally worth it when your drawings glow (or gloom) with depth.
Step 2 – Experiment with Pencil Grades
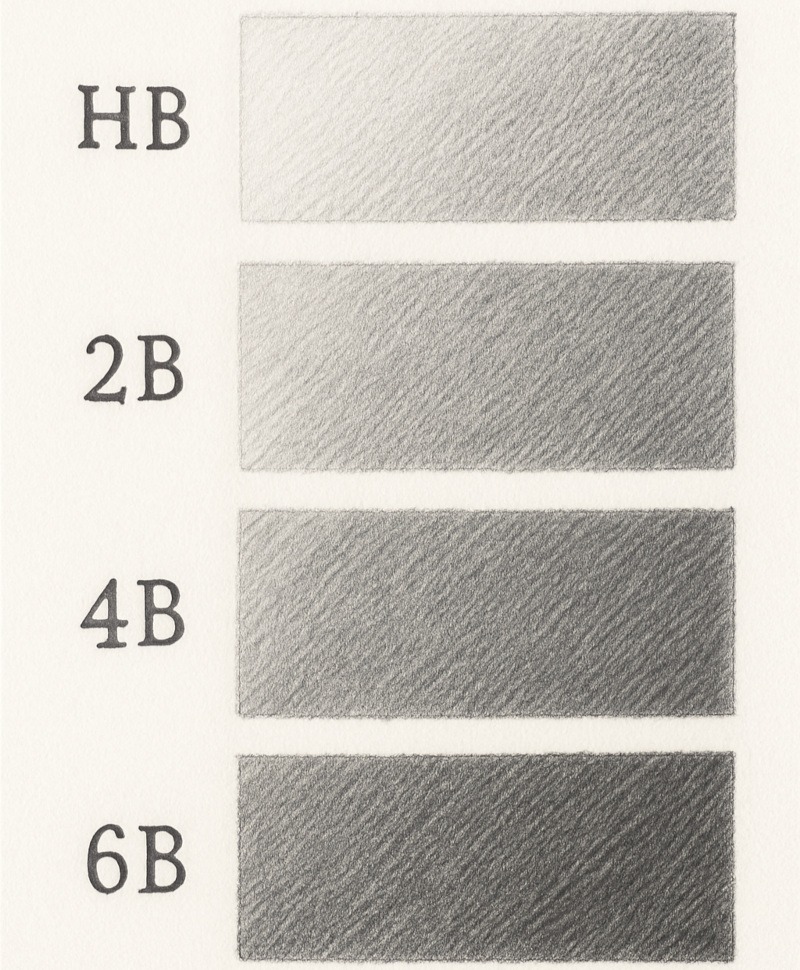
Repeat the gradient with different pencils: HB, 2B, 4B, and 6B.
Notice how little pressure it takes to get darker with each one.
- HB feels crisp and pale – great for first layers.
- 2B glides more smoothly and darkens quickly.
- 4B and 6B go dark fast, even with a gentle hand.
This teaches you to combine pencils like layers of atmosphere:
Step 3 – Layer, Don’t Press
Darkness doesn’t come from force – it comes from layers.
Build tone gradually with multiple passes, each one slightly darker than the last.
Use small circular or diagonal strokes so each layer fills the paper texture evenly.
Mini Exercise:
- Shade a patch with HB lightly.
- Add a 2B layer using the same motion.
- Deepen selective spots with 4B or 6B.
The result: rich shadows that don’t destroy your page.
Graphite works best when you whisper to it, not wrestle it.
Step 4 – Train Consistency
Draw five small boxes.
Try to shade all five to the same tone using only an HB pencil.
You’ll probably notice that a few look slightly darker or lighter than the others – that’s totally normal. This simple exercise reveals how even small shifts in pressure can change the tone. The goal isn’t perfection; it’s awareness.
Once you’ve done it, repeat the test using a different pencil grade, like 2B or 4B. Compare how each one reacts to the same amount of pressure. You’ll start to develop muscle memory for what “light,” “medium,” and “dark” pressure actually feel like.
Consistency takes time to master, but it’s one of the most valuable habits you can build. When you can control your tones easily, everything from zombie skin folds to eerie shadows will look smoother, creepier, and more intentional.
Step 5 – Apply It to Creepy Textures
Now it’s time to make it horror-worthy.
Try shading:
- Rotting Flesh: Start with light pressure, layer gradually, and darken inner folds.
- Cracked Bone: Press harder in crevices, lighter near raised edges.
- Misty Backgrounds: Use soft pressure in circular motions for a hazy atmosphere.
- Torn Fabric: Layer light tone first, then darken seams and shadowed folds.
You’ll start seeing how pressure alone creates believable textures – even before blending. Experiment with eerie things like wrinkled zombie skin, ghost fog, or cracked porcelain faces – anywhere your shadows can tell a sinister story.
Common Beginner Mistakes
- Pressing too hard, too early
This ruins your paper’s texture and creates shiny, uneven spots.- Fix:
Build up your tone slowly in 3-4 thin layers instead of one heavy one. You’ll achieve richer shadows and smoother transitions without compromising your page’s quality.
- Fix:
- Uneven pressure
Patchy, streaky shading that looks like your zombie sneezed mid-drawing.- Fix:
Hold your pencil farther back for lighter, more even tones, and keep your wrist loose to maintain control.
- Fix:
- Relying on one pencil (yes, even the mighty 6B)
It can’t do everything, no matter how confident it looks in your pencil case.- Fix:
Use a mix of pencils (HB for soft layers, 2B-6B for deeper tones). This gives you range without wrecking your texture.
- Fix:
- Forgetting to layer
Jumping straight to dark tones makes shading look flat or unnatural.- Fix:
Work gradually. Shade a light base first, then deepen with darker pencils. Think of it like stacking fog – thin, mysterious layers, one at a time.
- Fix:
- Flat edges from overuse
Creates harsh, blocky patches that won’t blend properly.- Fix:
Rotate your pencil often as you draw to keep the tip rounded and even.
- Fix:
- Overconfidence (the “I’ll just wing it” syndrome)
Skipping test strokes can lead to pressure mishaps or unwanted dents.- Fix:
Always test your pressure on a scrap piece before working on key areas. It saves both your drawing and your sanity.
- Fix:
Every horror artist’s sketchbook is haunted by at least one of these mistakes, so if you spot them, congrats, you’re officially one of us.
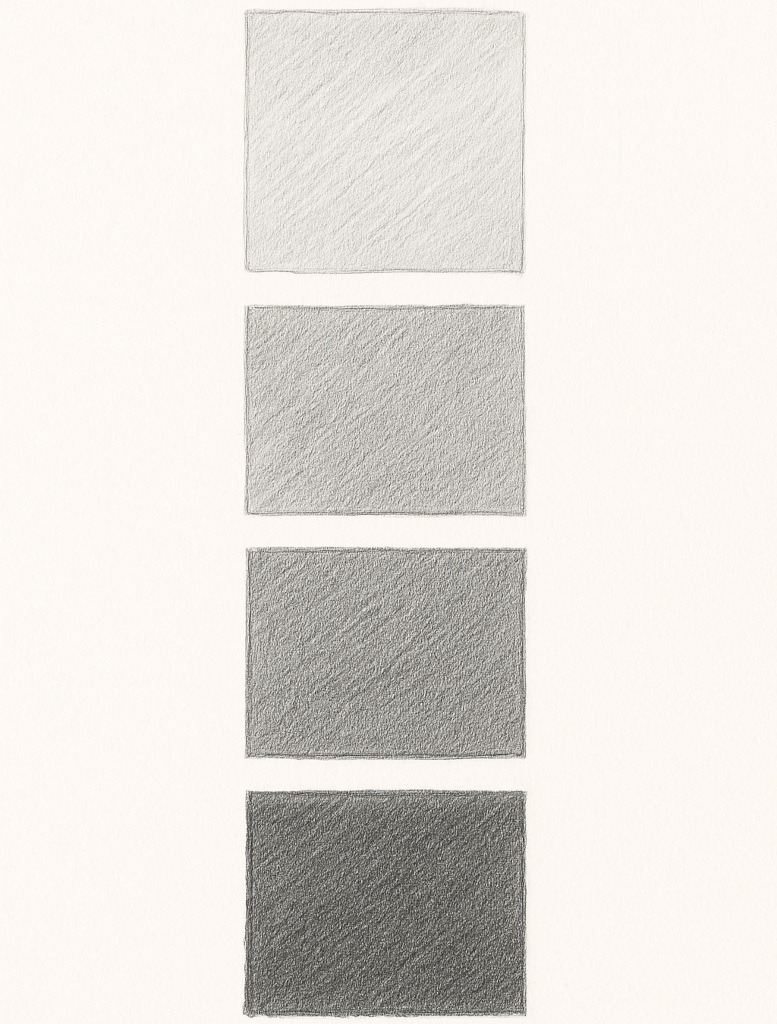
Practice Exercises
1. The Pressure Ladder
Draw four boxes in a column.
Shade each one slightly darker than the last using only HB.
Focus on consistency and smooth transitions.
You’re not aiming for perfection here – just a steady increase in tone. Even artists with years of experience don’t get a flawless ladder on the first go.
2. Pencil Grade Comparison
Create a small shading chart using HB, 2B, 4B, and 6B.
Apply the same pressure for each – see how tone changes purely from graphite softness.
You’re not changing pressure for this chart – the pencils are doing the work. Softer graphite naturally deposits more tone even with the same touch.
3. Layered Tone Exercise
Shade a gradient using two pencils: HB and 4B.
Layer HB first, then darken ends with 4B until the transition feels seamless.
If the transition looks streaky at first, don’t panic – that’s normal. Keep your strokes small and overlapping, and it will smooth out as you layer.
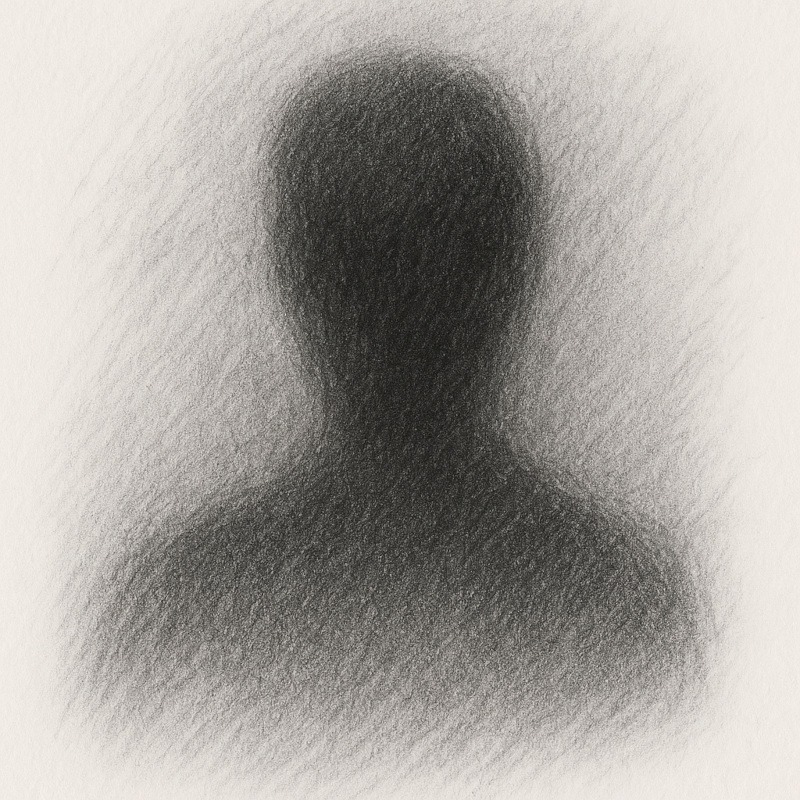
4. Creepy Challenge
Sketch something horror-themed – a cracked skull, a stitched eye, or a ghostly silhouette.
Use only pressure and grades to show form and atmosphere.
Avoid blending – let pure pencil control do the work.
Pro Tips
- Use light layers first to “find” your tones before committing.
- Keep your wrist loose – stiff hands = stiff shading.
- Rest your pinky lightly to steady pressure without smudging.
- Layer pencils logically: HB → 2B → 4B → 6B.
- Don’t skip sharpening – crisp edges give cleaner tone transitions.
Final Thoughts
Learning to control your pencil pressure and understand your grades is one of the most powerful things you’ll ever do for your art. It’s not flashy or dramatic – but it’s the quiet skill that makes every creepy masterpiece possible.
Don’t panic if it feels clumsy at first. Every smooth gradient, every believable wrinkle, every perfectly shadowed eye socket starts with practice that looks messy. The important part is that you keep showing up. Even a few minutes a day will build the muscle memory your hand needs to respond naturally.
You’ll start noticing when to ease off for soft, ghostly tones… and when to push just enough for those deliciously dark shadows that make your drawings come alive (or undead).
The more you practice, the more you’ll feel your pencil instead of fighting it – and that’s where the real magic begins.
So, keep going. Keep layering. Keep smudging, experimenting, and letting the graphite do its eerie little dance. Your shadows will get smoother, your contrasts bolder, and before long, you’ll look back at your old drawings and realise you’ve levelled up without even noticing.
What You Learned:
- Pencil pressure isn’t just about how hard you press; it’s how you control the mood of your shadows.
- H pencils are your precise scientists: crisp, clean, and great for structure.
- B pencils are your dramatic poets: soft, moody, and perfect for an eerie atmosphere.
- Building tone is about layering, not squashing your paper’s soul – let darkness creep in gradually.
- Even small changes in pressure can transform your drawing from a hesitant sketch to a haunted masterpiece.
- Practice makes muscle memory – before long, your hand will know exactly when to whisper graphite and when to summon shadows.
RElated Posts
If your pencil is still hungry for darkness, feed it with these posts: