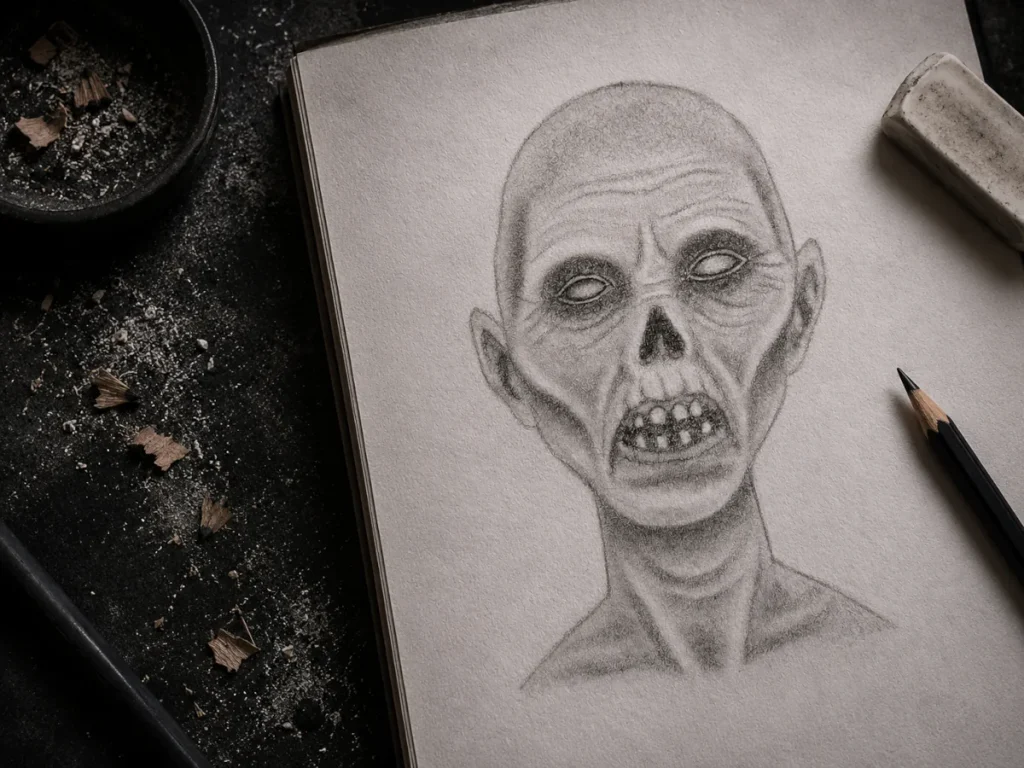
How to Draw a Zombie (Intermediate Graphite Tutorial)
Skill Level:
Intermediate – Ideal for artists who are comfortable with basic proportions and shading and want to push their depth, structure, and realism further.
Medium:
Graphite pencils on smooth to lightly textured drawing paper.
You’ve drawn cute ghosts. You’ve shaded moody pumpkins. Now it’s time for something with a little more… rot.
In this intermediate graphite tutorial, we’ll draw a zombie head with realistic structure, hollow eyes, aged skin, and an unsettling expression. You’ll learn how to build the basic head shape, place the features, add convincing bone structure, and use graphite shading to create depth, wrinkles, and decay.
No pressure, no panic – just pencils, paper, and the quiet satisfaction of giving a corpse better cheekbones than most living people.
Materials You’ll Need
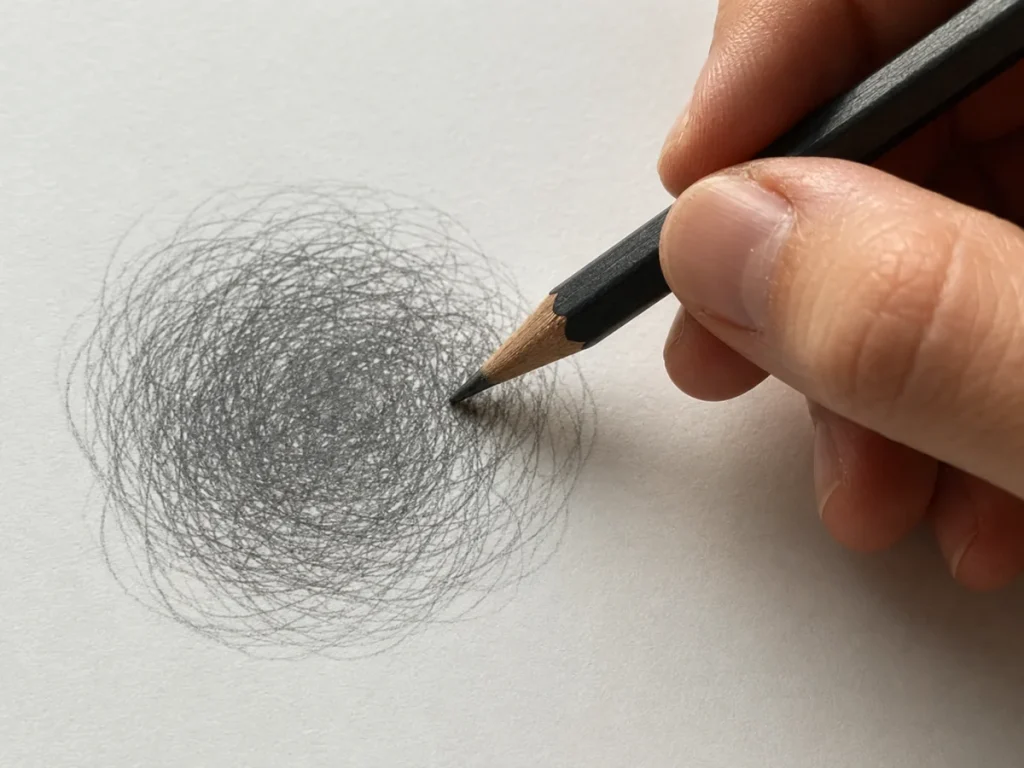
Before you bring your zombie to life (again), make sure you’ve got the essentials ready. This tutorial focuses on layering, texture, shading, and realistic detail, so the right tools will make the process much easier.
- Graphite pencils: 2H, HB, 2B, 4B, and 6B
- Blending tools: Blending stump, tissue, or cotton swab for soft shading and smooth transitions
- Erasers: A kneaded eraser for lifting highlights and a precision eraser for fine details
- Sharpener: Sharp pencils are essential for wrinkles, cracks, and facial structure
- Paper: Medium to heavyweight drawing paper with a slight texture for better graphite control, layering and smoother shading.
Tip: Keep your pencils sharp and clean as you work – this tutorial relies heavily on crisp detail and controlled shading.
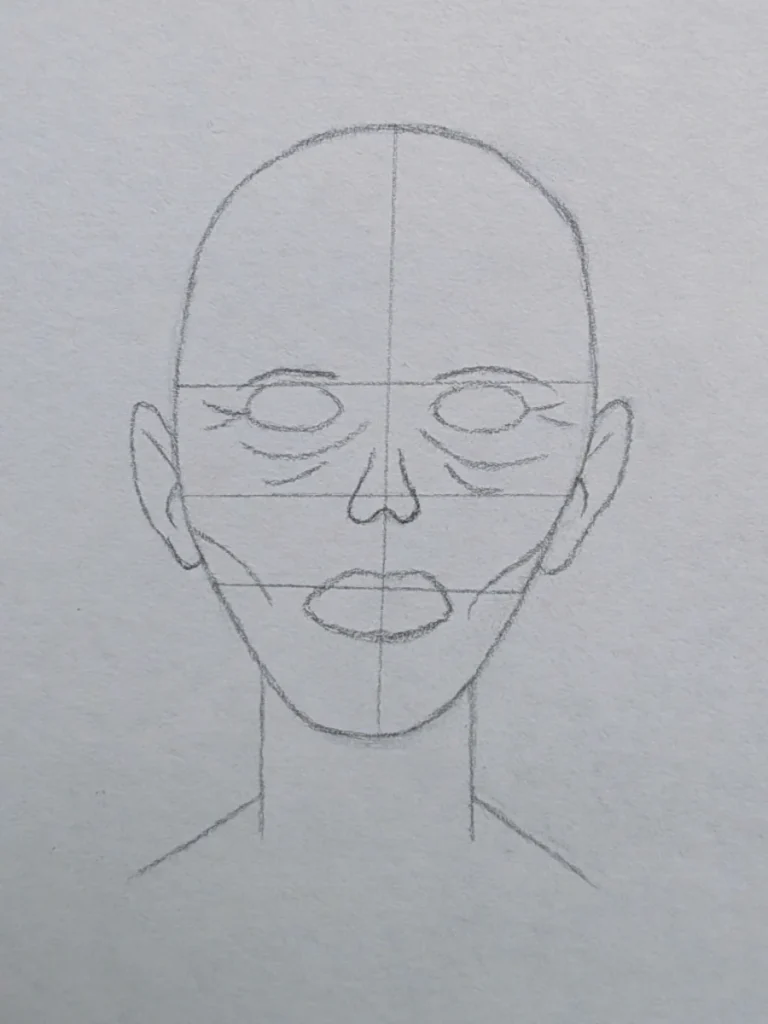
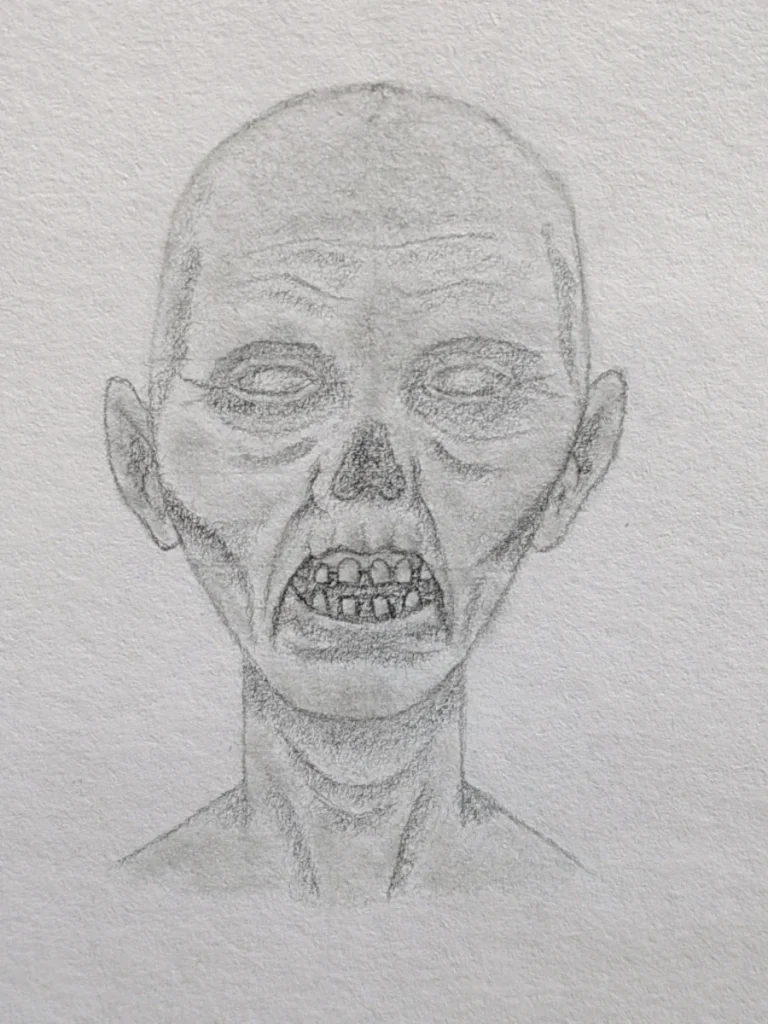
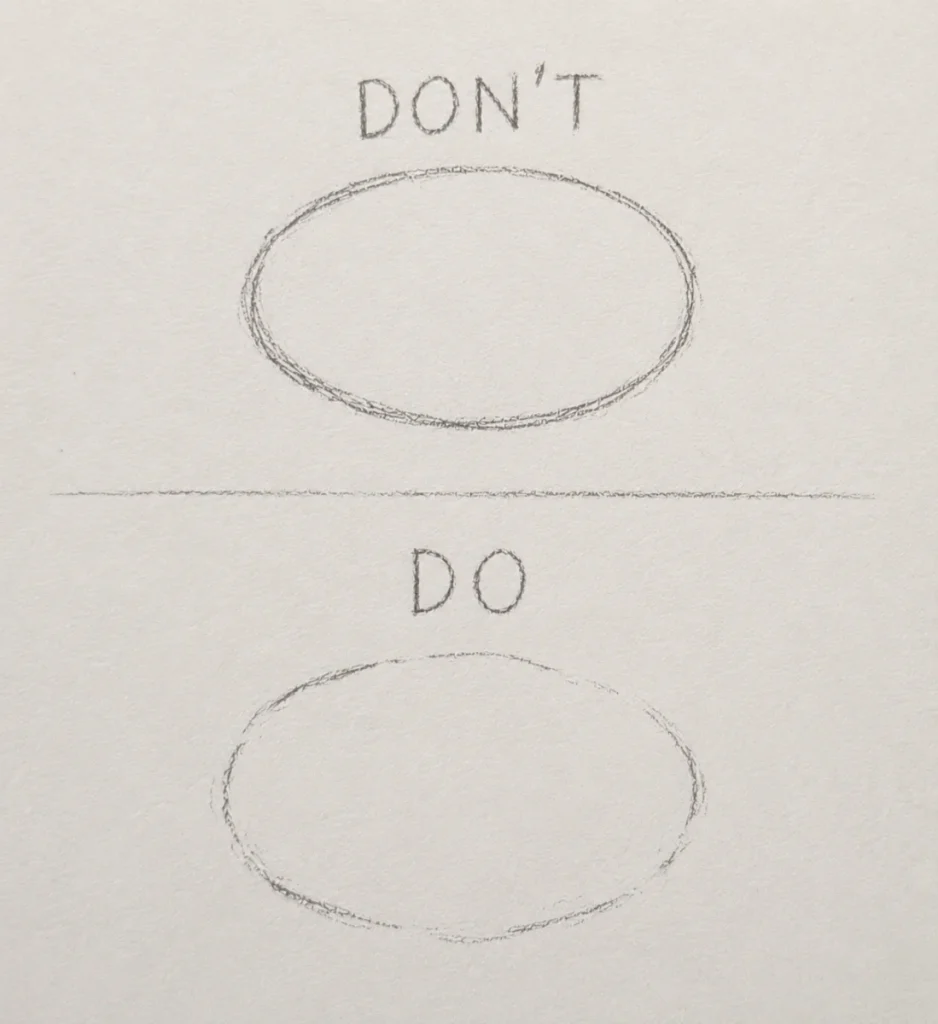
Step 1: The Basic Head Shape & Guidelines
a.) Draw a Soft Oval (Lightly)
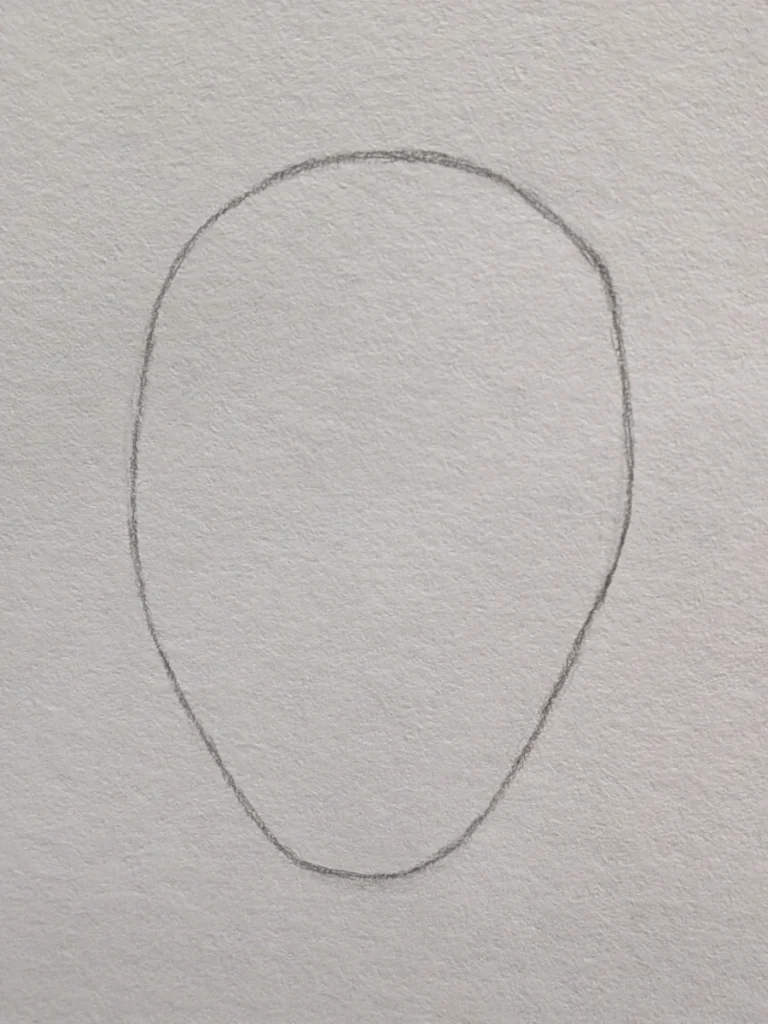
- Use an HB pencil and sketch a tall oval shape.
This creates a light structural foundation for the zombie’s head and helps position the facial features later. - Keep your lines very soft and loose since we’ll refine and darken the structure in later steps.
- Don’t worry about perfect symmetry – slight unevenness can actually make the zombie feel more natural and unsettling.
b.) Add a Centre Line (Nose-to-Chin Helper)
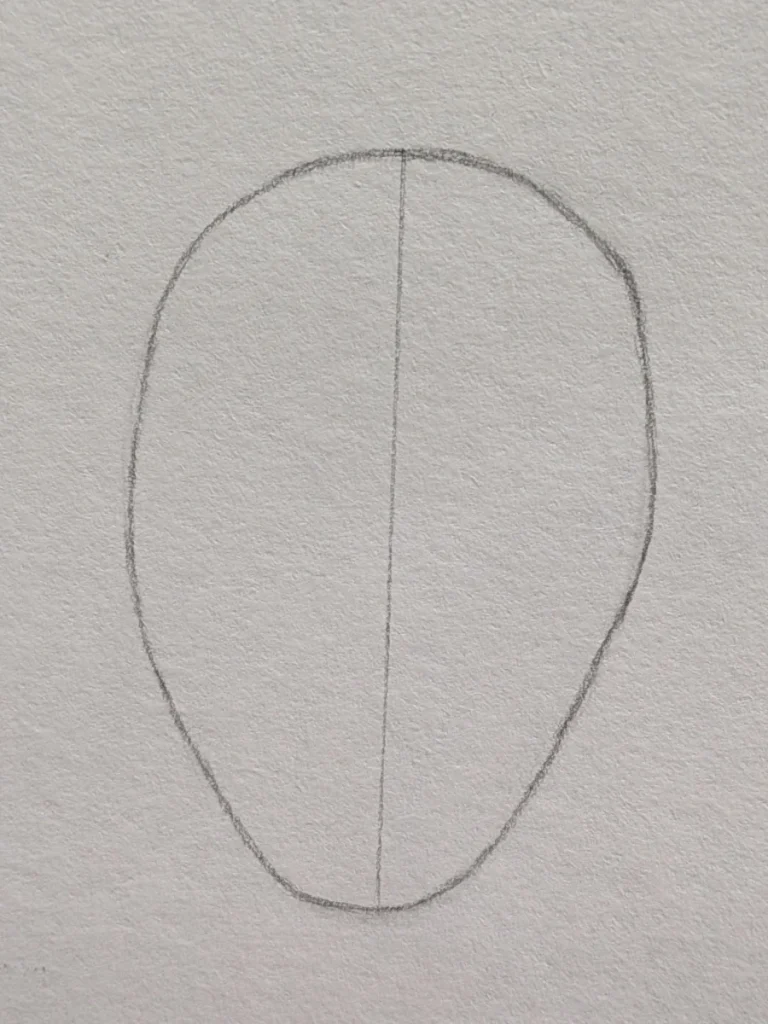
- Draw a light vertical line down the middle of the face.
- This acts as a light positioning guide to help keep the facial features balanced and centred.
- Keep the line faint since it’s only a construction guide and will mostly disappear later.
If the line curves slightly, that’s okay – subtle imperfections can make the zombie feel more unsettling and lifelike.
c.) Add Three Simple Guides
Now it’s time to give your zombie a bit more structure by lightly mapping out the eyes, nose, and mouth guidelines. These aren’t final features yet – they’re just simple placement guides to help everything sit correctly later.
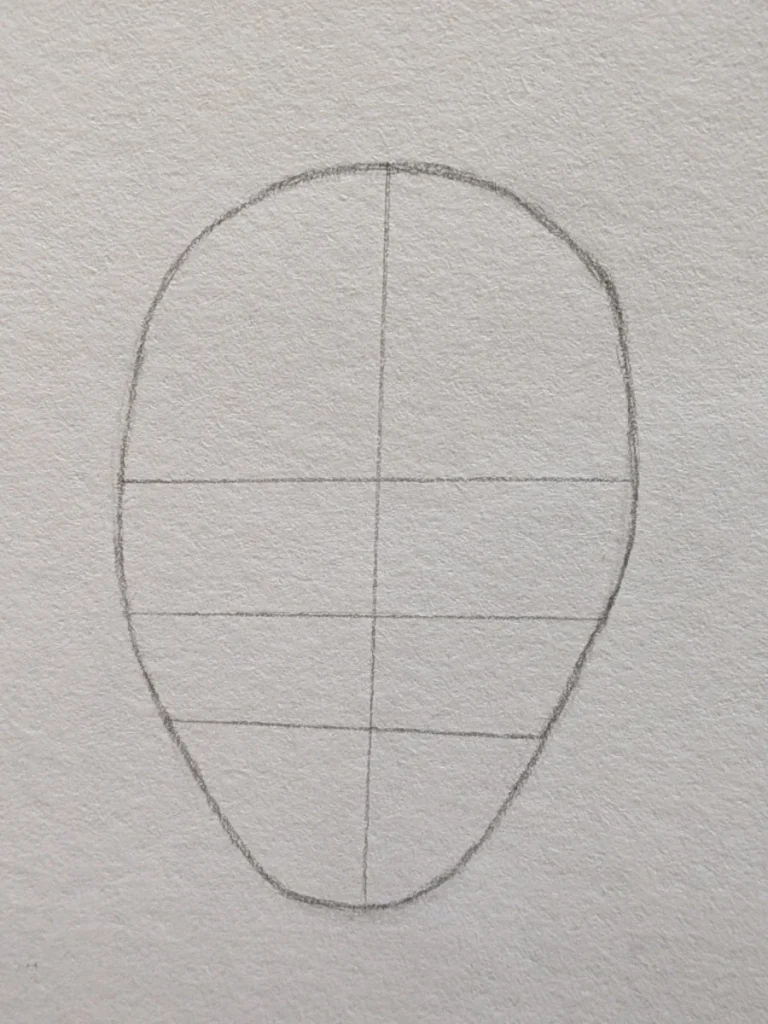
- Eye line: Draw a horizontal line slightly above the middle of the oval. This helps leave enough space for the forehead and upper skull area.
- Nose line: Add another horizontal line halfway between the eye line and the chin. This marks the base of the nose.
- Mouth line: Draw one final horizontal line between the nose line and the chin to position the mouth area.
Keep all guidelines soft and light since most of them will fade under shading and detail later on.
d.) Neck and Shoulders
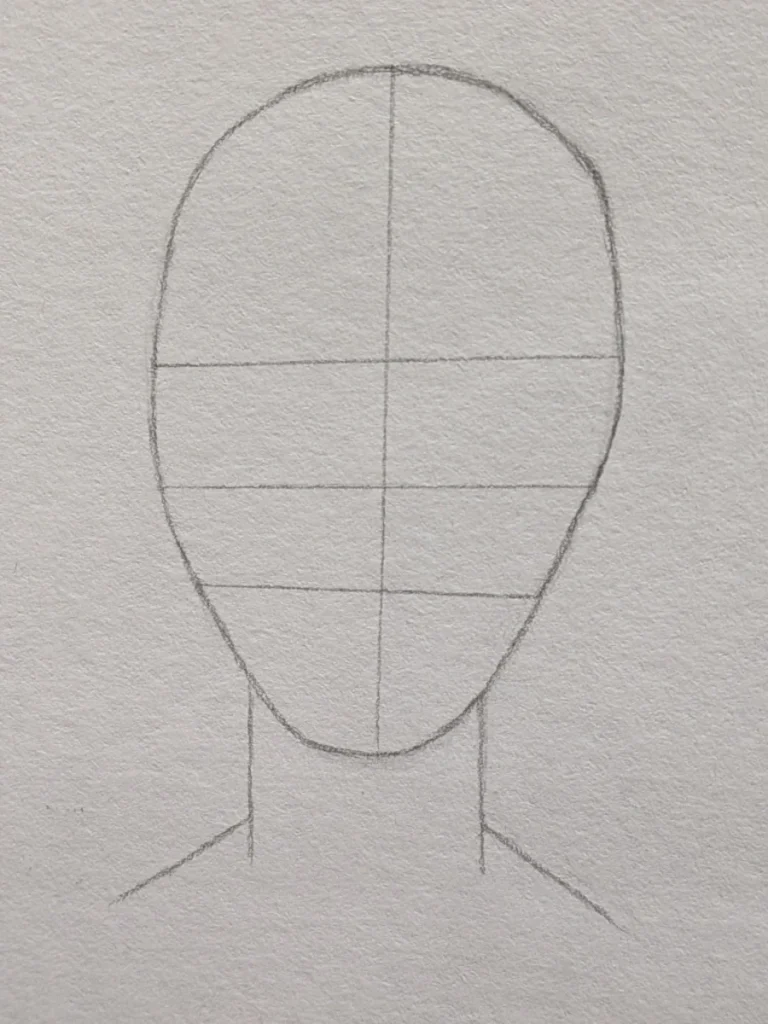
- Draw two straight lines down from the jaw to create a thin neck.
- Add soft, angled shoulder lines beneath the neck to give the zombie a basic upper-body structure.
- Keep the neck slightly narrow and gaunt to help the character feel more skeletal and undead.
- Use light pressure so these construction lines stay easy to adjust later.
Step 2: Facial Features (Eyes, Nose, and Mouth)
Now that your zombie’s head shape, neck, and guides are in place, it’s time to add the basic features.
This part isn’t about perfect anatomy; it’s about believable creepiness.
Keep every line whisper-light and relaxed.
a.) Eyes – Basic Eye Placement
- On the eye line, sketch two almond-shaped ovals, one on each side of the centre line.
- Leave a small gap between them, roughly the width of one eye.
- Keep the shapes soft and slightly uneven to give the zombie a more natural, unsettling appearance.
Tips for Beginners:
Don’t worry about expression yet. These are just simple placement shapes that will help guide the details later.
b.) Nose – Simple Undead Structure
- On the nose line, draw a short rounded shape to mark the base of the nose.
- Add two gentle curved lines rising upward from the sides to suggest the nostrils.
- Keep the lines light and subtle since much of the structure will be built later with shading.
c.) Mouth – Uneven and Slightly Sunken
- Draw a curved line along the mouth guide, letting the corners dip slightly downward.
- Add a second softer curve underneath to form the lower lip.
- Keep the lips uneven and relaxed to help the zombie look gaunt and lifeless.
Step 3: Adding the Ears
Your zombie’s face is starting to come together, but right now the head can still look a little unfinished. Adding the ears helps balance the face and makes the structure feel more natural.
Keep the shapes simple and lightly sketched for now.
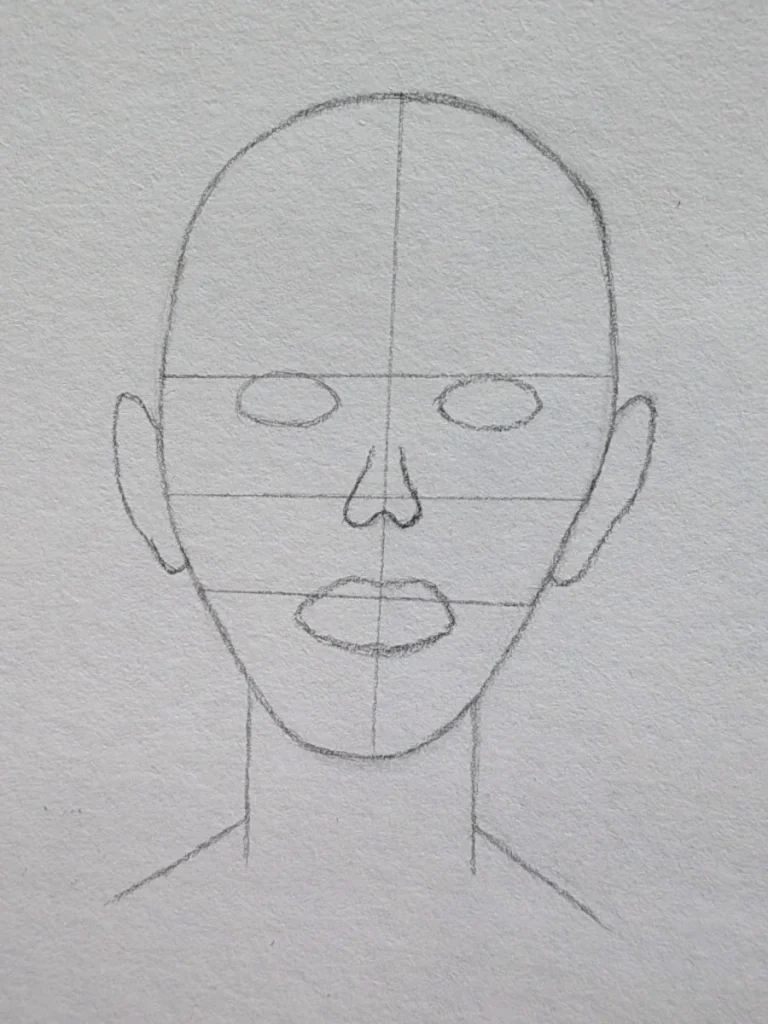
a.) Ear Placement
- The top of each ear should sit just below the eye line.
- The bottom of the ear should end slightly above the mouth line.
- This placement gives the head a more natural, slightly drooping appearance that works well for a gaunt zombie design.
b.) Ear Shape
- Sketch a soft C-shape on one side of the head and a backward C-shape on the other.
- Keep the ears narrow and subtle rather than large or overly detailed.
- Use light sketch lines since we’ll refine the edges and shading later.
Optional Creepy Touch:
Once you begin adding details and shading, you can roughen the edges slightly to make the ears look torn or worn. For now, smooth shapes work best while building the base structure.
Step 4: Adding Details & Wrinkles
Now it’s time to give your zombie a little more character. This step focuses on subtle wrinkles, sagging skin, and small crease lines that make the face feel older, tired, and slightly decayed.
Keep everything soft and lightly sketched. These details should look natural and worn rather than sharp or deeply carved.
a.) Around the Eyes
Start by adding light curved lines above and below each eye to suggest sagging skin and tired features.
Keep the wrinkles subtle and sketchy. Think “zombie who hasn’t slept in 80 years” rather than cracked porcelain.
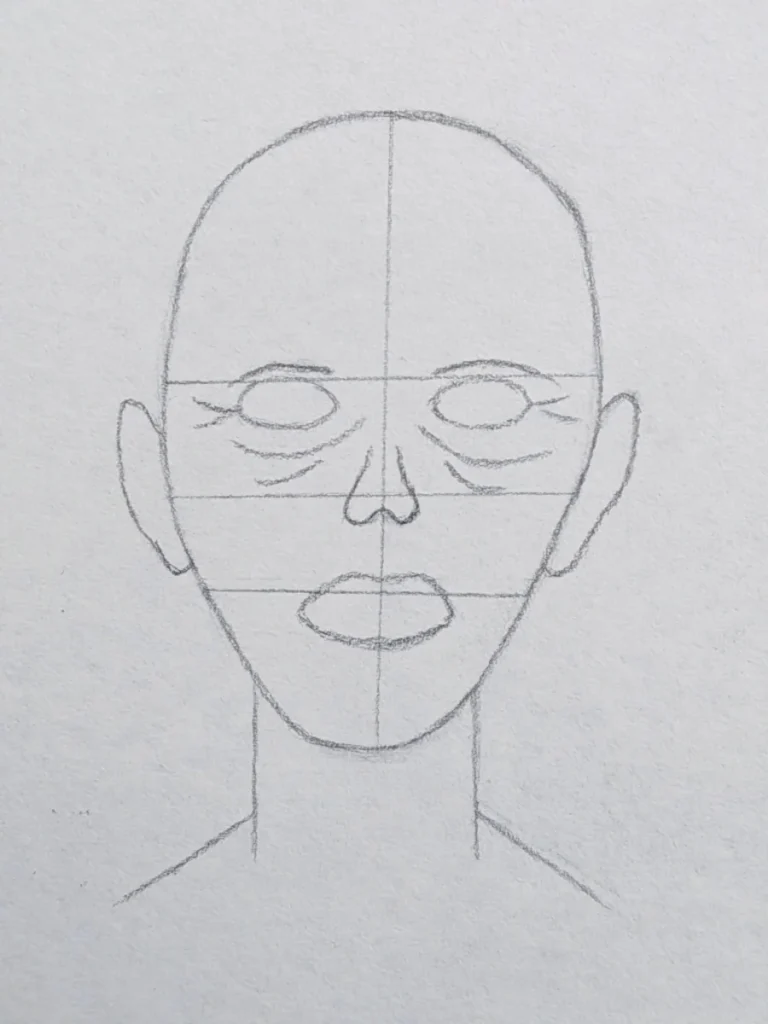
- Use an HB pencil with light pressure so the lines stay faint and easy to adjust.
- Draw one or two small arcs above each eye to create a loose brow crease.
- Under the eyes, add a few curved lines that follow the shape of the eye socket.
- Let the lines fade as they move outward to keep the wrinkles looking soft and natural.
- Add a few faint lines near the bridge of the nose to suggest age and tension.
Tip:
Build wrinkles gradually rather than pressing hard immediately. Soft layered lines usually look far more realistic than dark, harsh marks.
b.) Cheek Lines & Ears
Now let’s add a little more structure to the face by defining the hollow cheeks and adding a few subtle ear details.
These soft lines help the zombie look thinner, more tired, and slightly decayed without making the drawing overly detailed too early.
- Draw two light curved lines starting just below the ears and angling downward toward the corners of the mouth.
- Keep the curves soft and slightly uneven to create a more gaunt, sunken appearance.
- Inside each ear, sketch a couple of small curved lines to suggest simple folds and inner ear structure.
- Avoid adding too much detail yet; these are just gentle guides for later shading and texture.
Tip:
Keep your lines light and sketchy. Subtle cheek lines usually look far more natural than deep, harsh grooves.
c.) Mouth & Chin Lines
Now let’s add some of those tired, sunken facial lines that give the zombie a more worn and gaunt appearance.
These soft creases help the face look older, thinner, and slightly decayed without needing heavy detail.
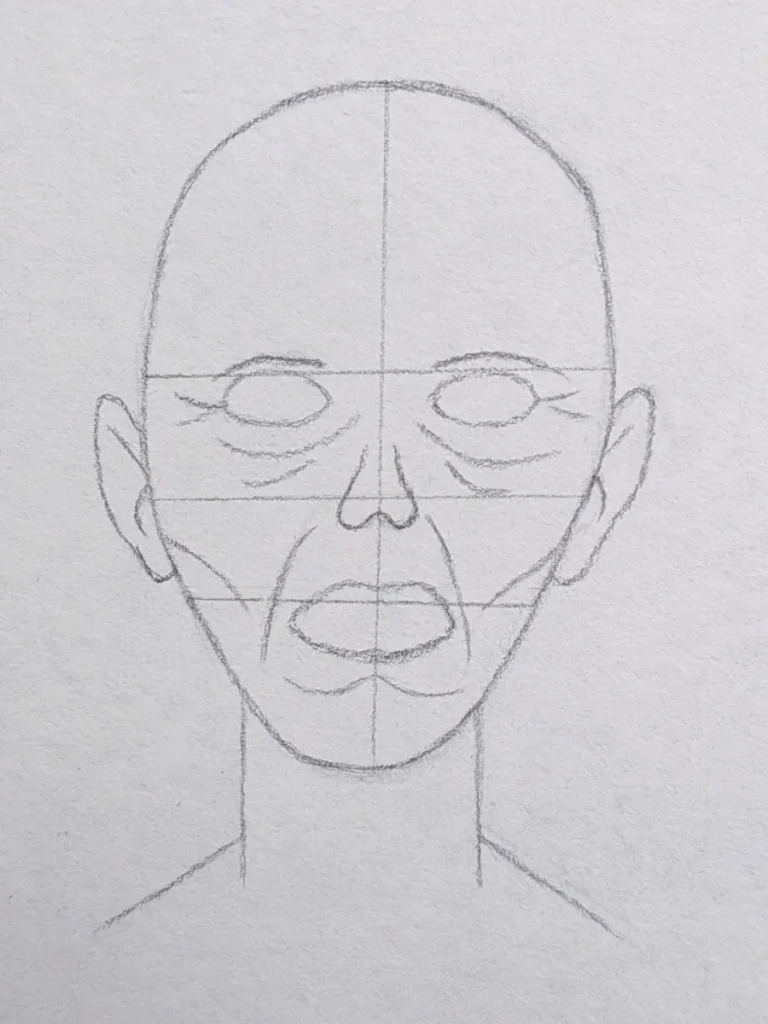
- From each side of the nose, draw a slightly curved line running downward toward the corners of the mouth.
- Keep the lines soft and narrow so that they resemble natural folds in the skin rather than deep grooves.
- Add a gentle crease just below the lower lip to suggest a little sagging or weight in the chin area.
- Lightly curve the chin crease downward at the edges for a more hollow, gaunt effect.
Tip:
Use an HB pencil with light pressure and build the lines gradually. Soft layered strokes tend to look far more natural than dark, heavy outlines.
If the lines start looking too deep or harsh, gently soften them with an eraser or lighter strokes.
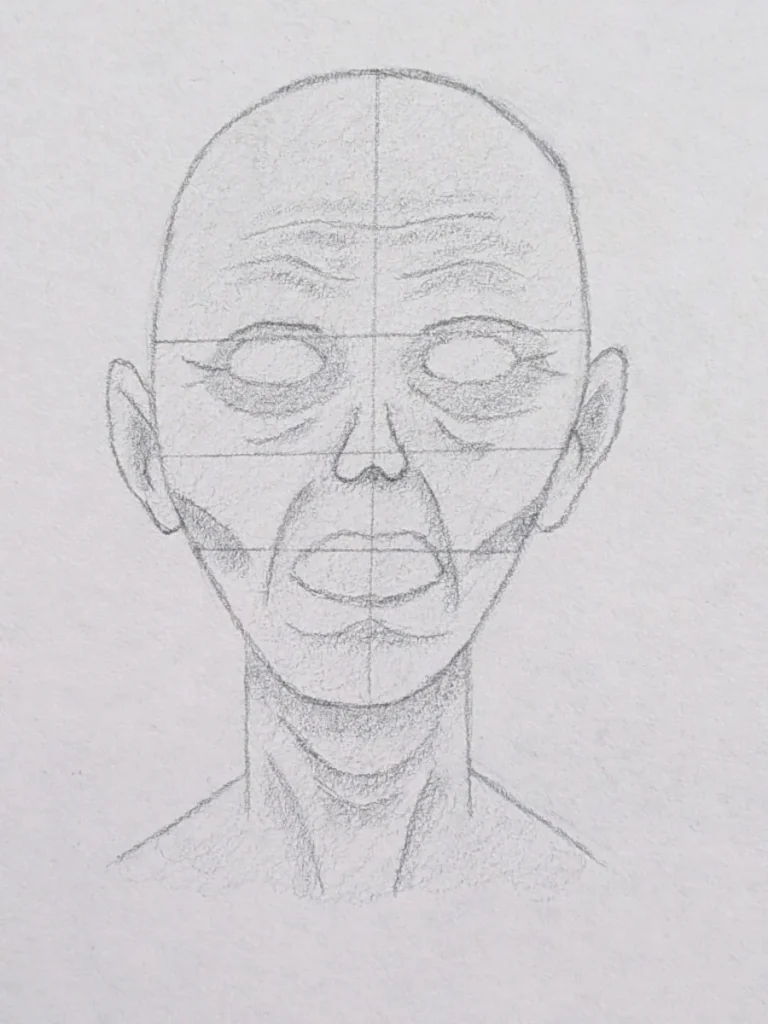
d.) Neck & Forehead Wrinkles
We’re almost done building the basic zombie face structure. Now it’s time to add a few final wrinkles and folds to make the character look older, thinner, and more worn down.
These small details help bring the face to life by adding age, tension, and subtle signs of decay.
- On the forehead, draw two slightly curved horizontal lines across the upper head area.
- Keep the lines light and uneven so they look natural rather than perfectly symmetrical.
- For the neck, sketch a few soft curved lines that follow the shape of the throat and neck muscles.
- Allow the lines to slope gently downward to create the appearance of loose, aged skin.
Tip:
Use an HB pencil with very light pressure so the wrinkles stay soft and buildable. Thin layered lines usually look far more realistic than dark, sharp marks.
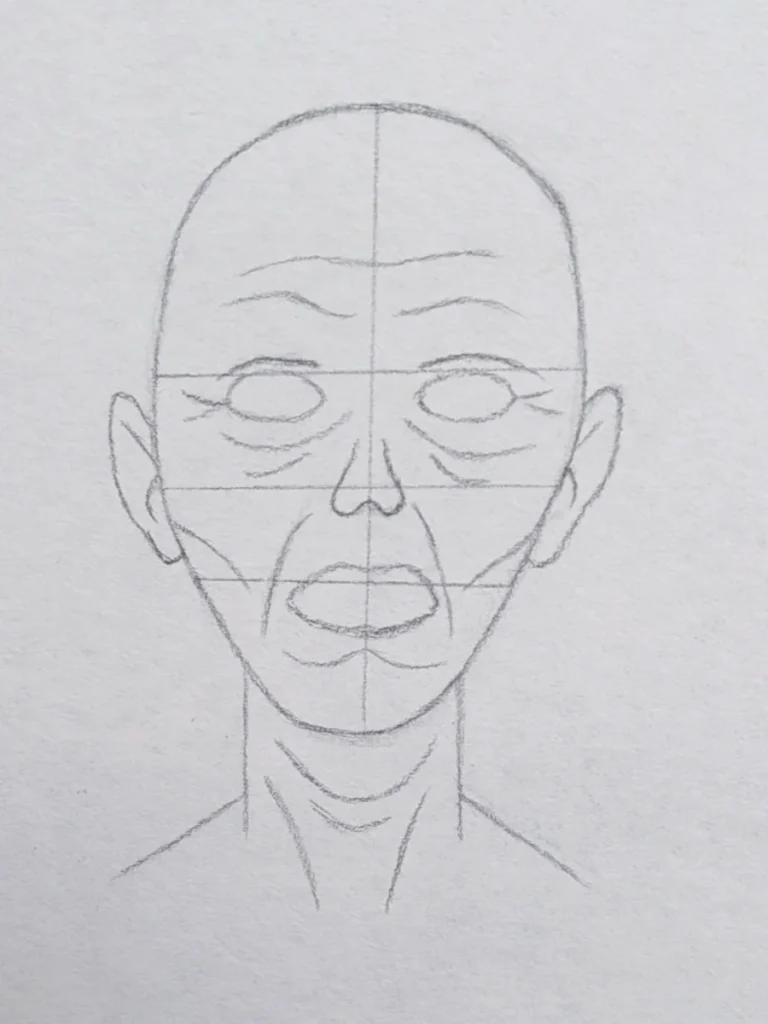
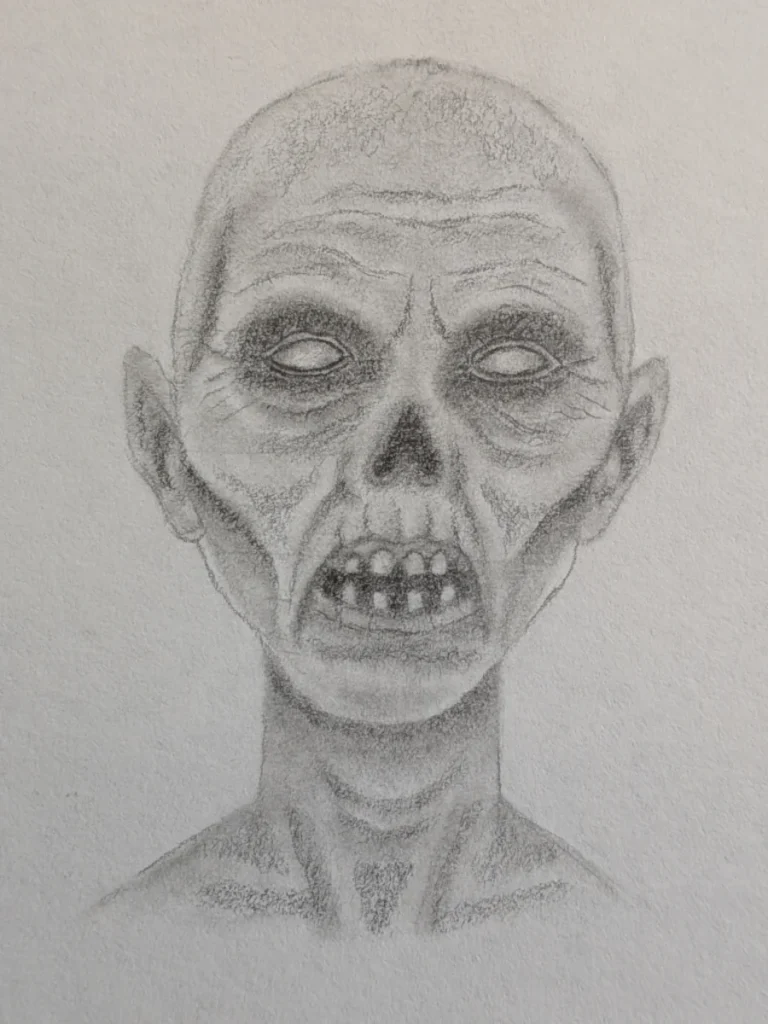
Step 5: Light Base Shading
Now that your zombie’s features are mapped out, it’s time to add some soft base shading to bring the face to life… or at least partially back to life.
This stage helps create depth and gives the skin a smoother, more realistic appearance before you begin adding darker shadows later on.
- Grab a 2H pencil and apply a very light, even layer of shading across the entire face and neck.
- Use soft circular motions to gradually build up a smooth, even base layer.
- Avoid harsh back-and-forth scribbling so the shading stays soft and natural.
- Keep the pressure light and consistent so that you don’t flatten the paper’s texture or create dark patches too early.
At this stage, you only want a subtle grey film over the skin. This pale layer helps soften the drawing and allows later shadows to blend much more smoothly.
Tip:
If you can still clearly see your guidelines and wrinkle details through the shading, you’re on the right track. The goal here is to gently build tone, not fully darken the face yet.
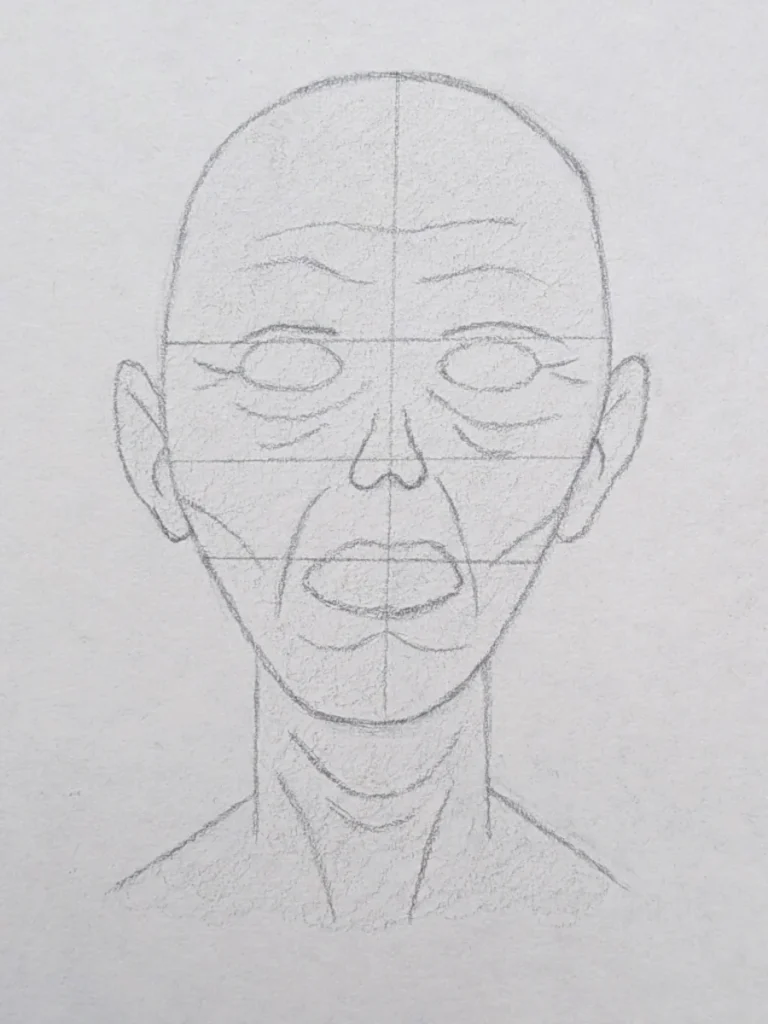
Step 6: Building Depth with HB Shading
Now it’s time to begin adding deeper shadows and building more form into the face.
Switch to your HB pencil and gently darken the areas that naturally fall into shadow, including:
- around and beneath the eyes,
- along the sides of the nose,
- beneath the cheekbones,
- around the mouth lines,
- and directly beneath the chin.
These darker areas help create the hollow, gaunt appearance that gives zombies their sunken, exhausted look.
- Add a small amount of shading inside the ears, especially around the inner folds, to give them more depth.
- Softly darken beneath the neck wrinkles so the folds appear more dimensional and realistic.
- On the forehead, avoid shading directly over the wrinkle lines. Instead, shade lightly above and below them to help the creases stand out naturally.
- Keep your pencil strokes soft and circular so the shadows blend gradually into the lighter base layer.
Tip:
Build the shadows slowly using light layers rather than pressing hard straight away. Gradual shading creates smoother transitions and gives you much more control over the final depth of the face.
Step 7: Adding the Teeth
Now for the fun part – giving your zombie some bite.
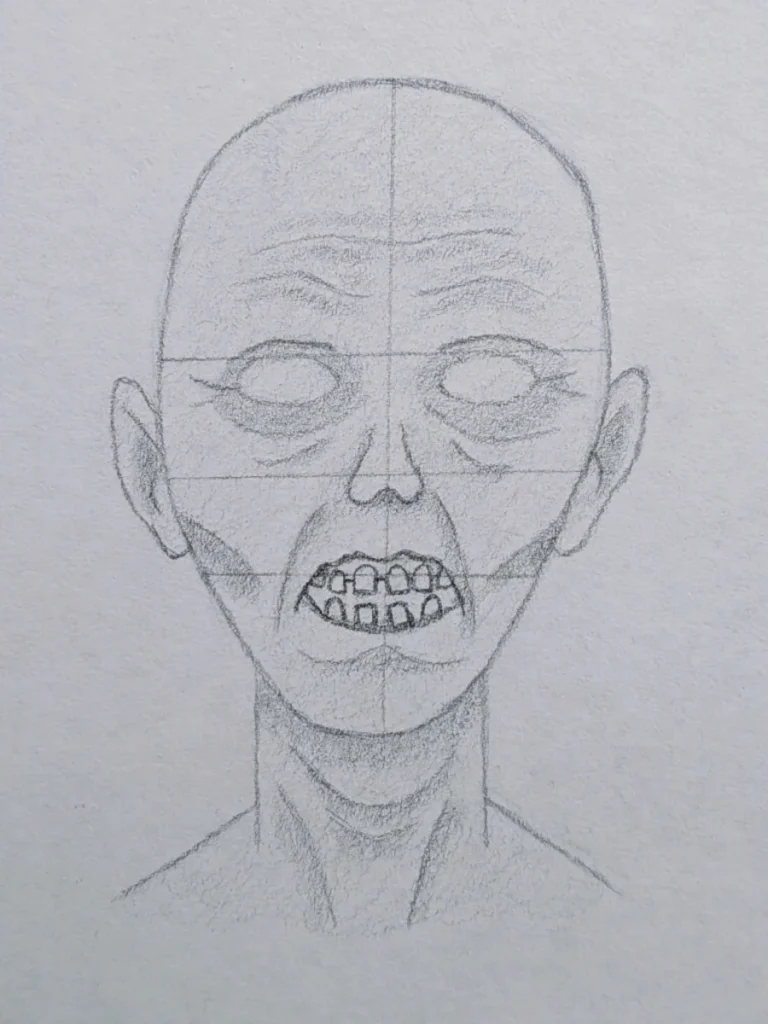
Using your HB pencil, lightly sketch in the teeth, keeping them uneven, crooked, and slightly misshapen. Zombies aren’t exactly known for excellent dental care.
Remember that teeth should follow the natural curve of the mouth rather than sitting in a perfectly straight row. Let some teeth overlap slightly, vary their sizes a little, and leave small gaps where needed to make the grin feel more unsettling and believable.
- Focus only on the outlines for now – avoid adding heavy shading inside the mouth at this stage.
- Sketch each tooth lightly and individually so you can adjust shapes easily if something looks too symmetrical.
- Allow some imperfections in the teeth placement and edges; slight irregularities make the zombie look much creepier and more realistic.
- Keep your pressure light and controlled so the lines stay soft and easy to refine later.
Tip:
Avoid making every tooth identical. Small differences in size, spacing, and angle help create a far more natural and unsettling zombie grin.
If your zombie’s teeth start looking cleaner than a toothpaste advert, it may be time to rough them up a little.
Step 8: Deepening the shadows
Grab your 2B pencil – it’s time to give your zombie some real depth and character.
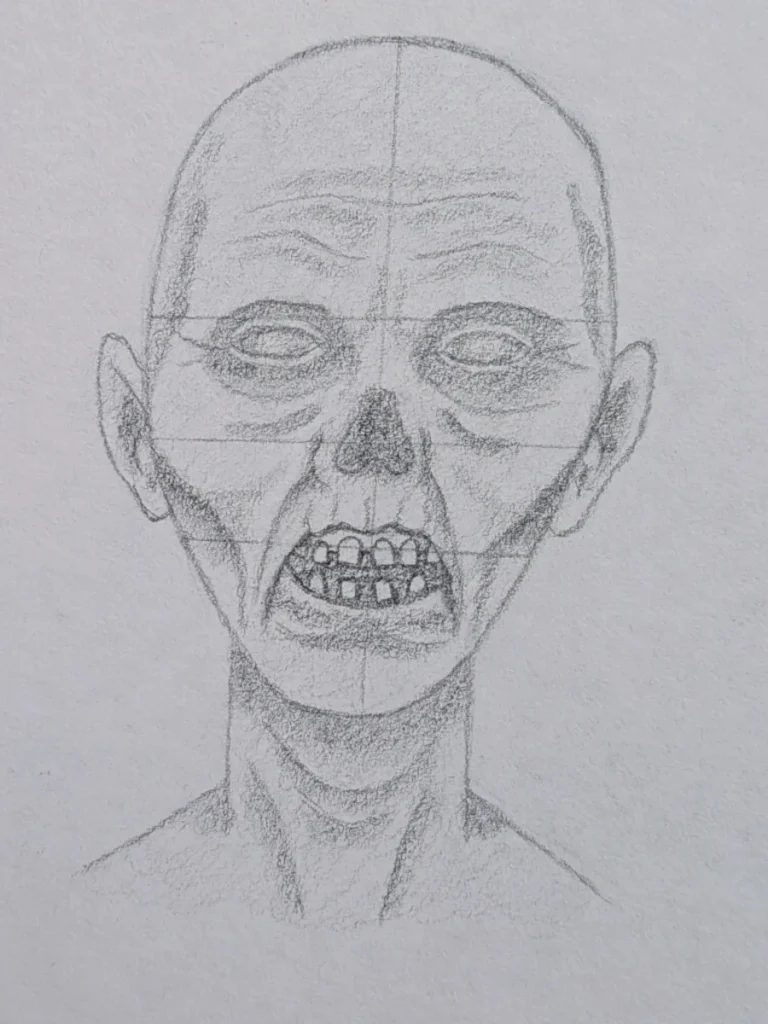
Using soft, circular motions, begin darkening the areas that naturally fall into shadow. Focus on the eye sockets, nose cavity, inside of the mouth, cheek hollows, neck folds, and beneath the chin. Build the graphite gradually rather than pressing hard straight away.
The goal here is to create smooth transitions between light and dark so the face starts to feel more sunken, hollow, and realistically decayed.
- Deepen the eye sockets carefully, keeping the darkest tones closest to the upper eyelids and inner corners.
- Darken the nose cavity and inside of the mouth to create stronger contrast and make those areas feel recessed.
- Build up the cheek shadows slowly using overlapping circular strokes rather than harsh scribbles.
- Shade around the sides of the forehead and temples to help the skull feel more rounded and three-dimensional.
- Add subtle shading above the upper lip and beneath the lower lip to give the mouth more structure and depth.
- Darken the folds in the neck and the shadow beneath the chin to help anchor the head naturally onto the body.
- Lightly shade inside and around the ears, especially within the inner folds.
For the forehead wrinkles, shade above and below the lines instead of directly on top of them. This helps the creases appear raised and natural rather than flat or carved into the skin.
Keep your hand light and controlled throughout the process. You’re building layers of tone, not trying to reach the darkest values immediately.
Tip:
If your shading starts looking patchy or scratchy, ease up on the pressure and return to soft circular motions. Smooth layering creates far more believable zombie skin than aggressive pencil attacks.
At this stage, your zombie should be looking noticeably more hollow, exhausted, and realistically decayed.
Step 9: Blending the Light Areas
Now it’s time to smooth things out – but only in the lighter areas.
Before you begin blending, grab a kneaded eraser or precision eraser and gently lift away any remaining guidelines that are still visible. This keeps the shading cleaner and stops stray pencil lines from muddying the skin later on.
Once the drawing is tidied up, take your blending stump, tissue, or cotton swab and begin softly blending the lighter areas of the face – especially the forehead, cheeks, jawline, and neck.
The aim here is to soften the graphite without completely removing the texture. You still want the zombie to look rough and decayed, just with smoother transitions between tones.
- Blend using small, soft circular motions rather than long rubbing strokes.
- Keep your pressure extremely light so you don’t flatten the paper texture or smear graphite too aggressively.
- Focus mainly on the lighter mid-tone areas where the skin would naturally appear smoother.
- Leave the darkest shadows mostly untouched for now, especially inside the eye sockets, nose cavity, mouth, and deepest neck folds.
- Use a cleaner section of your blending tool when moving into lighter areas to avoid dragging dark graphite across the face.
- Allow some rough texture to remain around the wrinkles and cheek hollows so the zombie still feels aged and decayed rather than airbrushed.
Tip:
If your shading suddenly turns muddy, your blending tool is probably overloaded with graphite. Either clean it slightly or switch to a fresh section before continuing.
By the end of this step, your zombie should start looking softer, smoother, and more realistically three-dimensional, while still keeping that wonderfully exhausted “freshly crawled out of a grave” appearance.
Step 10: Shading the Eyes
Now let’s finish those creepy, hollow eyes. You already have a light base of shading around the eye sockets, so now it’s time to slowly build more depth and contrast.

That slow layering is what gives the eyes that sunken, undead look rather than making them appear flat or cartoonish.
- Darken the upper edges of the eye sockets using your HB pencil. Focus mainly on the top eyelids and upper socket areas where natural shadows would fall.
- Use soft circular motions to slowly deepen the graphite rather than pressing hard with harsh lines.
- Shade lightly inside the eyes, leaving the very centre slightly lighter to create a cloudy, lifeless appearance.
- Deepen the outer corners and lower eye areas with a 2B pencil to make the eyes look more tired, hollow, and decayed.
- Blend softly outward using a blending stump, cotton bud, or tissue so the shadows fade naturally into the surrounding skin.
- Keep the transitions smoky and uneven rather than perfectly smooth – zombies rarely look well-rested or moisturised.
- Avoid making the eyes completely black at this stage. You still want room to deepen certain areas later if needed.
Tip:
If the eyes start looking too heavy or muddy, gently lift a little graphite with a kneaded eraser to bring back some softer highlights around the eyelids.
Tiny adjustments make a huge difference here. One extra dark patch can turn your zombie from “hauntingly undead” into “hasn’t slept since 2004.”
By the end of this step, the eyes should look deeper, emptier, and much more unsettling, helping the entire face feel more alive… or technically, less alive.
Step 11: Blend the Darker Areas
Now that the lighter areas are looking smooth and ghostly soft, it’s time to blend the darker shadows and bring the zombie’s face fully to life… or un-life.
At this stage, the drawing should already have a decent amount of depth. Your goal now is to soften the harsh edges without completely losing those deep, creepy shadows.

Grab a clean blending stump, cotton swab, or tissue and gently blend the darker areas around the:
- eye sockets
- nose cavity
- mouth
- cheek hollows
- neck folds
Use small, soft circular motions just like before, allowing the graphite to spread naturally across the paper.
- Blend outward from the darkest points so the shadows fade smoothly into the lighter skin areas.
- Keep the centre of the darkest shadows slightly richer in tone so the face still has strong contrast and depth.
- Avoid flattening everything into one grey tone. Zombies may be dead, but their cheekbones still deserve respect.
- Take extra care around the mouth and eyes, since these areas create most of the expression and atmosphere in the drawing.
Softening the Outer Edges
Once the shadows are blended, grab your kneaded eraser or precision eraser and gently lift or soften any overly harsh outlines around the:
- head
- shoulders
- ears
- jawline
This helps the zombie feel more natural and slightly faded into the page rather than sharply outlined like a cartoon character.
Important Tip:
Don’t press too hard while blending. If you grind the graphite into the paper like you’re trying to polish a haunted floorboard, you’ll lose the subtle texture and layered shading you worked so hard to build.
Let the graphite move gently.
By the end of this step, your zombie should look:
- smoother and more blended
- more three-dimensional
- more hollow and unsettling
- and fully ready for the final detailing stages
The face should now have that lovely “hasn’t seen sunlight or happiness in decades” kind of energy.
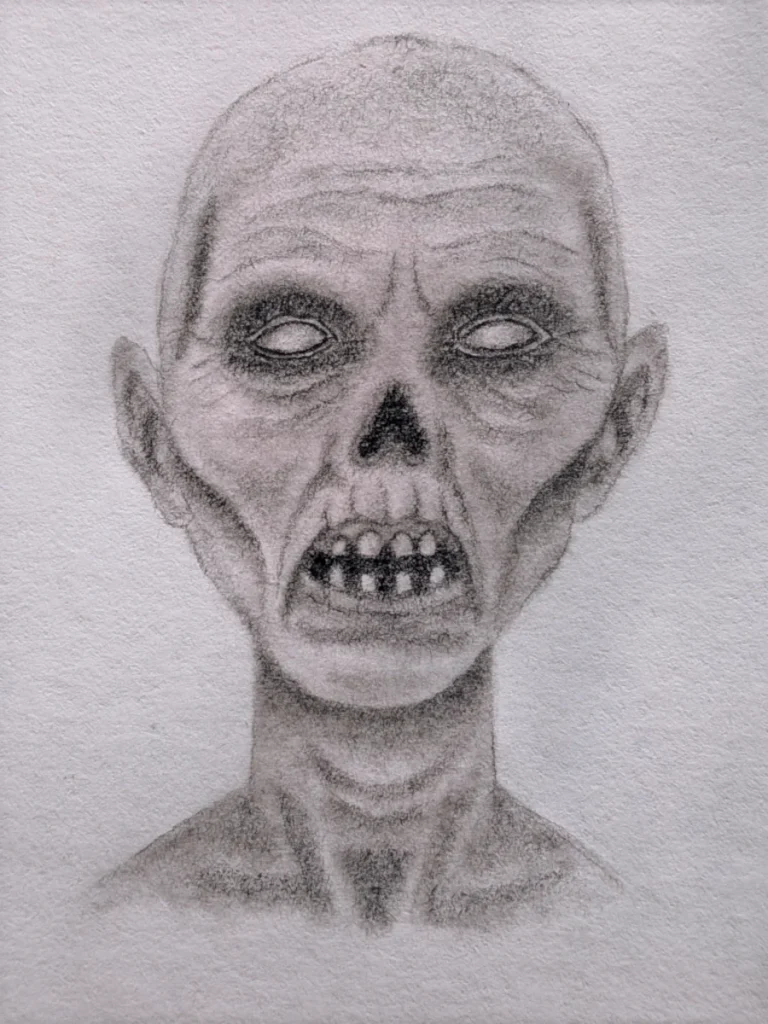
Step 12: Deepening the Shadows
Now it’s time to give your zombie some real presence. Grab your 4B and 6B pencils – these are your heavy lifters for the deepest shadows and strongest contrast.
This is the stage where the drawing starts to feel properly unsettling, rather than simply “a bit tired after a long week.”
Darken the existing shaded areas around the:
- eye sockets
- nose cavity
- mouth
- neck creases
- cheek hollows
Use small, controlled strokes to gradually build up the graphite instead of trying to make everything dark immediately.
- Focus on the darkest shadows closest to the deepest recesses of the face, especially inside the nose and around the eyes.
- Keep the edges slightly softer by lightly feathering the graphite outward into the surrounding skin.
- Deepen the shadows under the cheekbones and chin to strengthen the skull-like structure of the face.
- Add subtle wrinkles and texture beneath the eyes to push that exhausted, decayed appearance even further.
- Use the 6B pencil sparingly in the absolute darkest areas so the drawing keeps a nice range of values instead of turning into one giant graphite swamp.
Refining the Face
Now is also a good time to:
- lightly sharpen the wrinkles around the forehead
- reinforce the eyelid folds
- darken the gaps between the teeth
- add tiny uneven marks around the mouth and cheeks
These small details help the zombie feel aged, dry, and slightly decomposed without overcomplicating the drawing.
Important Tip:
If any outlines around the head, neck, or shoulders still look too harsh, gently soften or lift them with a kneaded eraser so the figure blends naturally into the page.
You want the shadows to feel atmospheric and layered – not like the zombie was outlined with a permanent marker during the apocalypse.
By the end of this step, your drawing should look:
- deeper
- more dramatic
- more textured
- and noticeably more realistic
The zombie should now have that classic “I’ve been undead since Tuesday” expression staring back at you from the paper.
Step 13: Final Blending – Leave Some Roughness
This is your final round of blending – the stage that pulls the entire drawing together while still keeping that gritty, undead texture intact.
At this point, your zombie should already look shadowy and unsettling. Now you’re simply refining the atmosphere without accidentally polishing all the creepy life out of it.
Use your blending stump, cotton bud, or tissue to gently smooth most of the:
- forehead
- cheeks
- chin
- neck
- outer facial shadows
Blend using soft circular motions with extremely light pressure.
Keep the transitions smooth, especially where shadows fade into lighter skin
Avoid heavily blending the darkest areas, including:
- the nose cavity
- the skin closest to the eyes
- inside the mouth
- the deepest neck shadows
Leaving these areas slightly rough helps preserve contrast and gives the drawing a more raw, unsettling appearance.
Keep Some Texture
One of the biggest mistakes at this stage is over-blending.
You want some graininess and uneven graphite texture remaining in places. Zombies are not exactly known for having flawless skincare routines.
A little roughness:
- adds realism
- keeps the skin looking dry and aged
- stops the drawing from looking flat or airbrushed
Softening the Highlights
If any lighter areas feel too harsh compared to the darker shadows:
- lightly feather graphite outward with a clean blending tool
- gently soften sharp transitions
- lift tiny highlights with a kneaded eraser if needed
This helps the face feel more natural and dimensional while still keeping those deep hollow shadows intact.
Final Check Before Detailing
Before moving on, step back from the drawing and quickly check:
- Are the darkest areas dark enough?
- Are the shadows smooth without looking muddy?
- Do the eyes still feel deep and hollow?
- Is there still enough paper texture showing through?
- Does the face feel three-dimensional?
If the answer is mostly “yes,” you’re ready for the final detailing stage.
And honestly… It’s already looking like something that would quietly stand at the end of a hallway at 3 a.m. and absolutely ruin your week.
Step 14: Highlights, Outlines & Finishing Touches
You’ve reached the final stage – the moment your zombie fully comes to life on the page. Or, more accurately, crawls reluctantly back from the grave with terrible posture and a deeply concerning skincare routine.
At this stage, you’re refining details, strengthening contrast, and adding just enough polish without losing that rough undead texture.

Deepen the Darkest Shadows
Before adding highlights, quickly check whether any of your darker areas became too soft during blending.
Using a 4B or 6B pencil, gently deepen:
- the eye sockets
- the nose cavity
- inside the mouth
- the corners of the lips
- the deepest neck folds
Build the darkness slowly with light layers instead of pressing hard immediately. The strongest contrast should still stay around the eyes and mouth – that’s where most of the zombie’s expression lives.
Refining the Outlines
Now lightly redefine the outer structure of the zombie using a sharpened HB pencil.
Focus on:
- the head shape
- ears
- jawline
- neck
- shoulders
Keep your outlines:
- soft
- thin
- slightly broken in places
Avoid thick, continuous cartoon-style outlines.
The goal is to suggest edges rather than trap the drawing inside harsh borders.
As a general rule:
- darker shadows = stronger edges
- lighter areas = softer or partially missing lines
That variation helps the drawing feel more natural and realistic.
Soften Harsh Transitions
If any areas suddenly feel too sharp or scratchy:
- lightly blend over them with a clean blending stump or tissue
- soften only the transition areas
- avoid smearing the darkest shadows too much
This stage is about subtle control.
Adding Subtle Highlights
Now use a:
- kneaded eraser
- precision eraser
- or eraser pencil
to gently lift tiny highlights from raised areas such as:
- the forehead
- cheekbones
- bridge of the nose
- tops of wrinkles
- upper lip
- edges of the neck folds
Keep the highlights faint and uneven. Small touches of reflected light help the face feel more dimensional and make the darker shadows stand out even more.
Final Texture Check
Before calling the drawing finished, take one last look and ask yourself:
- Do the eyes feel hollow and unsettling?
- Are the shadows deep enough?
- Is there still visible graphite texture?
- Do the highlights feel subtle instead of shiny?
- Does the face appear skeletal beneath the skin?
If yes, congratulations – your zombie is complete.
Not polished.
Not glamorous.
Just deeply, profoundly unwell. Which, honestly, is exactly what you want.
Haunted Masterpiece: You Did It!
You’ve officially reached the end of the tutorial – and honestly, look at what you’ve created.
At the start, this was just a rough sketch and a few creepy guidelines. Now it has depth, texture, shadows, personality, and that properly eerie “this thing definitely lives in an abandoned hospital basement” energy.
That takes real skill.
Creating a realistic zombie isn’t just about drawing random wrinkles and making the eyes dark enough to scare your neighbours. You’ve spent this tutorial learning how to build layers of graphite, soften transitions, create contrast, and make a face feel genuinely atmospheric instead of flat.
And that’s a huge step forward as an artist.
You’ve also practised something a lot of beginners struggle with: patience.
Realistic graphite drawings are built slowly. One soft shadow at a time. One blended area at a time. One moment of staring at your drawing wondering why the mouth suddenly looks like a haunted raisin… before fixing it and carrying on.
That process is completely normal.
Even if parts of your zombie didn’t turn out exactly how you imagined, don’t stress about it. Every drawing teaches you something valuable – especially horror art, where texture, experimentation, and imperfections often make things look even better.
Sometimes the roughest areas end up being the creepiest parts of the piece.
By finishing this tutorial, you’ve learned how to:
- build realistic shading gradually
- blend graphite without losing texture
- create depth using contrast
- add subtle highlights
- soften outlines for a more natural look
- and give a horror character actual atmosphere and personality
Those are skills you can carry into future portraits, creatures, monsters, and darker character designs.
So take a proper look at your finished drawing and appreciate the progress you’ve made here. Seriously.
You didn’t just draw a zombie.
You dragged one into existence with graphite and determination.